Month: December 2018

MMS • RSS
Article originally posted on Data Science Central. Visit Data Science Central
I originally started writing this notebook to serve as an introduction decision trees. It’s a description of the “1-rule” algorithm which I think is worth studying for the following reasons:
- It’s arguably the simplest and most useful machine learning algorithm you can learn
- It’s a simple introduction to “decision trees”
- It’s a simple introduction to “information entropy“
- It has minimal mathematical content, so that anyone technical can follow the ideas
I first encountered the “1 Rule” prediction algorithm in ‘Data Mining Practical Machine Learning Tools and Techniques’ by ‘Ian H. Witton’. A book which serves as a great introduction to machine learning ideas.
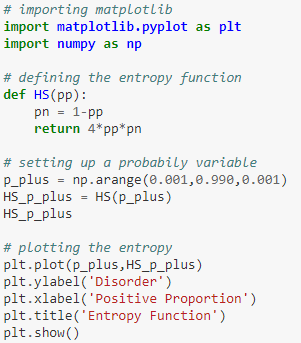
Content of the Notebook
- If you had to choose just one feature?
- If you didn’t have any features?
- Information Entropy
- Reducing Disorder
- Feature Selection
- Going Further
You can access the notebook here.
MMS • RSS
Article originally posted on Data Science Central. Visit Data Science Central
The Jupyter notebook at this link contains a tutorial that explains how to use the lxml package and xpath expressions to extract data from a webpage.
The tutorial consists of two sections:
- A basic example to demonstrate the process of downloading a webpage, extracting data with lxml and xpath and analysing it with pandas
- A comprehensive review of xpath expressions, covering topics such as “axes”, “operator” etc
The “Basic Example” section below goes through all of these steps to illustrate the process. To download a page the “get” http method is required, I have used the requests package to implement the get. Parsing the page and using xpath expressions to navigate the tree is accomplished with classes within the lxml package. Cleaning and data analysis has been performed with string manipulation and the pandas package. The appendix section contains untility functions that are used to help with the analysis presented but are not central to it. THE CELLS IN THE APPENDIX SHOULD BE RUN FIRST!!
The “xpath Tutorial” section below is based on the w3 schools xpath tutorial, with the xpath commands performed via the lxml package.
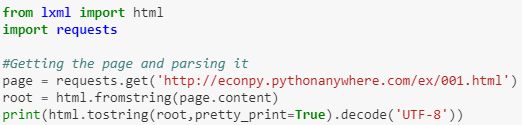
lxml general information
The lxml Package is a Pythonic binding for the C libraries libxml2 & libxslt, it is compatible but similar to the well known ElementTree API. The latest release works with all CPython versions from 2.6 to 3.6.
For more information about this package including installation notes visit the links below:
Basic Example
Downloading and Parsing
The code below uses the requests package to download a html page from the internet. The html class within the lxml library is then used to parse the content of the download into an object suitable for lxml manipulation. The page has been “pretty printed” for reference. The data is then extracted using an xpath expression, from within the lxml library. It is then cleaned and loaded into a pandas data frame and used to produce a simple bar plot.
Read the full tutorial, with source code, here.
MMS • RSS
Article originally posted on InfoQ. Visit InfoQ
Key Takeaways
- Understanding and using Unit Tests correctly are important for your ASP.NET Core Web API solutions
- Learning about and using Mock data for your unit testing will allow you to have stable testing scenarios
- Creating Mock Data projects in .NET Core 2.1 for use in your ASP.NET Core Web API solutions
- Understanding and setting up Integration Testing to test your APIs externally for a fully tested ASP.NET Core 2.1 Web API solution
With the release of .NET Core 2.0, Microsoft has the next major version of the general purpose, modular, cross-platform and open source platform that was initially released in 2016. .NET Core has been created to have many of the APIs that are available in the current release of .NET Framework. It was initially created to allow for the next generation of ASP.NET solutions but now drives and is the basis for many other scenarios including IoT, cloud and next generation mobile solutions. In this series, we will explore some of the benefits .NET Core and how it can benefit not only traditional .NET developers but all technologists that need to bring robust, performant and economical solutions to market.
This InfoQ article is part of the series “.NET Core“. You can subscribe to receive notifications via RSS.
When architecting and developing a rich set of APIs using ASP.NET Core 2.1 Web API, it is important to remember this is only the first step to a stable and productive solution. Having a stable environment for your solution is also very important. The key to a great solution includes not only building the APIs soundly, but also rigorously testing your APIs to ensure the consumers have a great experience.
This article is a continuation of my previous article for InfoQ called “Advanced Architecture for ASP.NET Core Web API.” Rest assured, you do not have to read the other article to get the benefits from testing, but it may help give you more insight into how I architected the solution I discuss. Over the last few years, I spent a lot of time thinking about testing while building APIs for clients. Knowing the architecture for ASP.NET Core 2.1 Web API solutions may help broaden your understanding.
The solution and all code from this article’s examples can be found in my GitHub repository.
Primer for ASP.NET Core Web API
Let’s take a quick moment and look at .NET and ASP.NET Core. ASP.NET Core is a new web framework which Microsoft built to shed the legacy technology that has been around since ASP.NET 1.0. By shedding these legacy dependencies and developing the framework from scratch, ASP.NET Core 2.1 gives the developer much better performance and is architected for cross-platform execution.
What is Unit Testing?
Testing your software may be new to some people, but it is quite easy. We will start with Unit Testing. The rigid definition from Wikipedia is “a software testing method by which individual units of source code, sets of one or more computer program modules together with associated control data, usage procedures, and operating procedures, are tested to determine whether they are fit for use.” A layman’s definition I like to use is that Unit Testing is used to make sure that your code within your solution performs as expected after you add new functionality or fix defects. We test a small sample of code to ensure we match our expectations. Let’s take a look at a sample unit test:
[Fact]
public async Task AlbumGetAllAsync()
{
    // Arrange

    // Act
    var albums = await _repo.GetAllAsync();

    // Assert
    Assert.Single(albums);
}
There are three parts of a good unit test. The first is the Arrange part which is used for setting up any resources that your test may need. In the example above, I do not have any setup, so the Arrange part is empty (but I still keep a comment for it). The next part called the Act is the part that performs the action of the test. In our example, I am calling the data repository for the Album entity type to return the entire set of albums from the data source the repository is using. The last part of the test is when we verify or Assert that the action of the test was correct. For this test, I am verifying that I returned a single album from the data repository.
I will be using the xUnit tool for my unit testing throughout this article. xUnit is an open source package for .NET Framework and now .NET Core. We will be looking at the .NET Core version of xUnit that is included when you install the .NET Core 2.1 SDK. You can create a new Unit Test project either through the .NET Core cli command dotnet test or through the project template in your favorite IDE such as Visual Studio 2017, Visual Studio Code or JetBrain’s Rider.
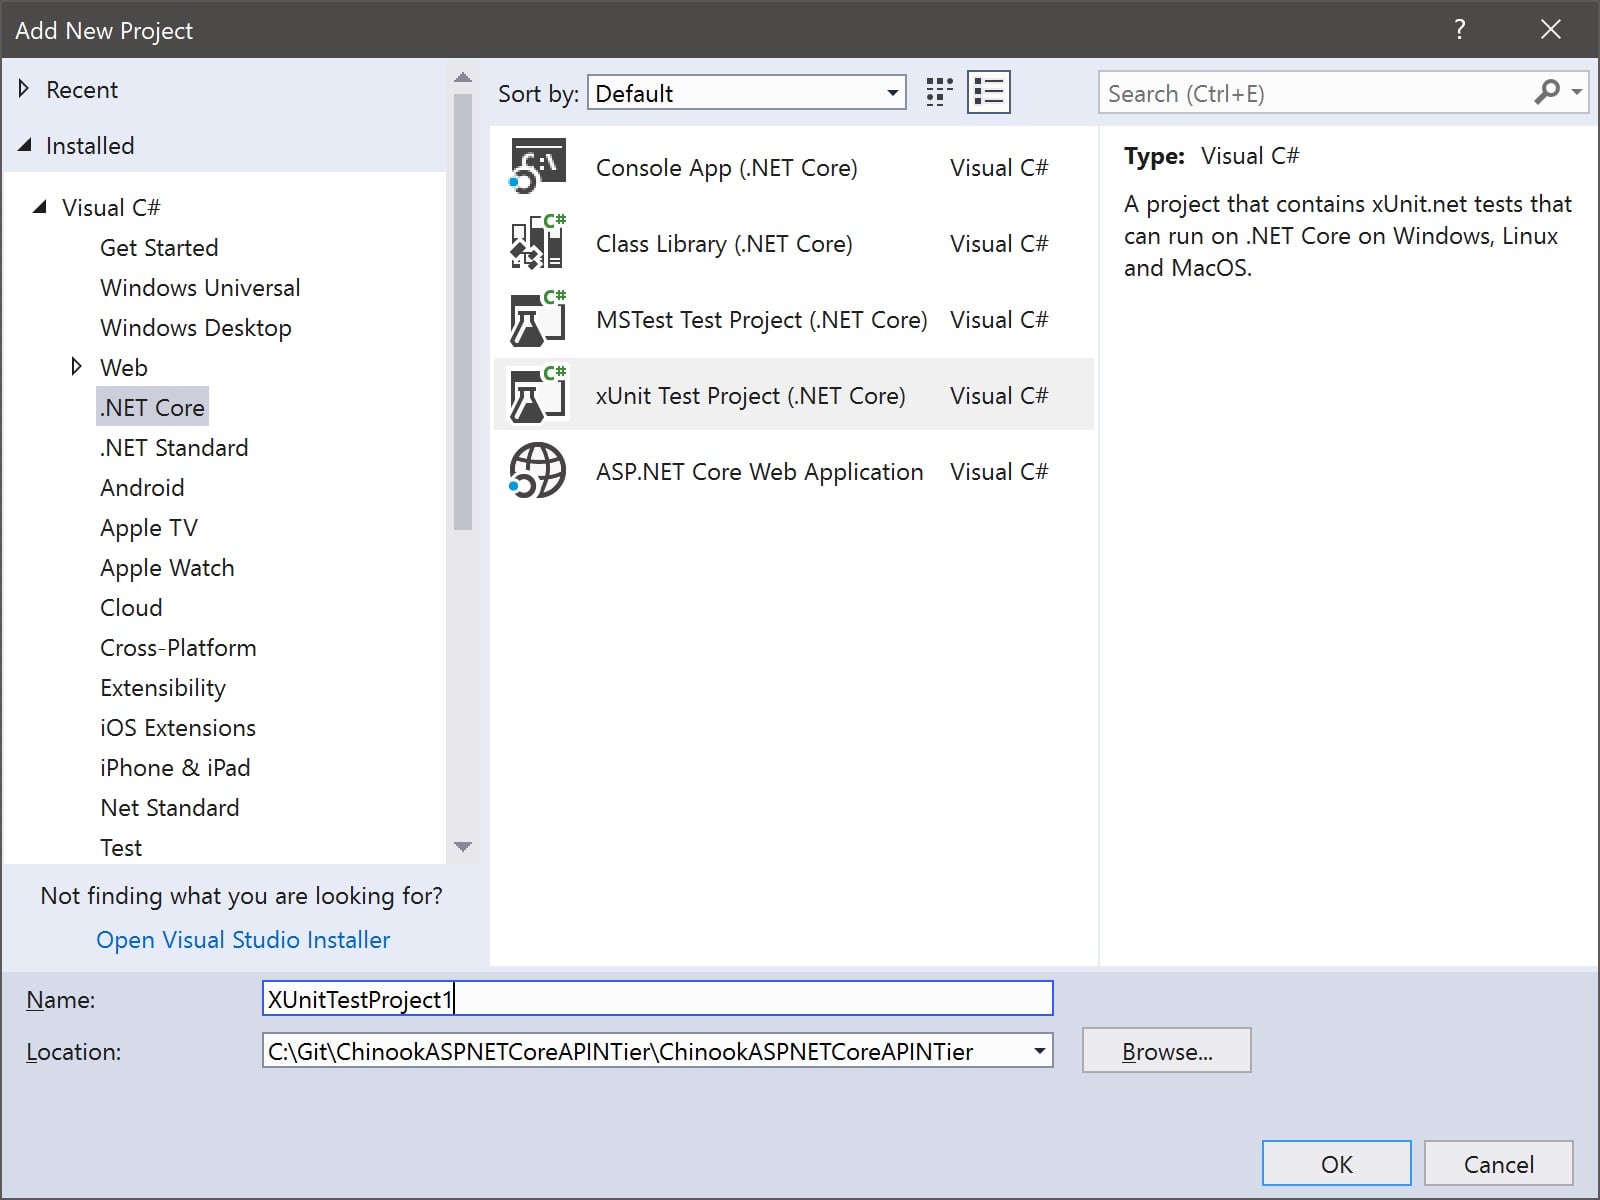
Figure 1: Creating a new Unit Test project in Visual Studio 2017
Now let’s dive into unit testing your ASP.NET Core Web API solution.
I am a huge proponent of using unit testing to keep a stable and robust API for your consumers. But I keep a healthy prospectus on how I use my unit tests and what I test. My philosophy is that you unit test your solution just enough and not anymore than necessary. What do I mean by that? I may get a lot of comments from this view, but I am not overly concerned with having 100% coverage with your tests. Do I think that we need to have tests that cover the important parts of the API solution and isolate each area independently to ensure the contract of each segment of code is kept? Of course! I do that, and that is what I want to discuss.
Since our demo Chinook.API project is very thin and able to be tested using Integration Testing (discussed later in the article), I find that I concentrate the most with unit tests in my Domain and Data projects. I am not going to go into detail about how you unit test (as that topic goes beyond this article). I do want you to test as much of your Domain and Data projects as you can using data that does not depend on your production database. That is the next topic we’re covering called Mock Data and Objects.
Why use Mock Data/Objects with your Unit Tests?
We have looked at why and what we need to unit test. It is important to know how to correctly unit test the code for your ASP.NET Core Web API solution. Data is key to testing your APIs. Having a predictable data set that you can test is vital. That is why I would not recommend using production data or any data that can change over time without your knowledge and expectations. We need a stable set of data to make sure all unit tests run and confirm that the contract between the code segment and the test is satisfied. As an example, when I test the Chinook.Domain project for getting an Album with an ID of 42 I want to make sure that it exists and has the expected details like the Album’s name and it is associated with an Artist. I also want to make sure that when I retrieve a set of Albums from the data source, I get the expected shape and size to meet the unit test I coded.
Many in the industry use the term “mock data” to identify this type of data. There are many ways to generate mock data for the unit tests, and I hope you create as “real-world” set of data as possible. The better your data you create for your tests, the better your test will perform. I would suggest that you make sure your data is also clean of privacy issues and does not contain personal data or sensitive data for your company or your customer.
To meet our need for clean, stable data, I create unique projects that encapsulate the mock data for my Unit Test projects. Let’s call my mock data project for the demo Chinook.MockData (as you can view in the demo source). My MockData project is almost identical to my normal Chinook.Data project. It has the same number of data repositories, and each one adheres to the same interfaces. I want the MockData project to be stored in the Dependency Injection (DI) Container so that the Chinook.Domain project can use it just like the Chinook.Data project that is connected to the production data source. That is why I love dependency injection. It allows me to switch Data projects through configuration and without any code changes.
After we have performed and verified the Unit Tests for our ASP.NET Core Web API solution, we will look at a different type of testing. I look at Unit Testing to verify and confirm expectations on the internal components of the solution. When we are satisfied with the quality of the internal tests, we can move on to testing the APIs from the external interface, what we call Integration Testing.
Integration Tests will be written and performed at the completion of all components, so your APIs can be consumed with the correct HTTP response to verify. I look at unit tests as testing independent and isolated segments of code while the integration tests are used to test the entire logic for each API on my HTTP endpoint. This testing will follow the entire workflow of the API from the API project’s Controllers to the Domain project Supervisor and finally the Data project’s Repositories (and back the entire way to respond).
Creating the Integration Test Project
To leverage your existing knowledge of testing, the Integration Testing functionality is based on current unit testing libraries. I will use xUnit for creating my integration tests. After we have created a new xUnit Test Project named Chinook.IntegrationTest, we need to add the appropriate NuGet package. Add the package Microsoft.AspNetCore.TestHost to Chinook.IntegrationTest project. This package contains the resources to perform the integration testing.
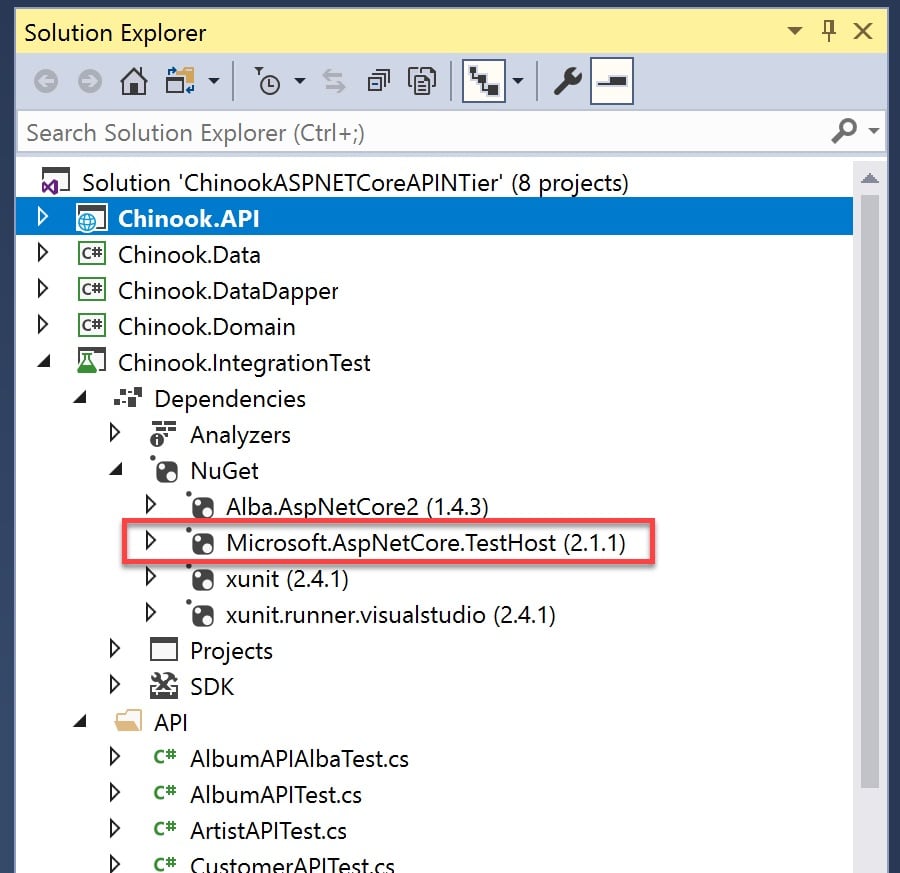
Figure 2: Adding the Microsoft.AspNetCore.TestHost NuGet package
We can now move on to creating our first integration test to verify our API externally.
Creating your first Integration Test
To start with the external testing of all of the APIs in our solution, I am going to create a new folder called API to contain our tests. I will also create a new test class for each of the Entity types in our API domain. Our first integration test will cover the Album entity type.
Create a new class called AlbumAPITest.cs in the API folder. We will now add the following namespaces to our file.
using Xunit;
using Chinook.API;
using Microsoft.AspNetCore.TestHost;
using Microsoft.AspNetCore.Hosting;
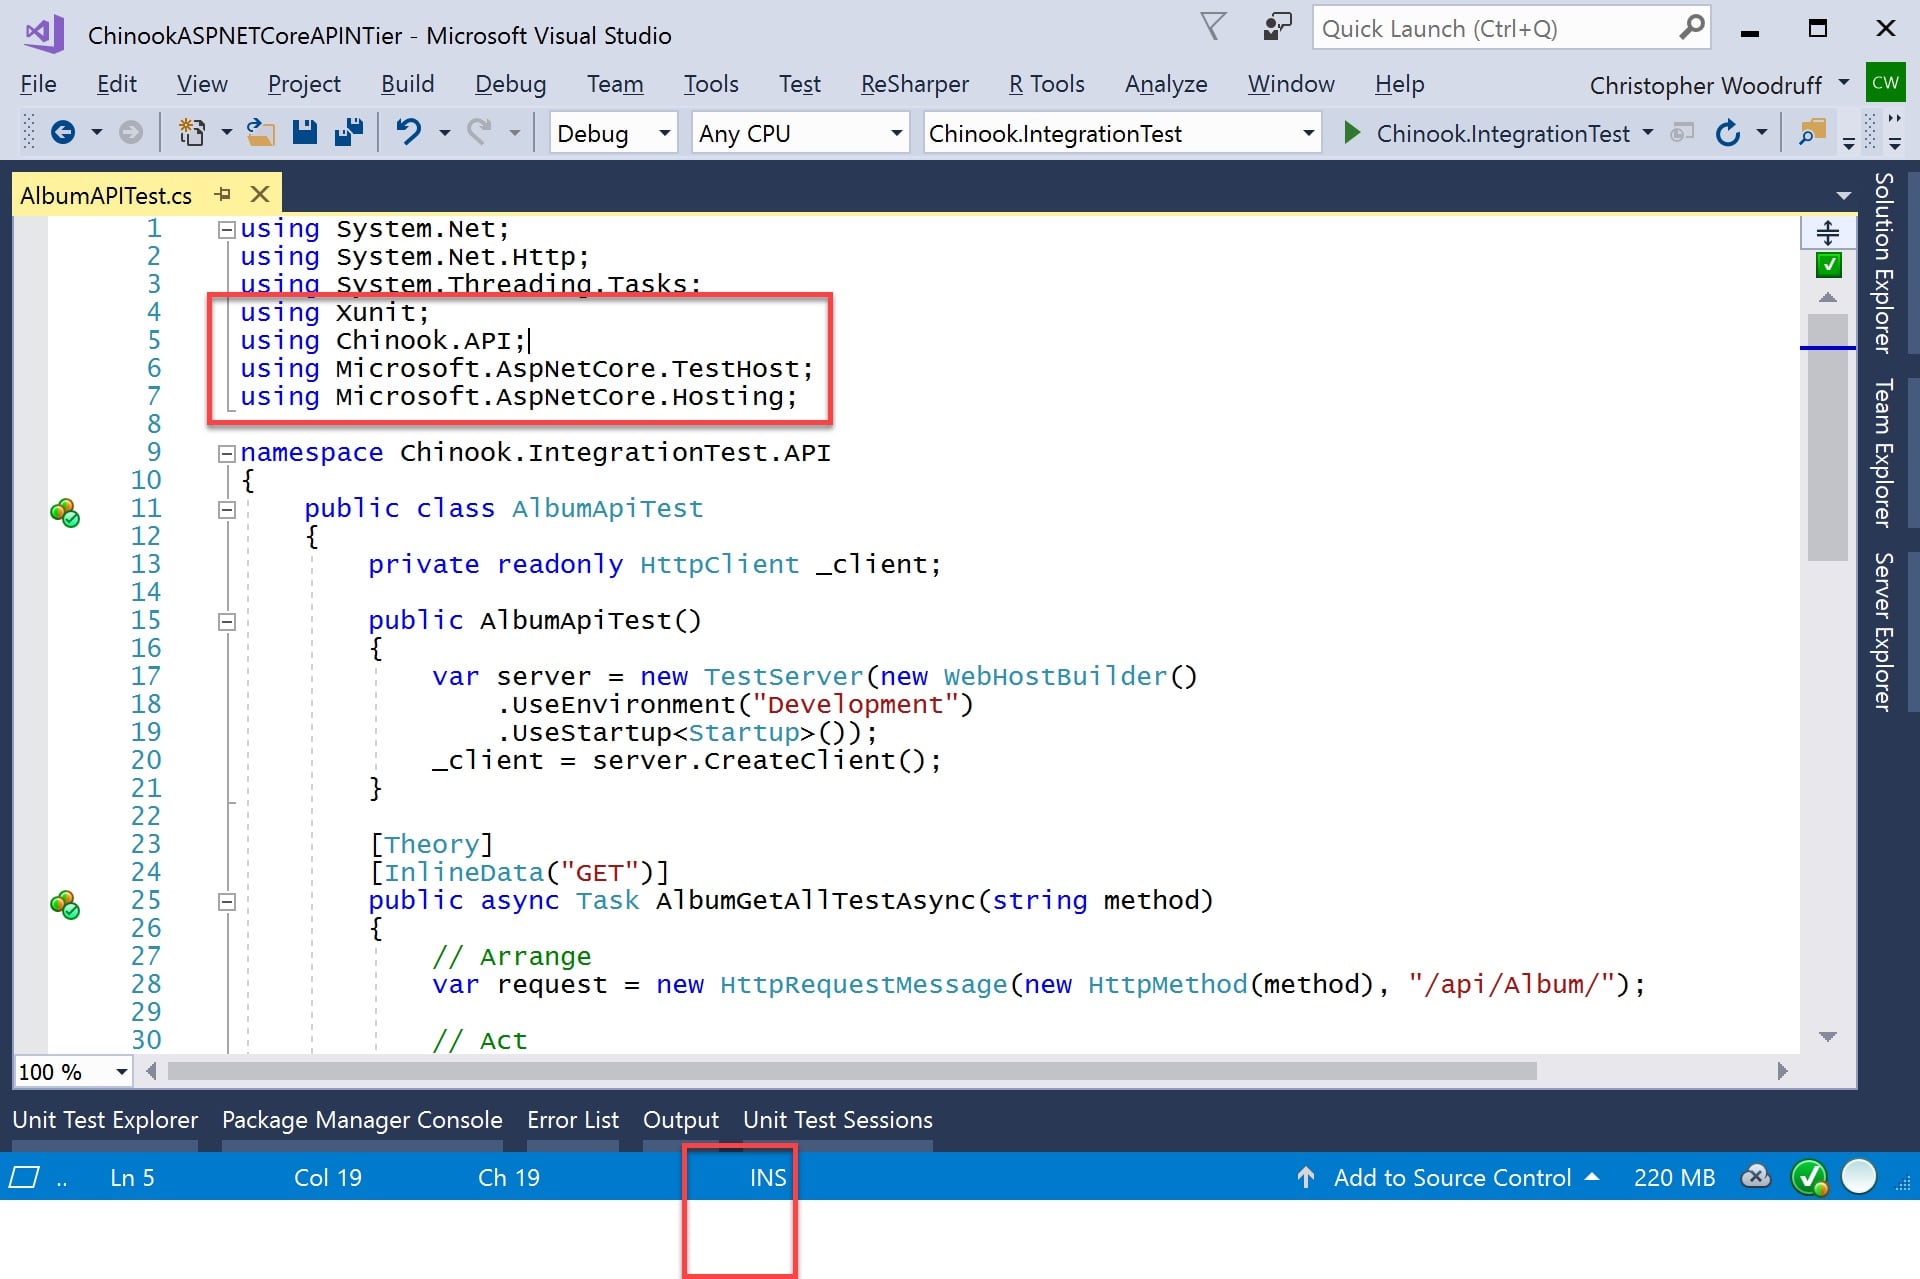
Figure 3: Integration Test Using Directives
We now have to set up the class with our TestServer and HttpClient to perform the tests. We need a private variable called _client of type HttpClient that will be created based on the TestServer initialized in the constructor of the AlbumAPITest class. The TestServer is a wrapper around a small web server that is created based on the Chinook.API Startup class and the desired development environment. In this case, I am using the Development environment. We now have a web server that is running our API and a client that understand how to call the APIs in the TestServer. We can now write the code for the integration tests.
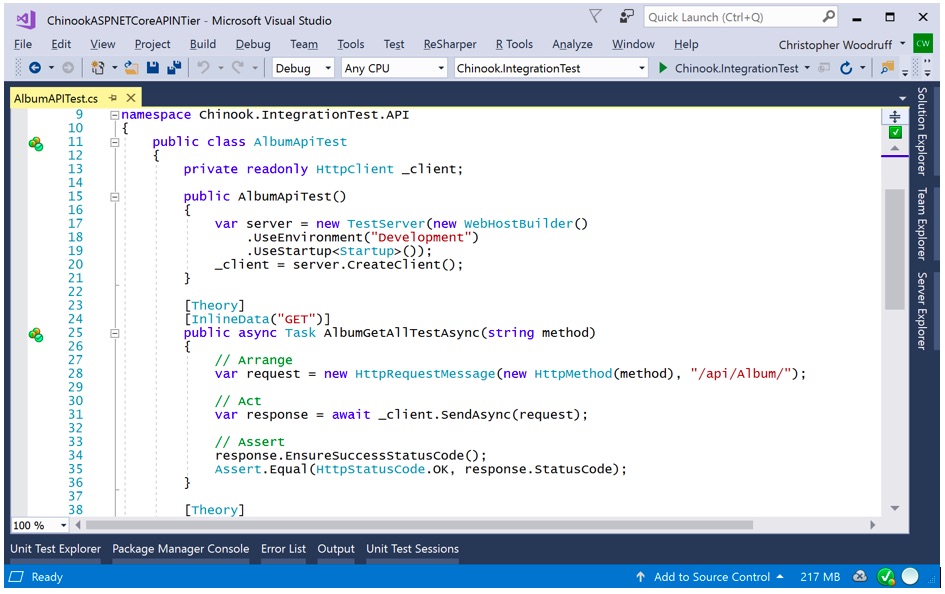
Figure 4: Our first integration test to get all Albums
In addition to the constructor code, Figure 4 also shows the code for our first integration test. The AlbumGetAllTestAsync method will test to verify that the call to get all Albums from the API works. Just like in the previous section where we discussed unit testing, the logic for our integration testing also using the Arrange/Act/Assert logic. We first create an HttpRequestMessage object with the HTTP verb supplied as a variable from the InlineData annotation and the URI segment that represents the call for all Albums (“/api/Album/”). We next will have the HttpClient _client send an HTTP Request, and finally, we will check to verify if the HTTP Response meets our expectations which in this case is a 200 OK. I have shown in Figure 4 two ways to verify our call to the API. You can use either, but I prefer the second way as it allows me to use the same pattern for checking responses to specific HTTP Response Codes.
response.EnsureSuccessStatusCode();
Assert.Equal(HttpStatusCode.OK, response.StatusCode);
We can also create integration tests that need to test for specific entity keys from our APIs. For this type of test, we will add additional value to the InlineData annotation that will be passed through the AlbumGetTestAsync method parameters. Our new test follows the same logic and uses the same resources as the previous test, but we will pass the entity key in the API URI segment for the HttpRequestMessage object. You can see the code in Figure 5 below.
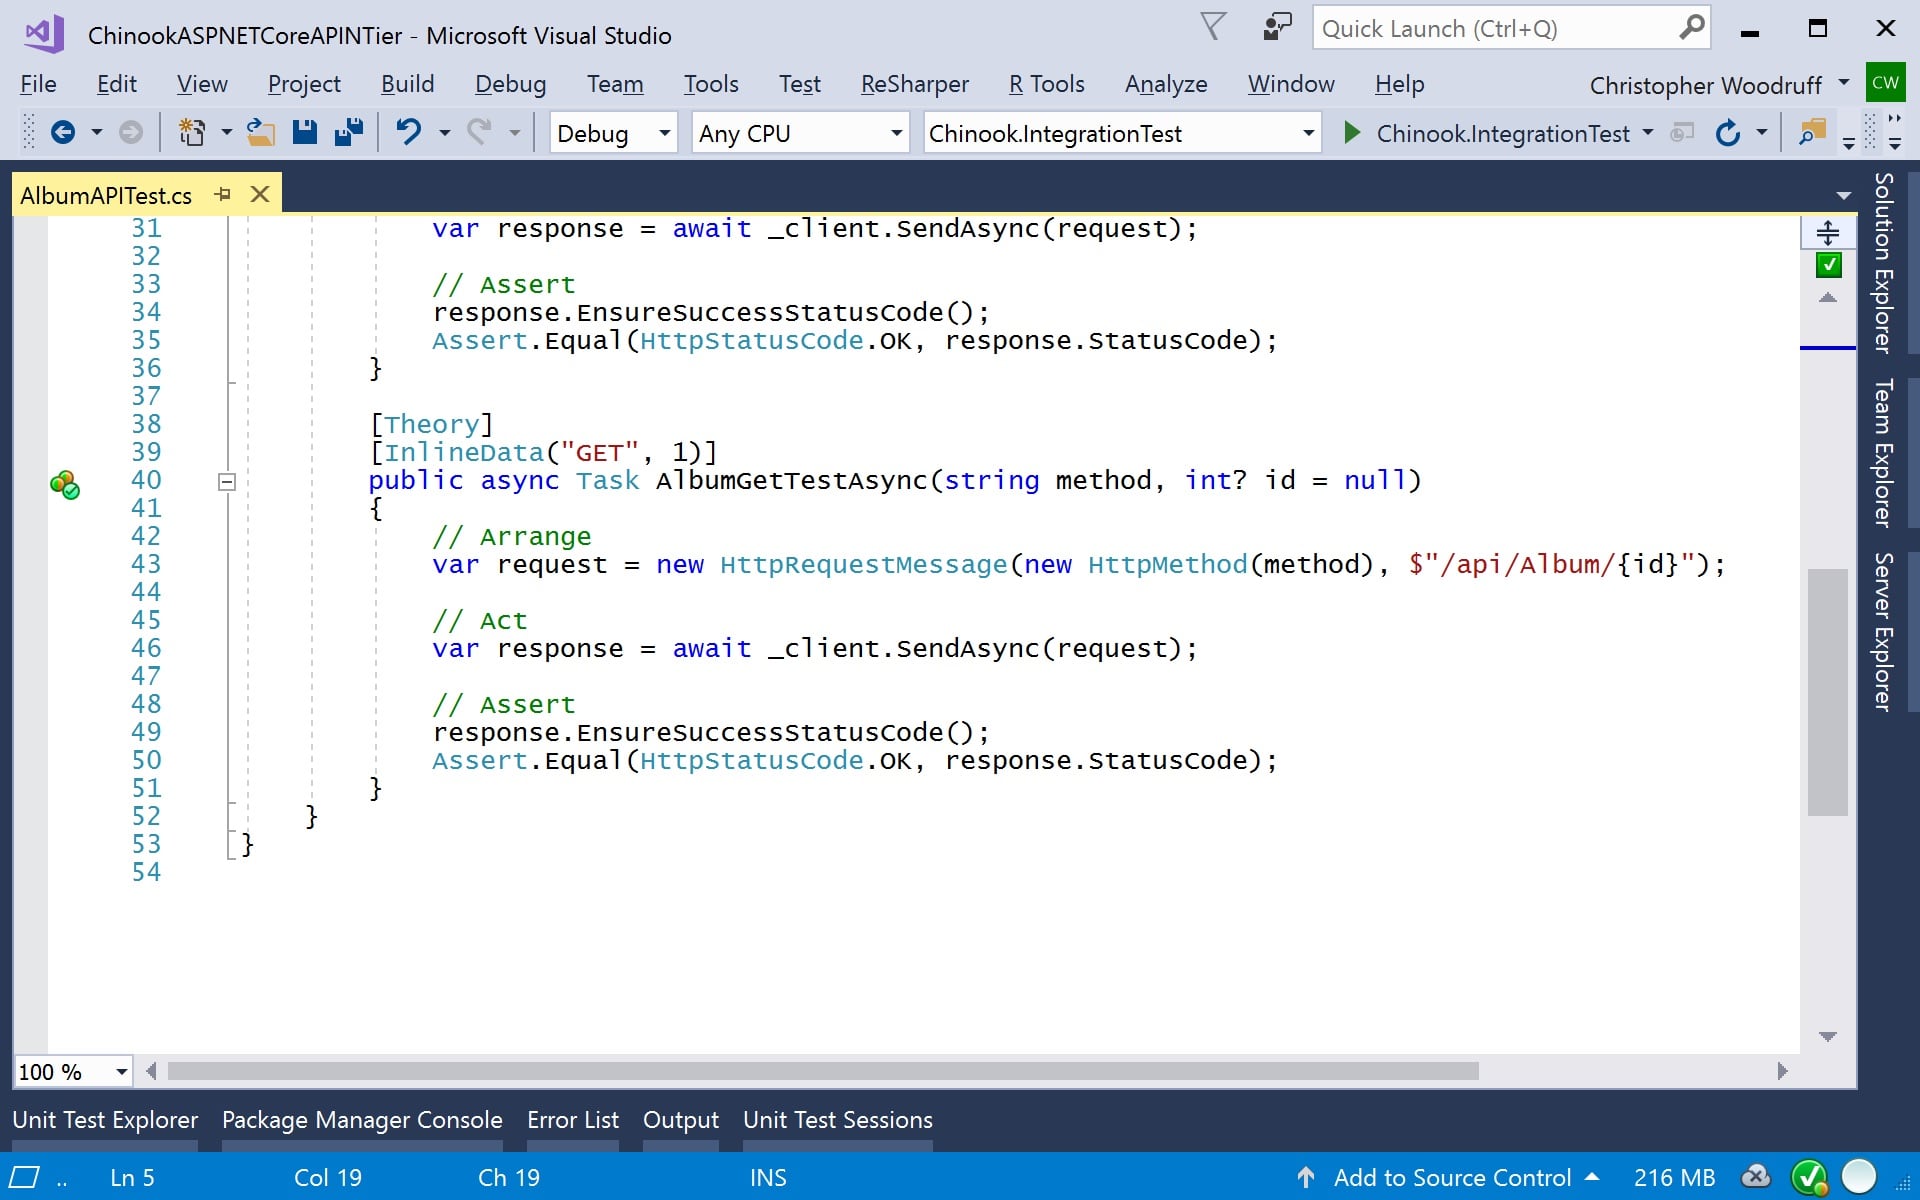
Figure 5: The second integration test for a single Album
After you have created all of your integration tests to test your API, you will need to run them through a Test Runner and make sure they all pass. All of the tests you have created can also be performed during your DevOps Continuous Integration (CI) process to test your API during the entire development and deployment process. You should now have an execution path for keeping your API well tested and maintained through the development, quality assurance, and deployment phases for the consumers of your APIs to have a great experience without incidents.
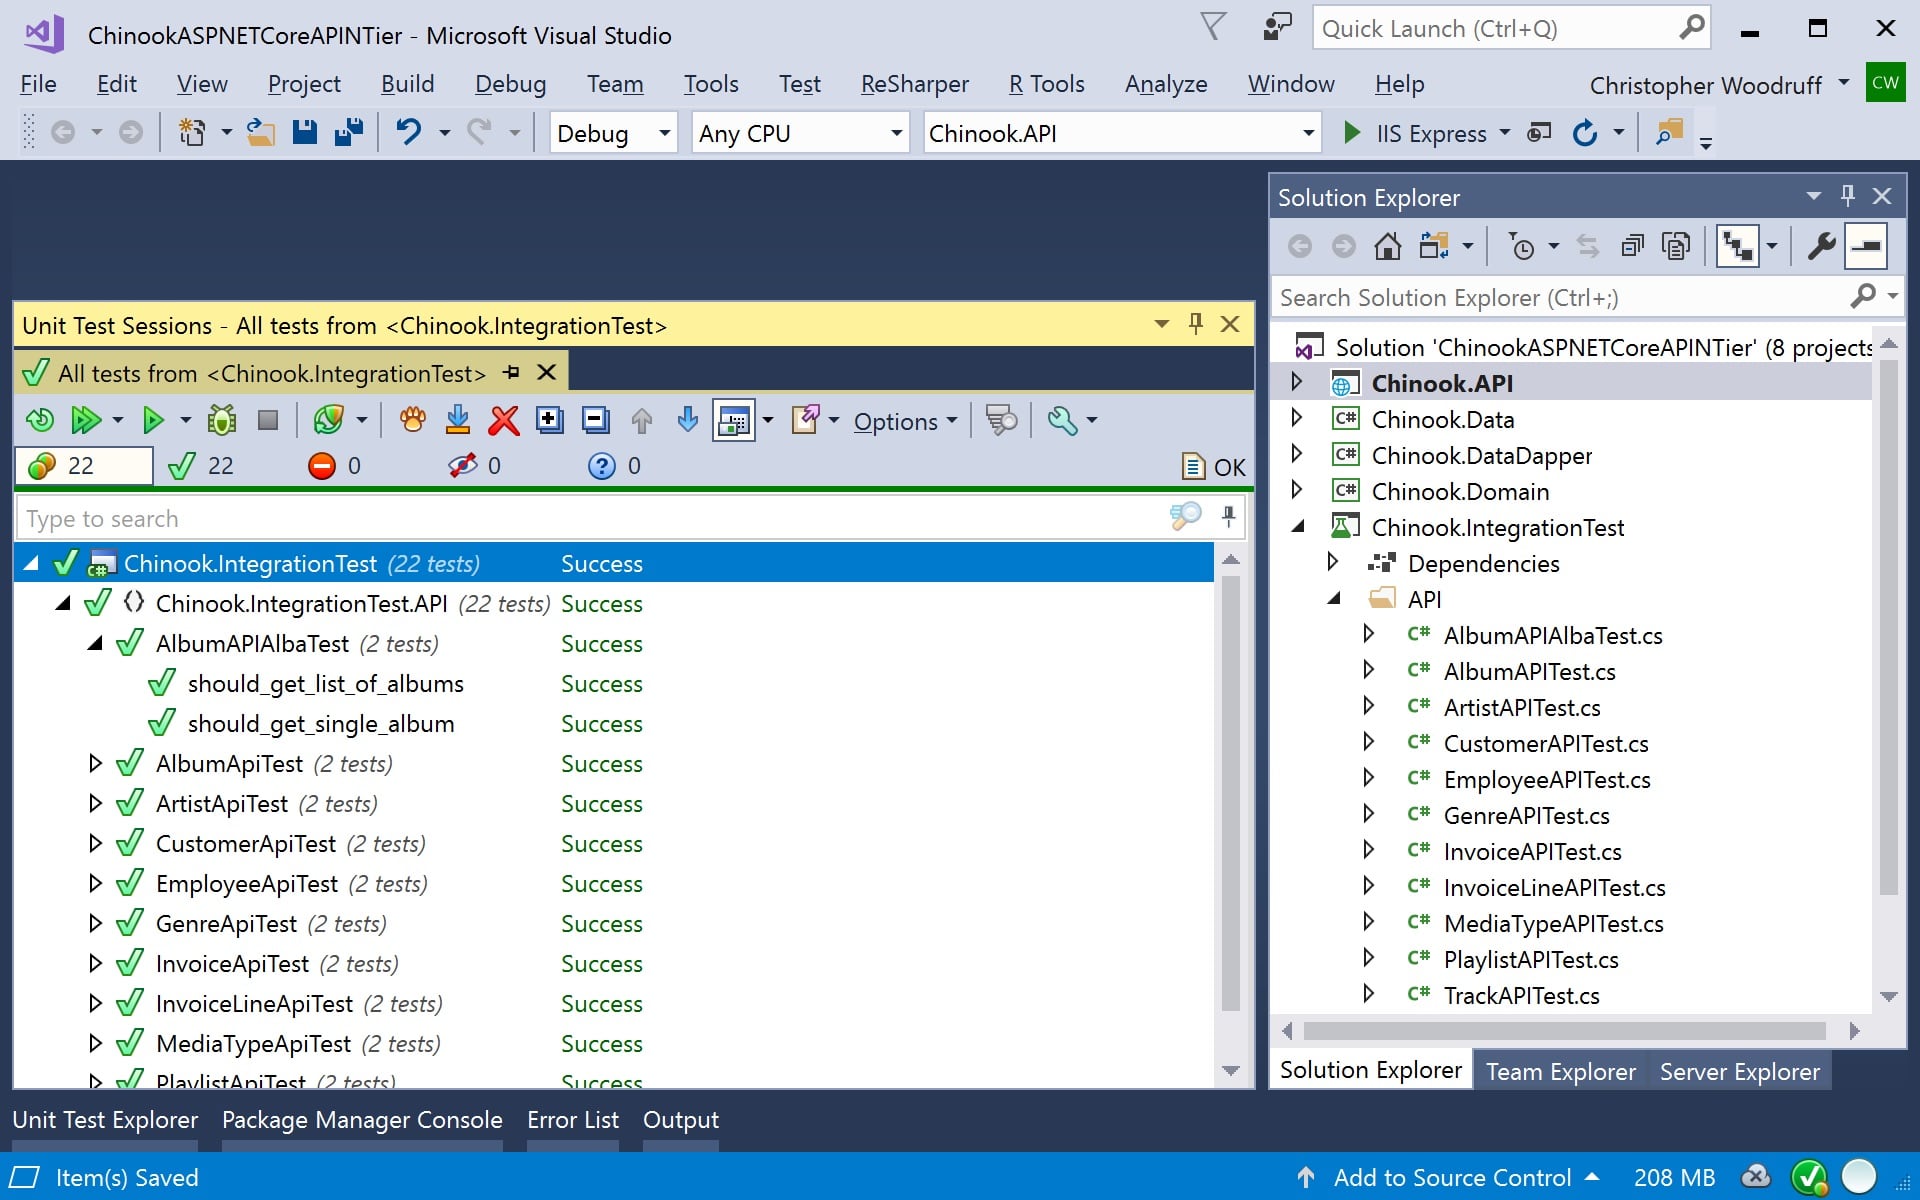
Figure 6: Running the Integration Tests in Visual Studio 2017
Conclusion
Having a well thought-out test plan using both unit testing for internal testing and integration testing for verifying external API calls is just as important as the architecture you created for the development of your ASP.NET Core Web API solution.
About the Author
 Chris Woodruff (Woody) has a degree in Computer Science from Michigan State University’s College of Engineering. Woody has been developing and architecting software solutions for over 20 years and has worked in many different platforms and tools. He is a community leader, helping such events as GRDevNight, GRDevDay, West Michigan Day of .NET and CodeMash. He was also instrumental in bringing the popular Give Camp event to Western Michigan where technology professionals lend their time and development expertise to assist local non-profits. As a speaker and podcaster, Woody has spoken and discussed a variety of topics, including database design and open source. He has been a Microsoft MVP in Visual C#, Data Platform and SQL and was recognized in 2010 as one of the top 20 MVPs world-wide. Woody is a Developer Advocate for JetBrains and evangelizes .NET, .NET Core and JetBrains’ products in North America.
With the release of .NET Core 2.0, Microsoft has the next major version of the general purpose, modular, cross-platform and open source platform that was initially released in 2016. .NET Core has been created to have many of the APIs that are available in the current release of .NET Framework. It was initially created to allow for the next generation of ASP.NET solutions but now drives and is the basis for many other scenarios including IoT, cloud and next generation mobile solutions. In this series, we will explore some of the benefits .NET Core and how it can benefit not only traditional .NET developers but all technologists that need to bring robust, performant and economical solutions to market.
This InfoQ article is part of the series “.NET Core“. You can subscribe to receive notifications via RSS.
MMS • RSS
Article originally posted on InfoQ. Visit InfoQ

This eMag brings together some of our favourite writing, interviews, links to presentations and so on from a year of QCon.
…
QCon London 2018 featured over 140 speakers from innovative software shops like Google, Sky Bet, Honeycomb.io, Data Artisans, Mozilla, UBA, Uber, and more, and the keynote lineup this year was especially noteworthy. @RealMrGloverman tweeted: “I have attended the last 4 @qconlondon and I can honestly say the closing keynote from @RichardWiseman is the highlight of them all. Outstanding. Thanks for another great year #qconlondon team.”
While the conference featured 18 curated tracks that covered nearly all of the major trends in software today, there were three that seemed to thread throughout the conference: Artificial Intelligence / Machine Learning, Microservices, and Ethics.
…
At the beginning of April, we ran our inaugural QCon.ai event conference at Parc 55 in San Francisco, with a focus on AI, machine learning, and data engineering for software engineers.
Our motivation for launching this event is that we believe that many of the techniques coming out of the various data-science disciples are fast becoming essential tools for software developers, and we wanted an event that would allow us to go much deeper into the topic than is possible at a typical QCon to help equip our attendees for this change. QCon.ai was a three-day show with four in-depth workshops covering TensorFlow, Apache Kafka, Apache Spark, and Python- based AI workflows, two days of three concurrent tracks on topics such as predictive data pipelines, AI in the physical world, deep-learning applications and practices, and real-world data engineering. We also had code labs on topics such as TensorBoard, R, and more.
…
This year, at the seventh annual QCon New York, our second year in Time Square, it felt like the emerging theme was diversity and inclusion. The event had a particularly positive atmosphere that made for something truly special, and we got a huge amount of positive feedback from attendees and speakers about it, both during the event and afterwards. This is something the QCon team has worked on for several years, and it felt wonderful to see that work starting to pay dividends. From a content perspective, attendees at the event got to see keynotes from Guy Podjarny, co-founder of Snyk, talking about “Developers as a Malware Distribution Vehicle”; Joshua Bloch giving a “Brief, Opinionated History of the API”; and Tanya Reilly, principal engineer of Squarespace, giving a thoroughly interesting and unusual talk about the history of fire escapes in New York City and what we as software engineers can learn from them.
…
In mid-November, around 1,600 attendees descended on the Hyatt Regency for the 12th annual QCon San Francisco.
QCon SF attendees — software engineers, architects, and project managers from a wide range of industries, including some prominent Bay Area companies — attended 99 technical sessions across six concurrent tracks, “ask me anything” sessions with speakers, 18 in-depth workshops, and eight facilitated open spaces. We’ve already started publishing sessions from the conference, along with transcripts for the first time. The full publishing schedule for presentations can be found on the QCon SF website. The conference opened with a presentation from Jez Humble and Nicole Forsgren, two of the authors of Accelerate: The Science of Lean Software and DevOps: Building and Scaling High Performing Technology Organizations — one of InfoQ’s recommended books for 2018.
…
Free download
MMS • RSS
Article originally posted on Data Science Central. Visit Data Science Central
Back in 2017, we posted a problem related to stochastic processes and controlled random walks, offering a $2,000 award for a sound solution, see here for full details. The problem, which had a Fintech flavor, was only solved recently (December 2018) by Victor Zurkowski.
About the problem:
Let’s start with X(1) = 0, and define X(k) recursively as follows, for k > 1:


and let’s define U(k), Z(k), and Z as follows:


where the V(k)’s are deviates from independent uniform variables on [0, 1]. So there are two positive parameters in this problem, a and b, and U(k) is always between 0 and 1. When b = 1, the U(k)’s are just standard uniform deviates, and if b = 0, then U(k) = 1. The case a = b = 0 is degenerate and should be ignored. The case a > 0 and b = 0 is of special interest, and it is a number theory problem in itself, related to this problem when a = 1. Also, just like in random walks or Markov chains, the X(k)’s are not independent; they are indeed highly auto-correlated.
Prove that if a < 1, then X(k) converges to 0 as k increases. Under the same condition, prove that the limiting distribution Z
- always exists, (Note: if a > 1, X(k) may not converge to zero, causing a drift and asymmetry)
- always takes values between -1 and +1, with min(Z) = -1 and max(Z) = +1,
- is symmetric, with mean and median equal to 0
- and does not depend on a, but only on b.
For instance, for b =1, even a = 0 yields the same triangular distribution for Z, as any a > 0.
Main question: In general, what is the limiting distribution of Z? I guessed that the solution (which implied solving a stochastic integral solution) was

About the author and the solution:
Victor not only confirmed that the above density function is a solution to this problem, but also that the solution is unique, focusing on convergence issues, in a 27-page long paper. One detail still needs to be worked out: whether or not scaled Z visits the neighborhood of every point in [-1,1] infinitely often. Victor believes that the answer is positive. You can read his solution here, and we hope it will result in a publication in a scientific journal.

Victor Zurkowski, PhD, is a predictive modeling, machine learning, and optimization expert with 20+ years of experience, with deep expertise developing pricing models and optimization engines across industries, including Retail, Financial Services. He published various academic papers in Mathematics and Statistics across numerous topics, and is currently Assistant Professor / Gibbs Instructor of Mathematics at Yale University. Victor holds a Ph.D. in Mathematics from the University of Minnesota and an M.Sc. in Statistics from the University of Toronto.
DSC Resources
- Book and Resources for DSC Members
- Comprehensive Repository of Data Science and ML Resources
- Advanced Machine Learning with Basic Excel
- Difference between ML, Data Science, AI, Deep Learning, and Statistics
- Selected Business Analytics, Data Science and ML articles
- Hire a Data Scientist | Search DSC | Find a Job
- Post a Blog | Forum Questions
MMS • RSS
Article originally posted on Data Science Central. Visit Data Science Central
So, you think you can be a data scientist. But, are you sure you have it what it takes to excel in the data science field? Be careful. It’s a very complicated field, and getting competitive day by day. In this post, we will go through what the industry demands of a modern data scientist in the real world, how to become a data scientist, top platforms and resources to learn the data science skills, and career advice & job search tips from data science experts.

Data Scientist: One of the Most In-Demand Tech Jobs for 2019
The data scientist job is definitely one of the most lucrative and hyped job roles out there. More and more businesses are becoming data-driven, the world is increasingly becoming more connected and looks like every business will need a data science practice. So, the demand for data scientists is huge. Even better, everyone acknowledges the shortfall of talent in the industry.
But, becoming a data scientist is extremely complicated and competitive. The career path of a data scientist is not going to be easy. It needs a mix of problem-solving, structured thinking, coding, and various technical skills among others to be truly successful.
Read the full article here: So You Think You Can Be A Data Scientist?
MMS • RSS
Article originally posted on Data Science Central. Visit Data Science Central
A report from Accentureclearly highlights those companies that don’t want to capitalize on AI will not survive the future (see Figure 1). Adopt or die. Yippee Ki Yay, Mr. Falcon.
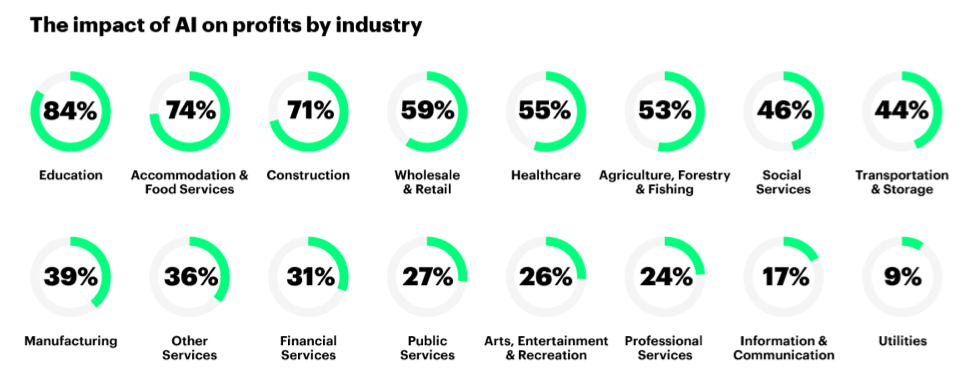
Figure 1: The Profit Impact of AI by Industry
The AI war is being fought with open source technologies such as TensorFlow, Spark ML, Caffe, Torch and Theano. But wait…if these AI algorithms and technologies – the “Weapons of Mass Business Model Destruction” – are readily available to everyone, what are the sources of business value and differentiation?
Increasingly the equation for deriving and driving business value and differentiation isn’t having the Machine Learning, Deep Learning and AI frameworks, but is found in two foundational principles:
- Identifying, validating, valuing and prioritizing the Use Casesfor which AI will deliver material business and operational value. Stephen Covey’s “Begin with an End In Mind” was never more appropriate, as organizations must invest in the upfront work to ensure that they thoroughly understand the problems they’re trying to solve, quantify the sources of business value, understand the metrics and KPI’s against which they’re going to measure progress and success, and understand potential implementation impediments and risks associated with False Positives and False Negatives.
- Ensuring organizations have identified and assessed the Data Sourcesneeded to enable the analytics that address the use cases.This requires a thorough assessment of the quality, accuracy, completeness, granularity, and latency of the data from which to mine the customer, product and operational insights that drive business value.
I have already written the book “Big Data MBA: Driving Business Strategies with Data Science” and several blogs on the “Thinking Like A Data Scientist” methodology which provides a thorough, business-driven process for identifying, validating, valuing and prioritizing the organization’s business and operational use cases. See the following blogs for more details on the “Thinking Like A Data Scientist” methodology:
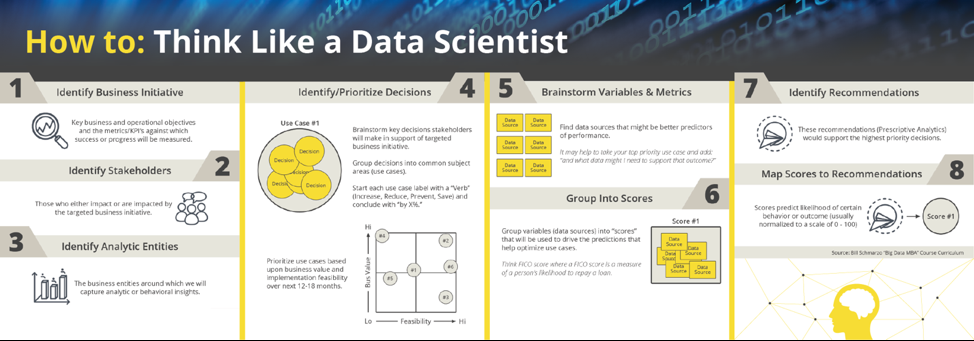
Figure 2: Thinking Like A Data Scientist Methodology
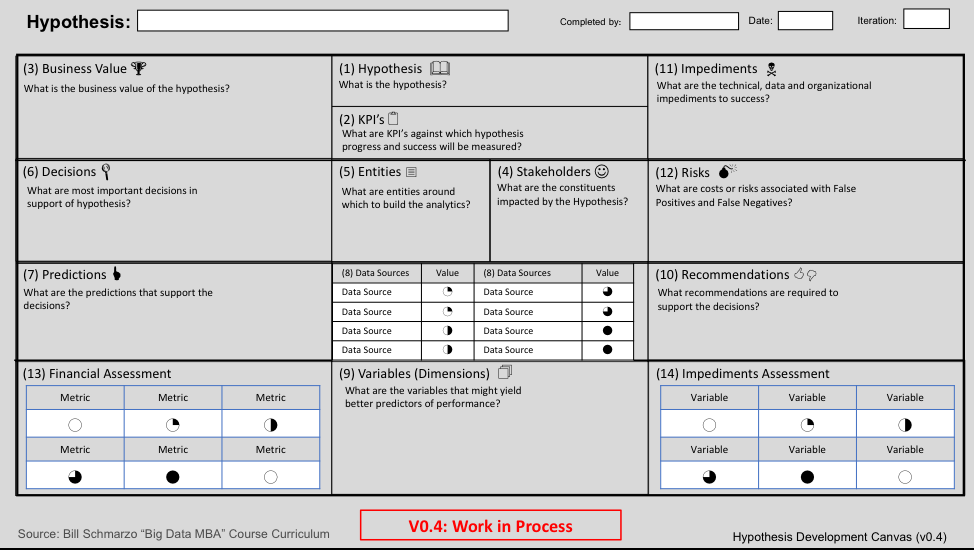
Figure 3: Business Hypothesis Development Canvas
Now let’s consider the other part of the AI equation – monetizing the data. As was well stated in the Sloan Review article “The Machine Learning Race Is Really a Data Race”:
“Data is becoming a differentiator because many companies don’t have the data they need. Although companies have measured themselves in systematic ways using generally accepted accounting principles for decades, this measurement has long been focused on physical and financial assets — things and money.”
Data Valuation Matrices
Throughout the data warehouse years, we struggled to get the business stakeholders to invest in their data. Anyone who has ever tried to sell your business stakeholders on a data governance program knows that data is the Rodney Dangerfield of corporate assets – it doesn’t get any respect!
In order to help organizations understand the importance of data governance and data management initiatives, we developed two data assessment matrices that are instrumental in helping organizations envision where and how data science can enable their key business initiatives.
The first of two, the Data Business Value Assessment Matrix, determines the relative value of each data source in enabling the analytics necessary for the business use cases (see Figure 4).
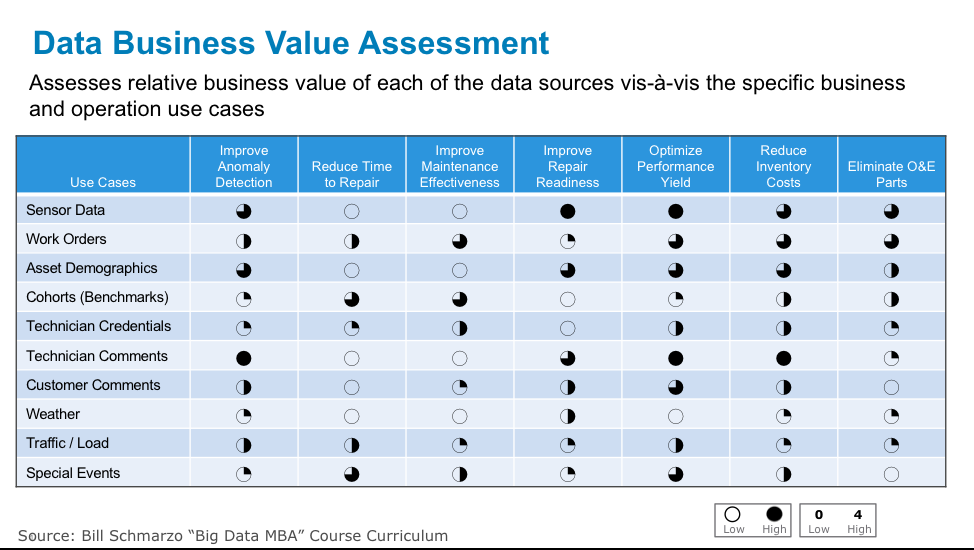
Figure 4: Data Business Value Assessment Matrix
The Data Business Value Assessment Matrix reframes the data valuation conversation by first brainstorming the data sources that the use cases might need. We then determine the importance of each data source vis-à-vis each use case through data science.
The Data Business Value Assessment Matrix probably looks familiar to folks who have read my University of San Francisco School of Management “Economic Value of Data” research paper. This technique was instrumental in helping attribute financial value to the data sources based upon their contribution to the analytics that support the use cases (see Figure 5).
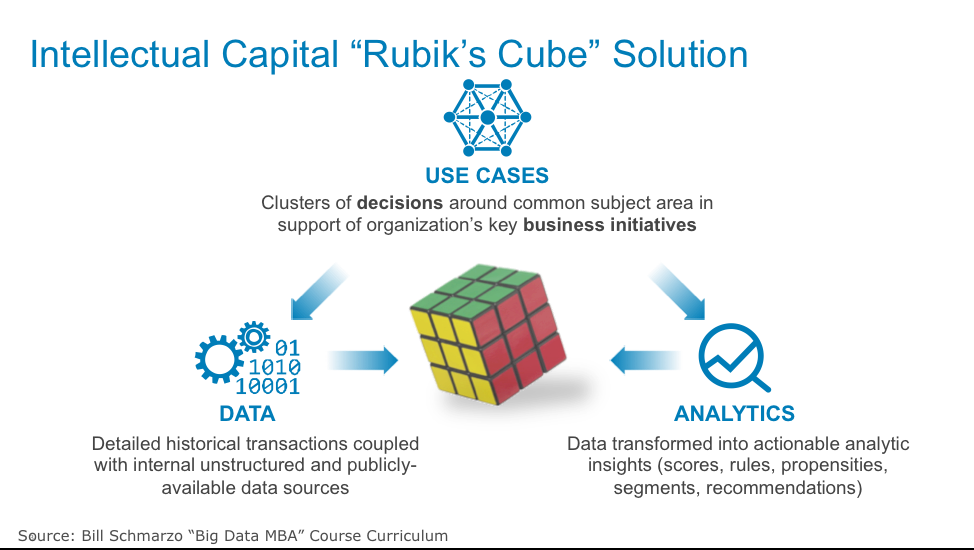
Figure 5: Importance of Use Cases in Framing the Economic Value of Data Determination
The second of the two, the Data Feasibility Assessment Matrix, assesses the technical feasibility and readiness of each of the data sources vis-à-vis key data management variables (see Figure 6).
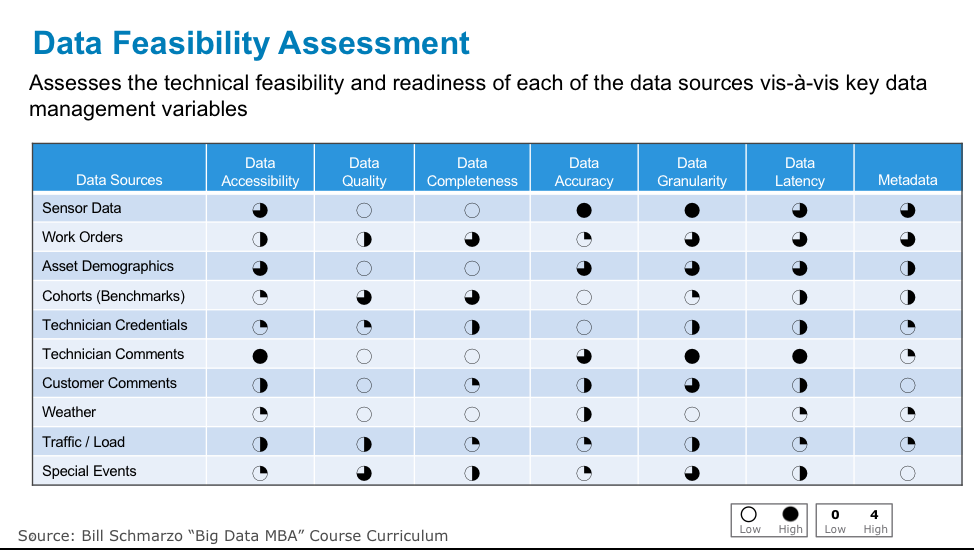
Figure 6: Data Feasibility Assessment matrix
Now that we 1) know which data sources are most important to our use cases and 2) have a general assessment of the technical feasibility of those data sources, we want to look at using techniques that make them even more valuable. And that brings us to the data discipline of Feature Engineering.
Understanding Feature Engineering
The quality of our data science and the resulting AI, Deep Learning and Machine Learning models are highly dependent upon the quality and richness of our data. And while there is much learning from our data warehouse and ETL experiences in trying to improve data quality, the field of enriching the data through feature engineering is still developing. Feature engineering is the process of using domain knowledge to engineer new data variables out of existing data variables in context of the business or operational situation that we are trying to address.
Types of Feature Engineering include:
- Data integration, whichis probably the most basic of Feature Engineering capabilities. It involves combining data residing in different sources using shared content (keys) into a unified view, based upon the subject being addressed.
- Normalization and Standardization, two termssometimes used interchangeably, but refer to different things. Normalization means to scale a variable to have values between 0 and 1, while standardization transforms data to have a mean of zero and a standard deviation of 1 (a z-score).
- Data Blending,a process where data from multiple sources are merged into a single data set in a non-permanent format to determine the predictive value of the blended metrics.
- Data enrichment,which merges third-party data with internal data sources to enhance the predictive capabilities of the data.
- Composite metrics,which define a new higher-level metric by specifying mathematical transformations and weightings to perform on a selection of native metrics. For example, a FICO Score is comprised of over 30 metrics that are weighted in a way as to yield the best predictor of an individual’s loan repayment capabilities.
From the book “Feature Engineering for Machine Learning: Principles and Techniques for Data Scientists”, written by Alice Zheng and Amanda Casari, we get the following Feature Engineering summary (by the way, I bought the book and will be reading it over the holidays…yep, that’s my definition of fun):
“Machine learning fits mathematical models to data in order to derive insights or make predictions. These models take features as input. A feature is a numeric representation of an aspect of raw data. Features sit between data and models in the machine learning pipeline. Feature engineering is the act of extracting features from raw data, and transforming them into formats suitable for the machine learning model. It is a crucial step in the machine learning pipeline, because the right features can ease the difficulty of modeling, and therefore enable the pipeline to output results of higher quality. Practitioners agree that the vast majority of time in building a machine learning pipeline is spent on feature engineering and data cleaning.”
Data Science and the Role of Feature Engineering
Data science is about identifying those variables and metrics that might be better predictors of performance.
Feature Engineering is a critical activity in the Data Science process by helping the Data Scientists to create new variables that might be better predictors of performance (see Figure 7).
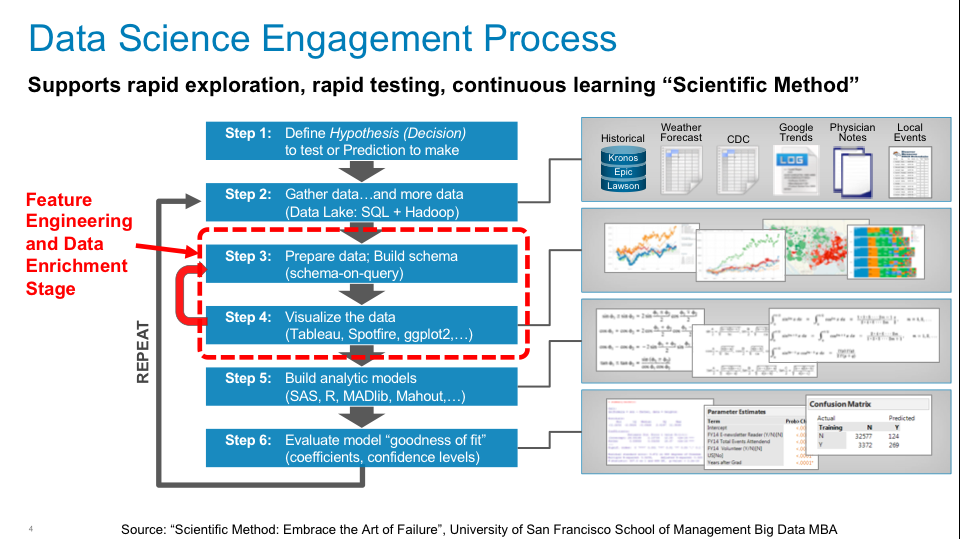
Figure 7: Data Science Engagement Process
Much of the initial Feature Engineering work is done by the Data Engineer who has gathered context on the business or operational use case through business stakeholder interviews. But as is shown in Figure 7, the Feature Engineering (and Data Enrichment) activity is an iterative process throughout the Data Science engagement between the Data Engineer and the Data Scientist in search of variables and metrics that might be better predictors of performance.
Summary
When I don’t really understand or appreciate a topic, I always find the best way to learn about it is to research and write about it. I also value hearing from folks who are subject matter experts and will point out anything I get wrong.
Hey, that’s typically for data – the Rodney Dangerfield of Corporate Assets!

Figure 8: LoadTVE: http://www.loadtve.biz/rodney-dangerfield-no-respect-album.html
MMS • RSS
Article originally posted on Data Science Central. Visit Data Science Central

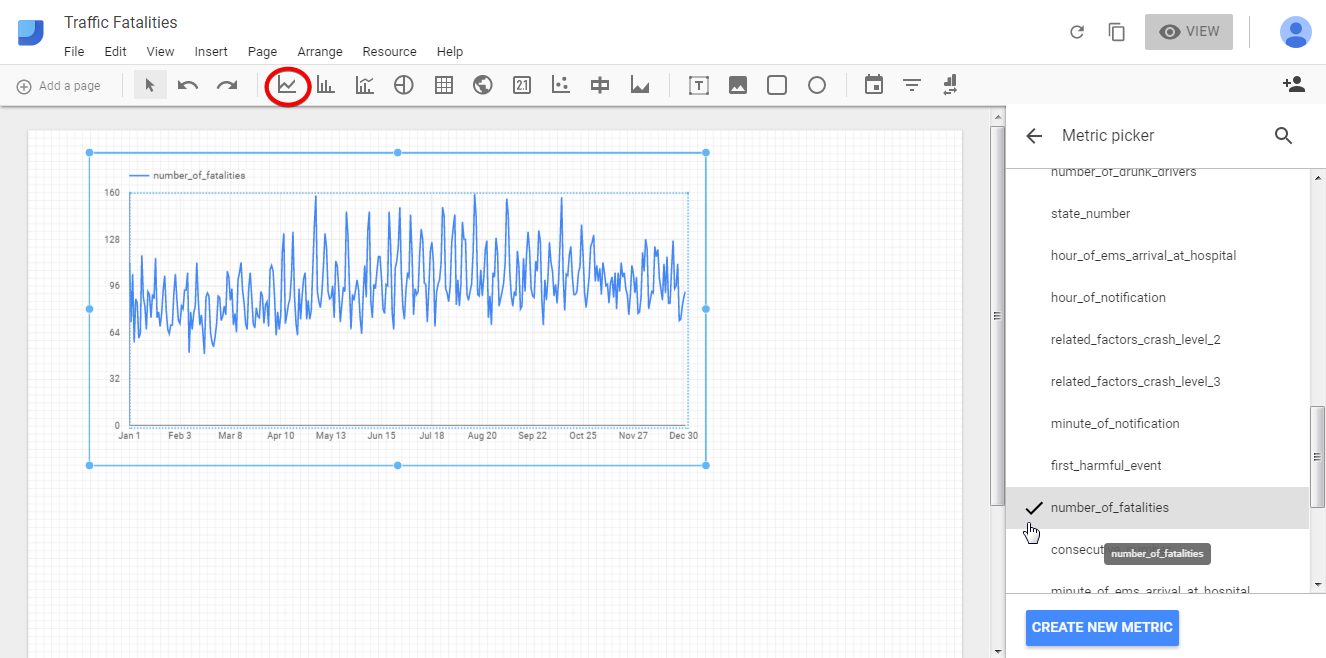
Google Data Studio is a new data visualization tool allowing you to transform your clear and dry data into visually appealing and understandable reports and to be shared then with your colleagues and clients. Using the bar graphs, geographical maps, charts, line charts, etc. you can represent your data and – the most important – make sense of it. It’s free, and you can create and share as many reports as you want. If you think that reporting isn’t fun and exciting, read this 10 minutes tutorial and learn how to easily create informative and dynamic reports with Google Data Studio. We will create a report about traffic fatalities that will look like this:

The original report can be found here.
But let’s go step-by-step and see how we got there.
Connecting and preparing data
Logging in and starting
All you need to start working in Google Data Studio is an active Google account. Moreover, you can manage Data Studio with other Google product like Google Analytics or Adwords, and quickly connect to any Google data source.
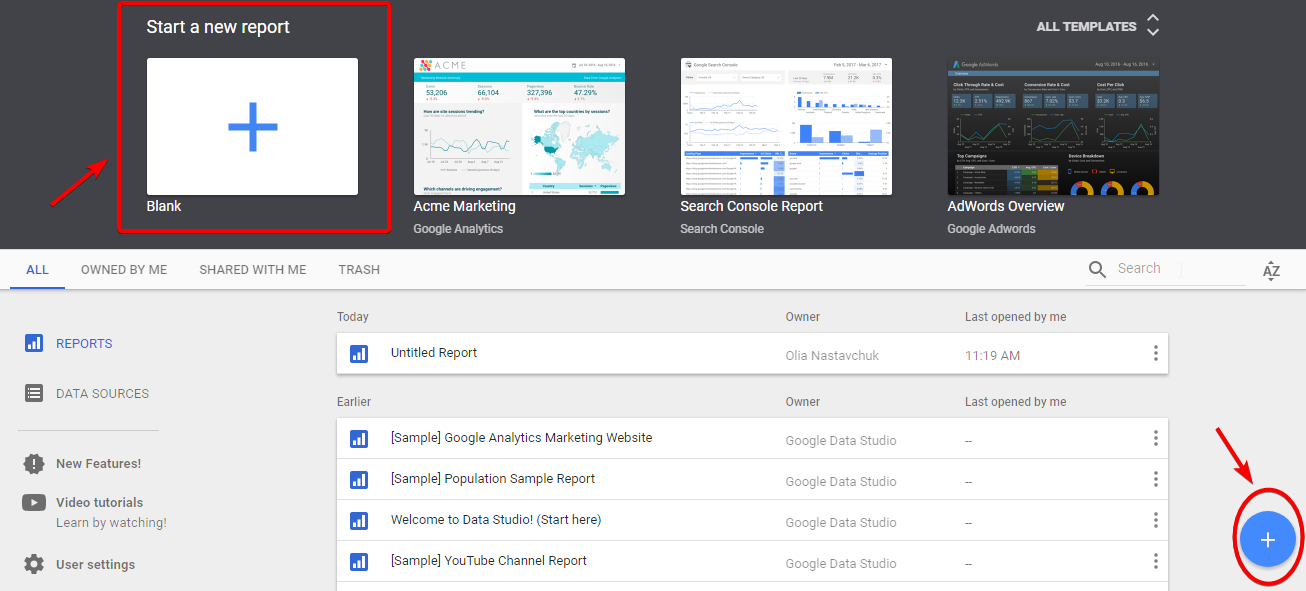
Now let’s take a look at the homepage. You can see some sample reports that will get you acquainted with the basic visualizations that you can incorporate in your report. You can sort the reports in a way that is the most convenient for you, and there is also a search bar helping to find a specific report. Finally, you can check out an interactive tutorial called “Welcome to Data Studio! (Start here)”.
Now it’s time to create a new report! You can start by either clicking on the plus (+) icon at the bottom right corner or the blank plus page and after that accept the terms and conditions.
Connecting a data source
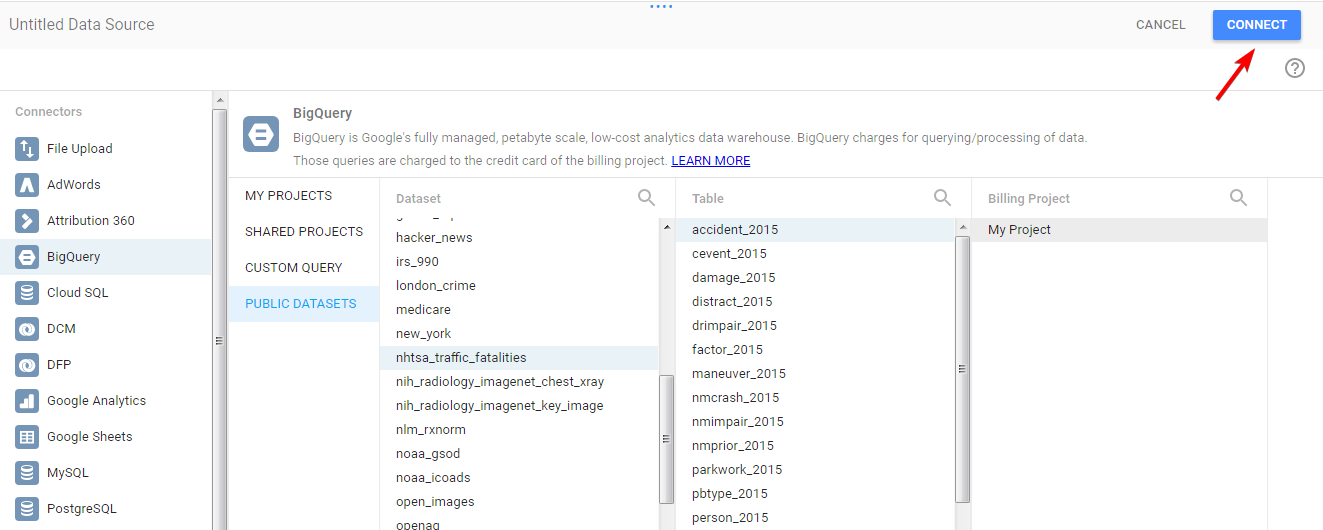
You may see some already existing data sources, or you can click the button at the bottom right corner and create a new data source.
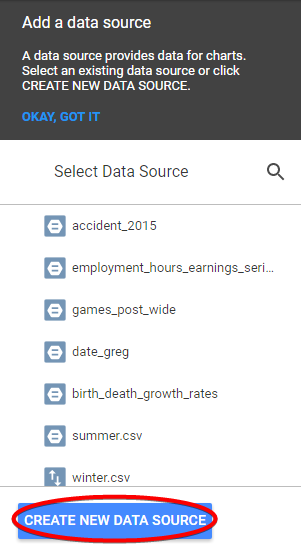
There are multiple options for you to obtain the data: AdWords, Google Analytics, Google Sheets, YouTube Analytics, etc. For this example, we picked the BigQuery public data set on traffic fatalities. Once you’ve chosen the dataset, table, and billing project, click “Connect”.
Preparing data
Now, there’s a table helping you to prepare your data. Let’s take a closer look.
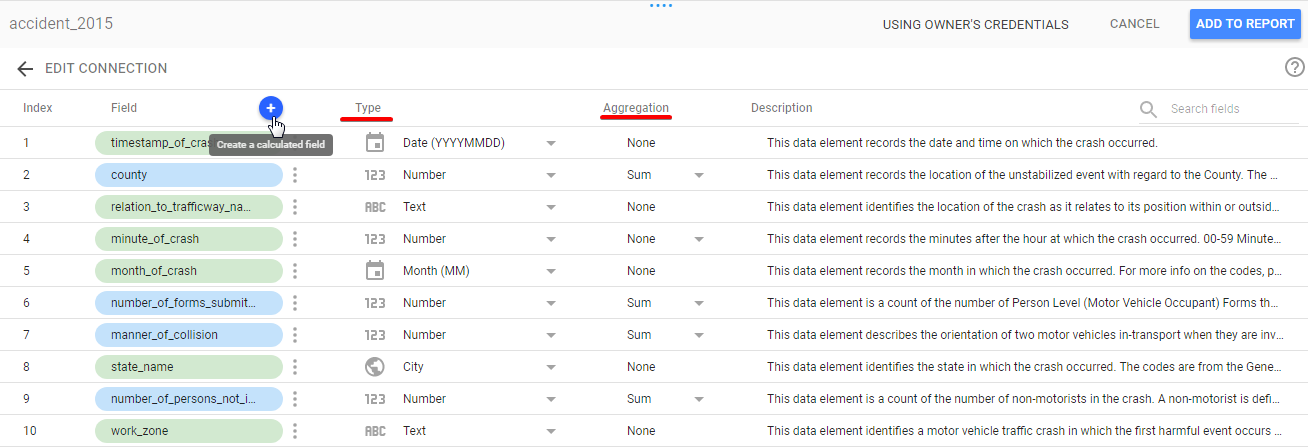
The fields in blue are metrics – fields that can be counted, and in green are dimensions – usually text fields. Field type allows you to select the type of your metrics. There are numeric, text, date & time, boolean and geo types. Be careful to select the correct formats! Then you can choose the aggregation for your metric: sum, average, minimum, maximum and of course none if you don’t need any. Finally, you can create a calculated field that calculates new metrics by using a formula transforming some existing metrics. If you have prepared your data, click “Add to report” and let’s get moving and start visualizing!
Creating a report
Toolbar
At the top of the page you can see a toolbar where you can find different options for creating a report.
Pages, names
First of all, your report needs a title. You can simply name it at the top left corner and the changes will be automatically saved.
Then you can add multiple pages to the report which you can also name and easily switch between them.

Types of data visualization
The next part of the toolbar is the data visualization tools. Let’s quickly look through them.
The first one is Time series. If your data includes date&time metrics to choose as a dimension you can build time series with different metrics. The time series properties menu allows you to choose dimension, metric, filter, and style for your graph. Note that if you need to, it is possible to add additional metrics.
Bar and combo charts display your data in a convenient way and the last one allows you to compare different metrics on the same chart.
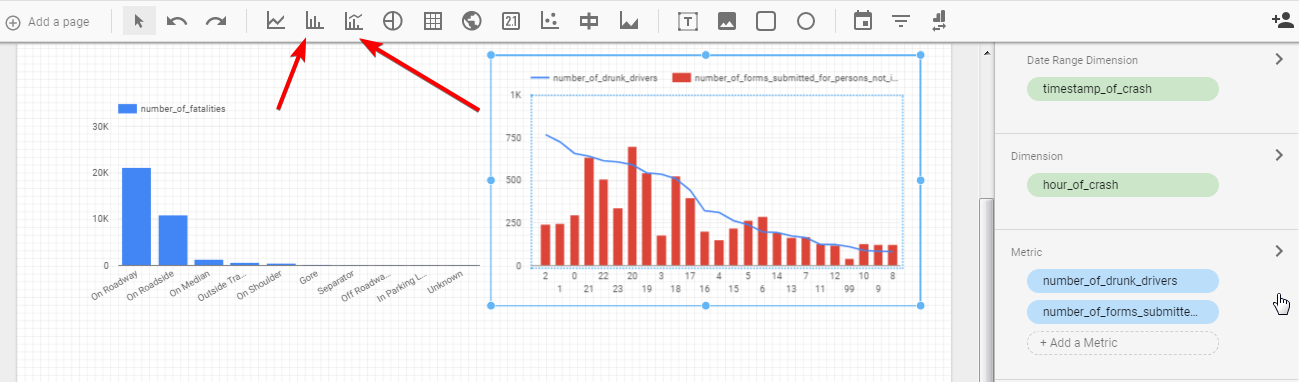
Remember that you can edit data source in the data tab and work with multiple datasets in the same report.
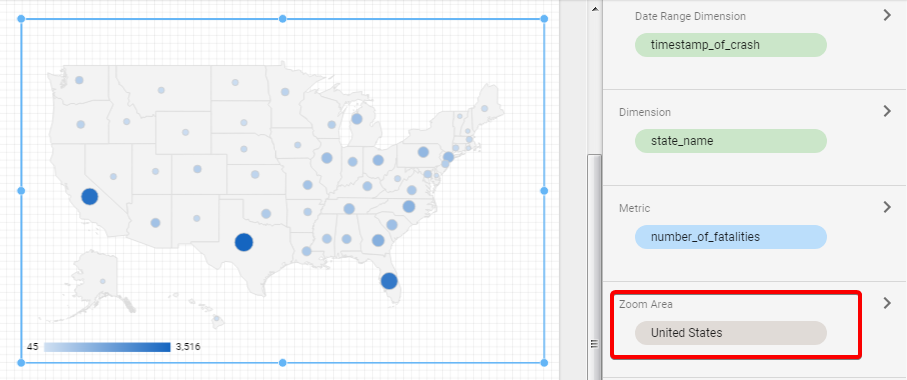
Another important visualization is a geo map. You can experiment with zoom area and choose world map, continents or specific countries.
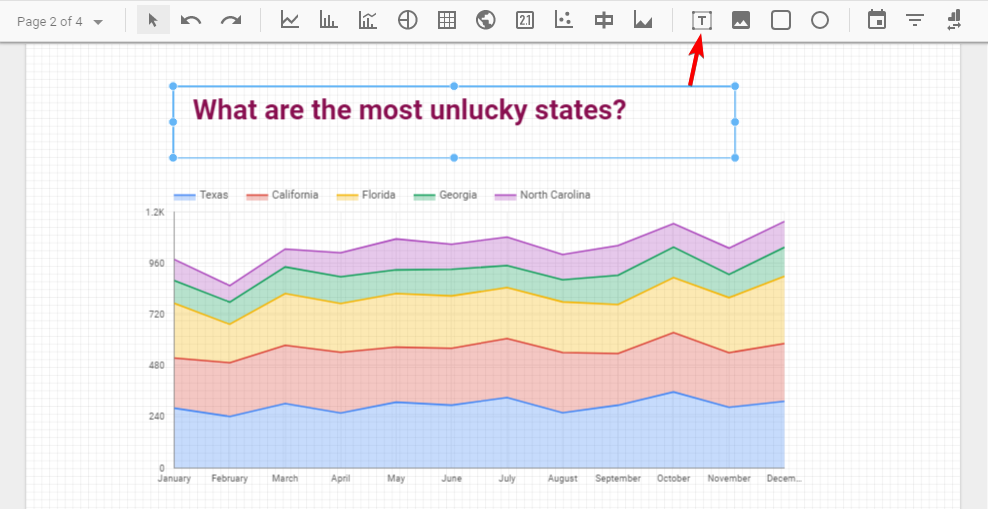
Inserting text and images
You can insert text, images, rectangles, and circles to the report depending on your purpose. For example, in such a way you can name your charts.
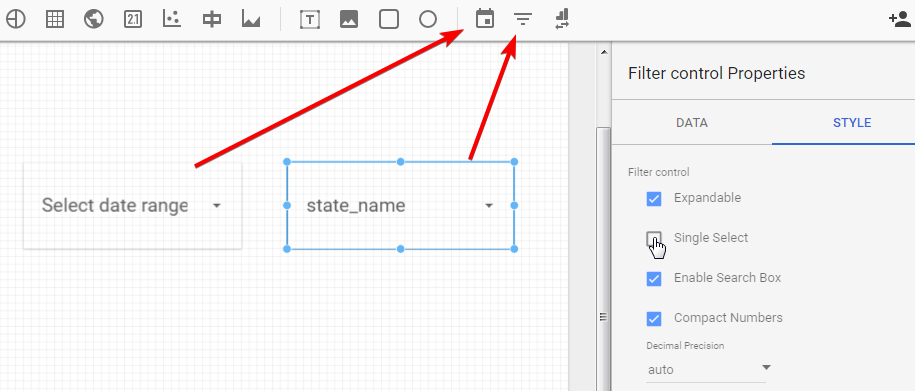
Date range, filter control
Data filtering helps you to organize reporting. You can do this by selecting date range or using filter control. Make sure to check the properties of these tools as they give you some additional opportunities.
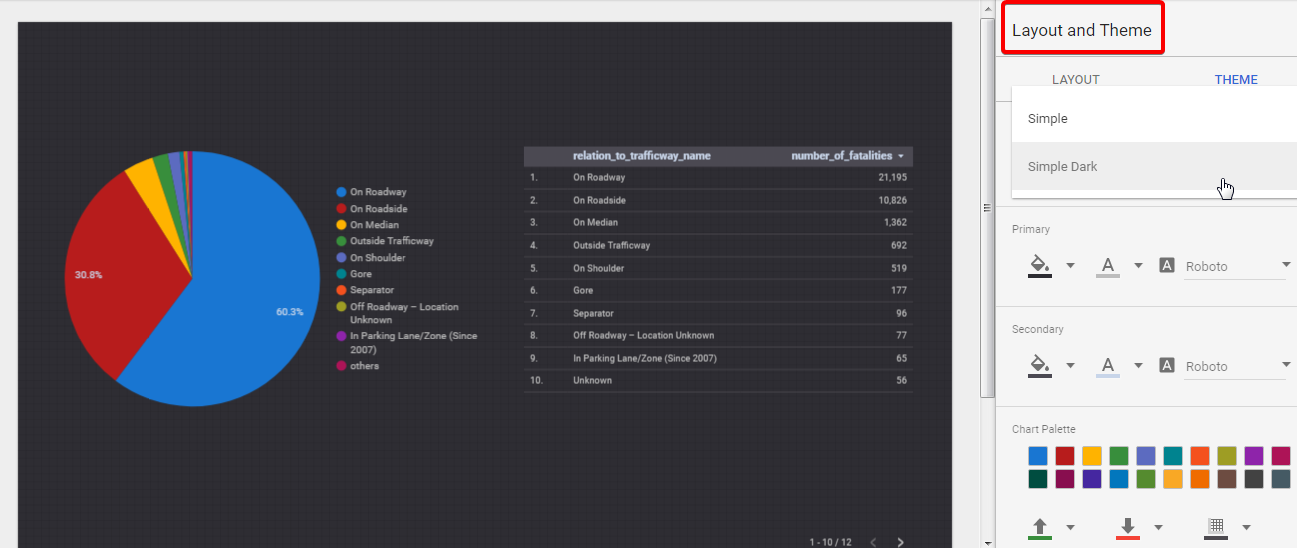
Selecting layout and theme
Layout and theme give you the possibility to play with the style of your report. You can change the background, colors, text styles, and display options and create a unique style that can represent the style of your company.
Styling and controlling menu
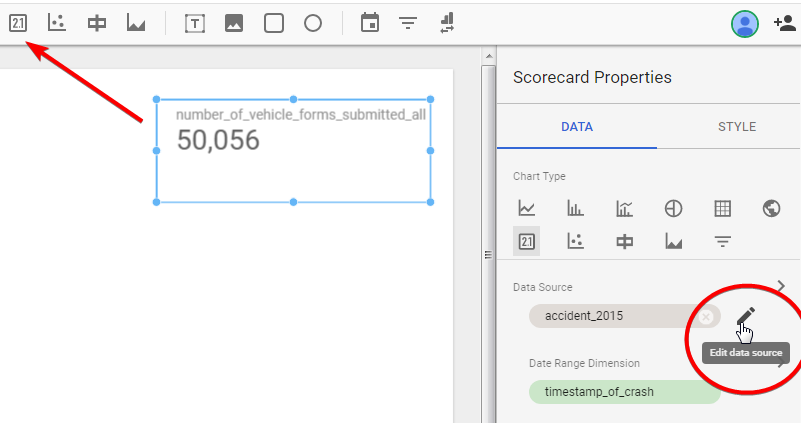
Finally, styling and controlling menu is a great help in the process of creating a report. You can select the chart type, experiment with metrics and dimensions, change data sources, apply a filter, etc.
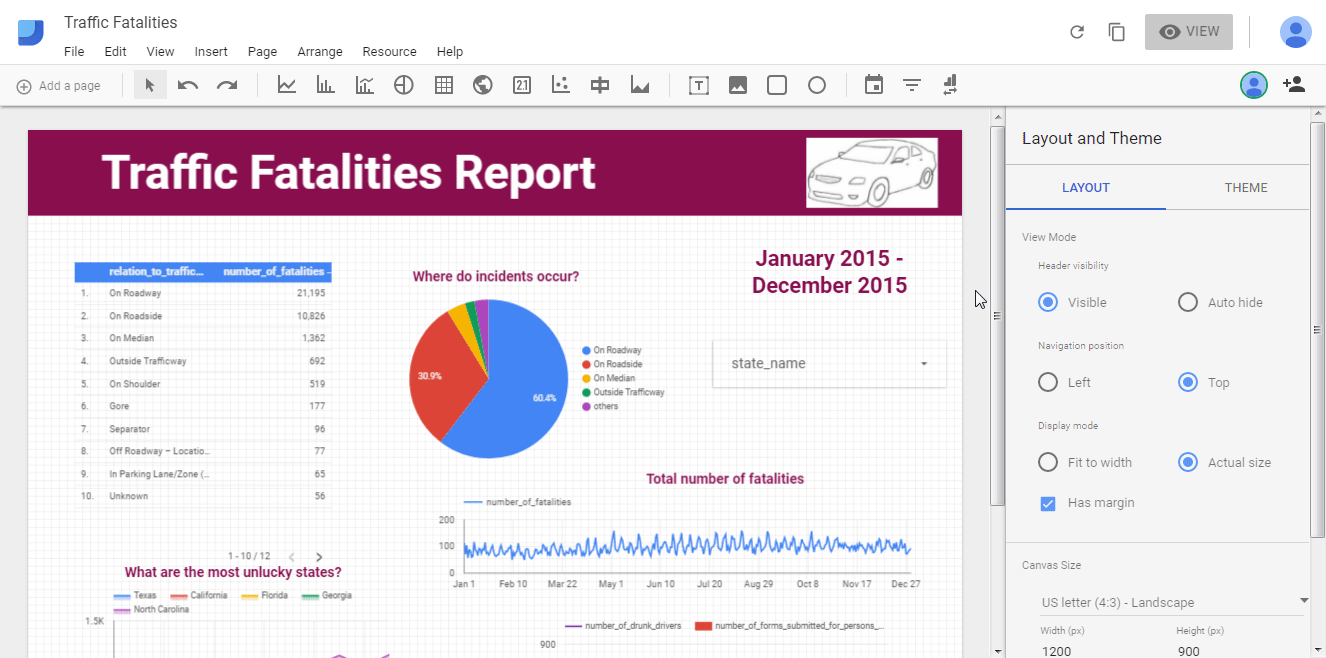
Now let’s switch between view and edit mode to see how our sample report looks like:
Sharing
With the icon at the top right corner you can easily share your report.
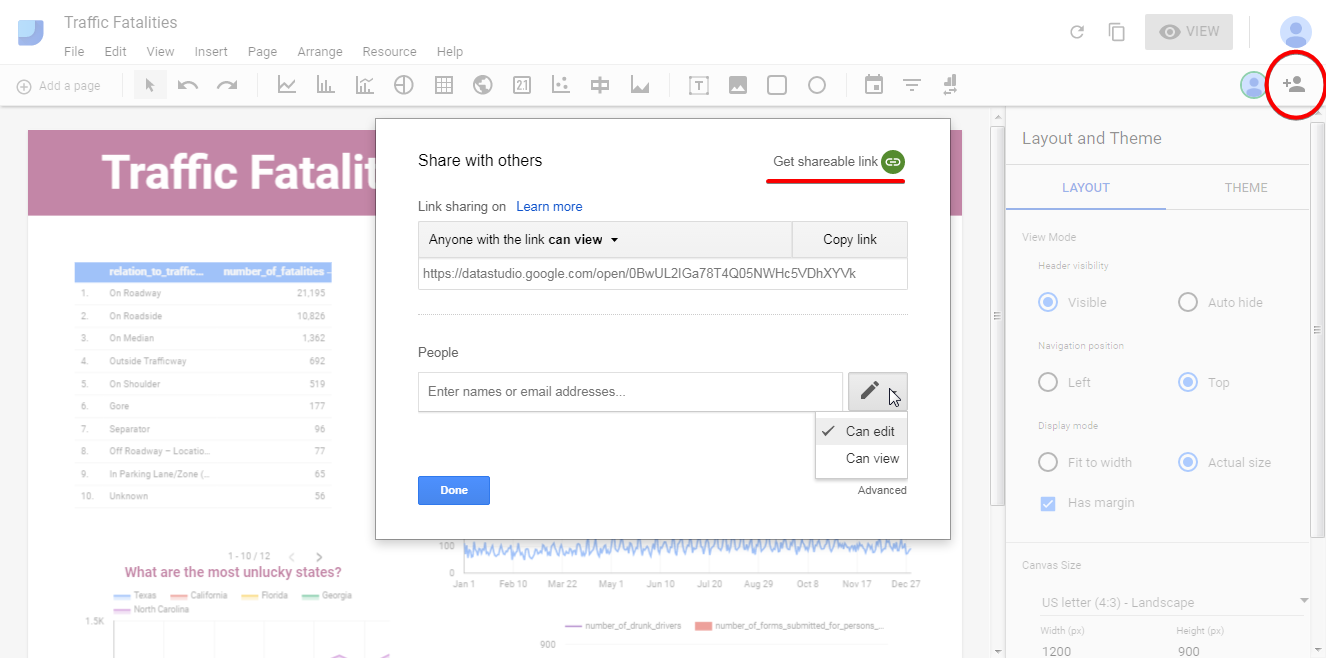
You can get a shareable link and enter the email addresses of people to share the report with and, moreover, you can choose who can edit your report and who can just view it.
Conclusion
In this step-by-step tutorial, we have demonstrated how to work with Google Data Studio and how to create some basic visualizations. This is a great tool for creating data reports, as it allows you to mix data from different sources, play with multiple charts, work with metrics and add calculated fields, create excellent and easy to read reports and share them quickly and easily.
Now it’s your turn! Enjoy!
MMS • RSS
Article originally posted on Data Science Central. Visit Data Science Central

Speech processing is a very popular area of machine learning. There is a significant demand in transforming human speech into text and text into speech. It is especially important regarding the development of self-services in different places: shops, transport, hotels, etc. Machines replace more and more human labor force, and these machines should be able to communicate with us using our language. That’s why speech recognition is a perspective and significant area of artificial intelligence and machine learning.
Today, many large companies provide APIs for performing different machine learning tasks. Speech recognition is not an exception. You don’t have to be the expert in natural language processing to use these APIs. Usually, they provide a convenient interface. All you need to do is to send an HTTP request with required content to the API’s server. Then you will receive the response with completed tasks. This approach is useful when you don’t need something special. In other words, if your problem is standard and well-known. The one more advantage of this way is that you can save such valuable resources as time and money.
Nevertheless, there are many situations where you cannot use API and need to develop speech recognition system from scratch. This way is rather complex, it requires many efforts and resources, but as a result, you can create a system that will be ideally compatible with your needs. Also, it is possible to improve the quality of the results if you build the algorithms by yourself. Anyway, it is good to know about APIs. You can understand what each API can do, what pros and cons they have and so on. So, you will be able to detect, when you should use API (and what API) and when you should think about your own system. In this article, we want to compare the most popular APIs which can work with human speech.
There are two main tasks in speech processing. First one is to transform speech to text. The second is to convert the text into human speech. Here is a list of some popular APIs for speech processing:
- Google Cloud Speech API
- IBM Watson Speech to Text
- IBM Watson Text to Speech
- Microsoft Azure Bing Speech API
- Amazon Transcribe
- Amazon Polly
There are some other less-known products which can work with speech:
- VoxSigma API
- Twilio Speech Recognition
- Speechmatics ASR
- Nexmo Voice API
We will describe the general aspects of each API and then compare their main features in the table.
Google Cloud Speech API
Google Cloud Speech API is a part of Google Cloud infrastructure. It allows converting human speech into text. This API supports more than 110 languages. The system supports customization in the form of providing the list of possible words to be recognized (this thing is especially useful if you want to use speech recognition in some devices or other situations where the list of possible words is limited). API can work both in batch and real-time modes. It is stable against side noises in the audio. For some languages the filter for inappropriate words is available. The system is built using deep neural networks and can be improved over time. The files you want to process can be directly fed to the API or be stored on the Google Cloud Storage.
The price is flexible. Up to 60 minutes of the processed audio is free for each user. If you want to process more than 60 minutes, you should pay 0.006 USD per 15 seconds. It is interesting that the total monthly capacity is limited to 1 million minutes of audio.
IBM Watson Speech to Text
IBM Watson Speech to Text is a service provided by IBM Watson that can convert human speech into text. IBM Watson supports customization not only for specific words dictionary but also for the particular acoustic condition. So, you can adapt the system to the environment where you are planning to use it. The main flaw of the IBM Watson Speech to Text is the very small amount of supported languages. Furthermore, the custom models are available for even fewer number of languages. At the moment, such functions as keywords spotting and labeling of speakers are available in beta version. When they are merged with the master version, this allows identifying different speakers for English, Spanish and Japanese languages. Keywords spotting allows detecting the user-defined strings directly from the speech. Other useful functions available in the IBM Watson Speech to Text are word alternatives (in beta), word confidence, word timestamps, profanity filtering, smart formatting for phone numbers, dates, currency, etc. (in beta). You can become familiar with the supported audio file formats in the documentation.
There are three levels of access to the service. The standard level provides free access for the first 1000 minutes of processed audio per month. Then, the flexible per minute prices are used. They depend on the number of minutes you want to process (Graduated Tiered Pricing). If you’re going to use customization models, you will have to pay 0.03 USD in addition to the Standard level prices. To use Premium level, you should contact the IBM to agree on the details.
IBM Watson Text to Speech
Similarly to the speech-to-text task, IBM Watson provides a service for performing text-to-speech task. IBM Watson Text to Speech tool fits this task perfectly well.
The system produces high-quality audio files from the input texts. It can recognize some abbreviations and numbers. For example, it can pronounce “United States Dollars” when it meets “USD” abbreviation in the text. The API can detect the tone of the sentence (question, for example). You can choose the expressiveness of the voice (GoodNews, Apology, Uncertainty). Also, there are available such voices as Young, Soft, Male, Female. However, expressiveness and different types of voices are currently available only for English language. Word timing feature allows synchronizing the text streaming and the voice accompanying. The service can produce audio files with different formats. You can read more about supported formats in the documentation.
Pricing depends on the level of usage. If you want Premium level, you should contact IBM to agree on the details of the price and usage. If using Standard level is sufficient, the conditions are as follows. First 1 million characters of processed text per month are free. If you need to process more characters, you will need to pay 0.02 USD per 1000 characters. All languages and voices are available in the Standard level.
Microsoft Azure Bing Speech API
Microsoft Azure Bing Speech API is a component of the Microsoft Azure cloud services allowing to solve two tasks simultaneously: speech-to-text converting as well as text-to-speech converting.
The speech-to-text task in Azure Bing Speech API allows real-time processing, customization, text formatting, profanity filtering, text normalization. It also supports different scenarios (conditions of speaking) like interactive, conversation or dictation. Integration with the Azure LUIS is available. Azure LUIS allows extracting intent from the text as well as main entities.
Text-to-speech feature allows tuning of different voice parameters: gender, volume, pitch, pronunciation, speaking rate, prosody contour. The system can detect and process some words in a specific manner. For example, it can recognize the money amount expressed in floating point number and convert this to the words where “cents” are present.
It is free to use this API if you want to perform up to 5000 transactions per month. If you need more, you should pay 4 USD for every 1000 transactions.
Amazon Transcribe
Amazon Transcribe is a part of the Amazon Web Services infrastructure. You can analyze your audio documents stored in the Amazon S3 service and get the text made from the audio.
Amazon Transcribe can add punctuation and text-formatting. Another valuable function provided by this service is the support for telephony audio. It is because the audio from the phone conversations often has low quality. So, the developers of Amazon Transcribe considered, that they have to process this type of audio in a specific way. The system adds timestamps for each word in the text. So, you will be able to match each word in the text to the corresponding place in the audio file. It is expected that the API will be able to recognize multiple speakers and label their voices in the text soon. Creating custom words also should be available in a short time. Users will be able to explicitly add, for example, names of their products, or some other specific words.
There is a Free Tier in pricing: you can use the service for free during the first 12 months after registration (max 60 minutes of audio per month). After this period, you will need to pay 0.0004 USD per second of processed audio.
Amazon Polly
Amazon Polly is a service that allows text-to-speech conversion both in batch and real-time modes. It is also a part of the Amazon Web Services infrastructure.
Amazon Polly not only converts text to speech but also allows to tune some speech parameters. For example, you can set up different voices (gender), volume, pronunciation, the speed of the speech, pitch and some others properties.
Pricing is flexible. The Free Tier is available during the first 12 months, but you will be able to process not more than 5 million characters per month. The Pay-As-You-Go model is an alternative. You will have to pay 4 USD per 1 million characters processed.
VoxSigma API
VoxSigma API for speech to text converting is a product of Vocapia Research company. This company is specialized in the area of speech and language technology. VoxSigma API can not only convert the input speech into text but also perform language identification and speech-text alignment. Other interesting features of the API is that it can add punctuation to the output text, compute the confidence score for the output. Also, VoxSigma API can process numerical and some other entities (like, for example, currencies) in a unique way. It is possible to customize the available language model, but for this purpose, you have to contact the company and talk with them directly.
The company proposes several usage plans. The most popular method is pay-as-you-go. According to this plan, you will have to pay 0.01 USD (or EUR) per minute. It is interesting that they take into account only the places on the input audio where some speech is present. In other words, if your input audio has some silent places, the duration of these places will be deducted while computing the total cost. The free trial period is also available, but for this purpose you need to contact the company directly.
Twilio Speech Recognition
Twilio Speech Recognition is available as a component of the Twilio Flex platform. This is an API for contact centers with full-stack programmability. Maybe due to the fact that this is not a standalone application Twilio Speech Recognition proposes not so many features as some others speech recognition APIs. It provides real-time mode and profanity filtering. Thus, for example, some words from the obscene language can be detected, and asterisks will replace all but the first character. It really can be useful when used by the contact centers.
The service can be used on pay-as-you-go conditions. You will need to pay 0.02 USD per 15 seconds of processed audio.
Speechmatics ASR
Speechmatics ASR is a set of several services providing both batch and real-time modes for converting speech to text. They are specialized in English enabling recognition of different dialects of English all over the world. Nevertheless, many other languages are also available. Other useful features available in Speechmatics ASR are confidences scores and timing information for each word in the transcription, as well as providing information about sentences boundaries.
The price for using cloud services is 0.06 GBP per 1 minute of processed audio. If you buy more than 1000 GBP, you can get the discount and pay 0.05 GBP per minute.
Nexmo Voice API
Nexmo Voice API is not a standalone API. You can use it for calling. For example, if you want to call someone, you can use Nexmo Voice API to convert text to speech. Nexmo is the company that provides services for programmable communication. The set of available features is not very rich. It includes only the possibility to change the gender of voice (male or female) as well as to change the accent of the speech.
The prices depend on the country to which you want to make a call, and also depends on whether is it the mobile or landline phone. Pricing is carried out on a per-minute basis.
Now, we will compare the main features of these APIs for each task, so you can choose something that is compatible with your needs.
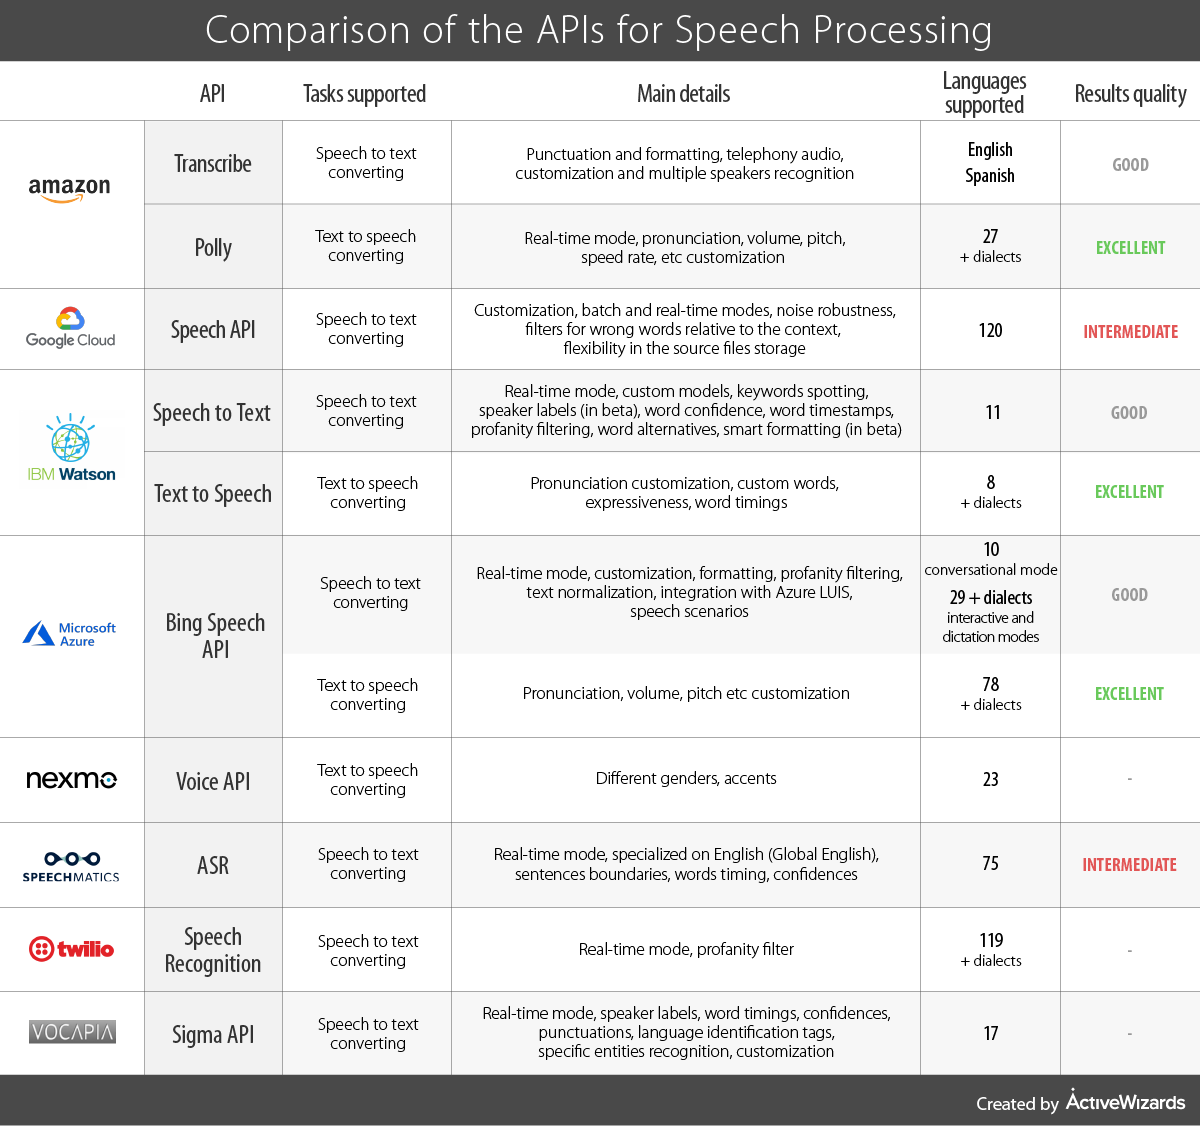
Conclusion
In this article, we have analyzed the key characteristics of different APIs performing text-to-speech and speech-to-text tasks. Using these modern technologies communication becomes much more natural and productive.
To facilitate the process of selecting the API that would perfectly meet your needs we have completed a table highlighting the crucial features of such APIs. Based on our experience, all these APIs proved its efficiency under various conditions. Hopefully, the results of our field research will be helpful for you and will save your time.
MMS • RSS
Article originally posted on InfoQ. Visit InfoQ

Key Takeaways
- For a modest amount of effort, a CloudFormation template can be made flexible and powerful by using parameters and conditions.
- Mappings can be used to conditionally select values from a lookup table
- Outputs can be used to clearly designate specific stack resources to other stacks.
- Teams can use exported outputs as inter-team communications
In part one of this article, we looked at how to use Infrastructure as Code, and CloudFormation in particular, to create and maintain an AWS VPC. The CloudFormation template we created provides a simple, reusable artifact we can use any time we need to create a simple VPC.
However, this template is not as flexible as it can be. We would like to have a template that can build a VPC with a varying number of subnets to handle development vs test vs production usage. We would like something that could create public-only subnets if we needed to quickly create something for demo / POC purposes. Or we might wish to use a NAT instance instead of a NAT gateway.
Instead of creating separate templates for these cases, we can make our existing template more flexible by using Parameters, Conditions, Mappings, and Outputs. Since this is the second article in the series, you should probably acquaint yourself with the original article and template. I’ll deliver this narrative from the perspective of taking the original template and enhancing it.
Cut to the Chase: The source code CloudFormation template described by this article is found here on GitHub. Feel free to download, modify, and use this template however you like (though I will not accept liability for misuse).
Variable Number of Subnets / AZs
Availability Zones: AWS has made it easy and inexpensive to take advantage of multiple Availability Zones (AZs) within a given region. For an overly simplistic explanation, you can think of an Availability Zone as a huge independent datacenter. AZs within a region are connected to each other by high-speed, low-latency, privately operated links. They are close enough to each other to support synchronous communications, but far enough apart to mitigate the effect of natural disasters, power outages, etc. Exactly how far apart is not disclosed, and not really relevant.
Two AZs is a good number to achieve basic high-availability at minimum cost. But sometimes a single AZ is better for simple cases like demos or POC’s. Other times three is desired for marginally improved high availability, or to make better use of the spot market. So let’s adjust the template to make the number of AZ’s variable.
Using the template from article 1, add the following section above the “Resources” section.
Parameters:
  NumberOfAZs:
    Type: Number
    AllowedValues:
    - 1
    - 2
    - 3
    Default: 2
    Description:  How many Availability Zones do you wish to utilize?
YAML Basics: In YAML, indentation with double spaces indicates hierarchy (no tabs!). The dash character “-“ is YAML syntax for defining a ‘sequence’, multiple values belonging to the same group. The parameters section is commonly placed above the resources section, but technically it can reside anywhere in the template.
NumberOfAZs: This entry defines an input parameter for the template. When creating a stack using this template within the AWS Management Console, the UI will prompt you to enter “NumberOfAZs” with the given description near the field. Since we’ve provided “AllowedValues”, the input field will be a drop-down box with the choices of 1, 2, and 3. The value 2 will be used if we make no other selection. The valid types of parameters is defined here, we could have used Number or String in this case.
One goal we should pursue is the ability to use this single template to create a stack in any region we like. At the time of this writing, most regions now have a minimum of three availability zones, but some do not (Montreal, Mumbai, Beijing, Seoul only have two). Selecting three AZs in these regions will result in an error. Whether it is worthwhile to limit the template’s flexibility to eliminate an awkward error in the minority case is for you to decide.
CLI usage: When creating a stack via the AWS command line interface (CLI), input parameters still have purpose. We can supply a value for this parameter if we like, or simply take the default value. Providing an input value outside the allowed set will result in an error.
Now that we have a way to specify the desired number of AZ’s, we need to alter the rest of the template to have CloudFormation build the subnets to match what we want.
Conditions Section
In order to have CloudFormation build one, two, or three subnets, we will define some “Conditions” that can be used in the resources section. Add this code below the Parameters section and above the Resources section:
Conditions:
  BuildPublicB:         !Not [ !Equals [ !Ref NumberOfAZs, 1 ]]
  BuildPublicC:         !Equals [ !Ref NumberOfAZs, 3 ]
Conditions are boolean (true/false) expressions that we will use elsewhere in the template. Here we are creating two, one indicating if we want to build the “B” subnets, one indicating if we want to build the “C” subnets. Since “1” is the minimum number allowed by NumberOfAZs, we will always build the “A” subnets.
BuildPublicB: This expression is checking if the selected NumberOfAZs is anything other than 1. Since we don’t have greater than, less than intrinsic functions in CloudFormation, we will use the !Equals function to reference the input parameter and check its equality to “1”. The !Not is negating that result (false becomes true, true becomes false). The resulting boolean is stored in BuildPublicB were it can be referred to elsewhere in the template.
BuildPublicC: This expression is simpler, the NumberOfAZs is either “3” (our maximum allowed) or not. We will only build our PublicSubnetC if this is true.
Now that we have clearly defined conditions about which subnets to create, we can use these to affect the creation of the actual resources.
The Condition Attribute
In the original template from article 1, we created PublicSubnetB with this code:
  PublicSubnetB:
    Type: AWS::EC2::Subnet
    Properties:
      VpcId: !Ref VPC
      CidrBlock: 10.1.20.0/24
      AvailabilityZone: !Select [ 1, !GetAZs ]    # Get the second AZ in the list
      Tags:
      - Key: Name
        Value: !Sub ${AWS::StackName}-Public-B
Now notice the replacement code below, specifically the new “Condition” attribute:
PublicSubnetB:
    Type: AWS::EC2::Subnet
    Condition: BuildPublicB
    Properties:
      VpcId: !Ref VPC
      CidrBlock: 10.1.20.0/24
      AvailabilityZone: !Select [ 1, !GetAZs ]    # Get the second AZ in the list
      Tags:
      - Key: Name
        Value: !Sub ${AWS::StackName}-Public-B
The condition attribute is an available option on any CloudFormation resource. Essentially it is saying, “only create this resource if the BuildPublicB condition is true”. When it is false, the entire resource is bypassed during stack creation – there will be no PublicSubnetB.
While we are here, let’s add a third public subnet, but only if the BuildPublicC condition allows it:
 PublicSubnetC:
   Type: AWS::EC2::Subnet
   Condition: BuildPublicC
   Properties:
     VpcId: !Ref VPC
     CidrBlock: 10.1.30.0/24
     AvailabilityZone: !Select [ 2, !GetAZs ]    # Get the third AZ in the list
     Tags:
     - Key: Name
       Value: !Sub ${AWS::StackName}-Public-C
You may wonder if there is a way to express the condition in-line on the resource rather than using the separate “Conditions” section. At the time of this writing there is not. But after writing many templates, I’ve come to appreciate the simple decoupling of the logical expression calculation from its usage. After all, these templates can become quite complex with in-line expressions, such as the ones you see here for AvailabilityZone or the Tag/Value.
Last step, the subnet to route table associations must be adjusted for the varying number of public subnets. Note the use of the condition attributes in the following:
  PublicSubnetBRouteTableAssociation:
    Type: AWS::EC2::SubnetRouteTableAssociation
    Condition: BuildPublicB
    Properties:
      SubnetId: !Ref PublicSubnetB
      RouteTableId: !Ref PublicRouteTable
  PublicSubnetCRouteTableAssociation:
    Type: AWS::EC2::SubnetRouteTableAssociation
    Condition: BuildPublicC
    Properties:
      SubnetId: !Ref PublicSubnetC
      RouteTableId: !Ref PublicRouteTable
Not shown is the association for PublicSubnetA. Since it is always present in the stack it requires no conditional attribute. Likewise, the PublicRouteTable itself is always needed. At this point, our stack will create one, two, or three public subnets based on our input parameter. Let’s look at the private subnets…
Private Subnets.
Let’s imagine we’d like to use the VPC produced by this template for some quick public-facing demos. Having private subnets or a NAT in such a VPC would be overkill, and would take longer to create, so let’s add a parameter to allow us to designate public-only subnets. In the “Parameters” section add:
  PrivateSubnets:
    Type: String
    AllowedValues:
    - True
    - False
    Default: True
    Description: Do you want to create private subnets in addition to public subnets?
Here we are defining an input parameter to control whether any private subnets are created. I wish CloudFormation provided a “Boolean” input type for yes/no cases like this, but we’ll have to make do with a String that accepts only “True” or “False”.
Let’s add these conditions inside the Conditions section to act on the input value; this is going to get a bit complicated:
  BuildPrivateSubnets: !Equals [ !Ref PrivateSubnets, True ]
  BuildPrivateA:       !Equals [ !Ref PrivateSubnets, True ]
  BuildPrivateB:       !And[!Not[!Equals[!Ref NumberOfAZs,1]],!Equals[!Ref PrivateSubnets,True]]
  BuildPrivateC:       !And[!Equals[!Ref NumberOfAZs,3],!Equals[!Ref PrivateSubnets, True]]
BuildPrivateSubnets: This is a clear, succinct condition that directly expresses the input parameter. There are a few spots where we will build something based on whether there are any private subnets at all (i.e. the NAT)
BuildPrivateA: A synonym for “BuildPrivateSubnets”. Not strictly necessary, but you’ll see how clean the resulting code is when we are done. It’s a bit of a shame that we can’t reference a condition from another condition, that would allow a nice way to break down complex logic.
BuildPrivateB: The logic here is saying “Only build PrivateSubnetB if 1) we want to use more than one AZ, and if 2) we want to build private subnets”
BuildPrivateC: The logic here: “Only build PrivateSubnetC if 1) we want to utilize three AZ’s, and if 2) we want to build private subnets”.
Now we can convert the private subnet definitions from our original template to use condition attributes, like this:
  PrivateSubnetA:
    Type: AWS::EC2::Subnet
    Condition: BuildPrivateA
    Properties:
      VpcId: !Ref VPC
      CidrBlock: 10.1.50.0/24
      AvailabilityZone: !Select [ 0, !GetAZs ]    # Get the first AZ in the list
      Tags:
      - Key: Name
        Value: !Sub ${AWS::StackName}-Private-A
  PrivateSubnetB:
    Type: AWS::EC2::Subnet
    Condition: BuildPrivateB
    Properties:
      VpcId: !Ref VPC
      CidrBlock: 10.1.60.0/24
      AvailabilityZone: !Select [ 1, !GetAZs ]    # Get the second AZ in the list
      Tags:
      - Key: Name
        Value: !Sub ${AWS::StackName}-Private-B
  PrivateSubnetC:
    Type: AWS::EC2::Subnet
    Condition: BuildPrivateC
    Properties:
      VpcId: !Ref VPC
      CidrBlock: 10.1.70.0/24
      AvailabilityZone: !Select [ 2, !GetAZs ]    # Get the third AZ in the list
      Tags:
      - Key: Name
        Value: !Sub ${AWS::StackName}-Private-C
Again, the only modification from our starting template is the addition of the Condition attributes. Plus, we have added PrivateSubnetC, which was relatively easy to clone from the definitions of PrivateSubnetA and PrivateSubnetB.
The subnet route table associations will require modification. There is no need for a subnet association if there is no subnet:
  PrivateSubnetARouteTableAssociation:
    Type: AWS::EC2::SubnetRouteTableAssociation
    Condition: BuildPrivateA
    Properties:
      SubnetId: !Ref PrivateSubnetA
      RouteTableId: !Ref PrivateRouteTable
  PrivateSubnetBRouteTableAssociation:
    Type: AWS::EC2::SubnetRouteTableAssociation
    Condition: BuildPrivateB
    Properties:
      SubnetId: !Ref PrivateSubnetB
      RouteTableId: !Ref PrivateRouteTable
  PrivateSubnetCRouteTableAssociation:
    Type: AWS::EC2::SubnetRouteTableAssociation
    Condition: BuildPrivateC
    Properties:
      SubnetId: !Ref PrivateSubnetC
      RouteTableId: !Ref PrivateRouteTable
The NAT Gateway.
Since our template now conditionally creates the private subnets, we need to adjust our NAT Gateway and RouteTable entries accordingly. First, the NAT Gateway; there is no longer a reason to create it or its associated Elastic IP Address if we do not wish to build private subnets:
 # A NAT Gateway will be built and used if the user selected Private subnets and a Gateway instead of an EC2 instance.
 NATGateway:
   Type: AWS::EC2::NatGateway
   Condition: BuildPrivateSubnets
   Properties:
     AllocationId: !GetAtt ElasticIPAddress.AllocationId
     SubnetId: !Ref PublicSubnetA
     Tags:
     - Key: Name
       Value: !Sub NAT-${AWS::StackName}
 ElasticIPAddress:
   Type: AWS::EC2::EIP
   Condition: BuildPrivateSubnets
   Properties:
     Domain: VPC
The only change from our original template is the Condition attributes; we only wish to build these if we have chosen to build private subnets.
Next, the condition may indicate we won’t need the private route table or its entry:
 # Here is a private route table:
 PrivateRouteTable:
   Type: AWS::EC2::RouteTable
   Condition: BuildPrivateSubnets
   Properties:
     VpcId: !Ref VPC
     Tags:
     - Key: Name
       Value: Private
 PrivateRoute1:            # Private route table can access web via NAT (created below)
   Type: AWS::EC2::Route
   Condition: BuildPrivateSubnets
   Properties:
     RouteTableId: !Ref PrivateRouteTable
     DestinationCidrBlock: 0.0.0.0/0
     # Route traffic through the NAT Gateway:
     NatGatewayId: !Ref NATGateway
At this point, our stack will bypass creation of any private subnets, route tables, or NATs when “BuildPrivateSubnets” is false. Our template has the ability to create between one and six subnets based on parameter input. Pretty flexible, and really not that much work to achieve this.
Optional: NAT Type
For further flexibility, let’s have our template provide an alternative to the NAT Gateway. The built-in managed service is great for production use, but we might find it a bit expensive for POC’s. In the days before NAT Gateways, we used regular EC2 instance configured to provide NAT support, and there are advantages and disadvantages either way. So in the name of experimentation, let’s add a parameter to allow this choice:
  NATType:
    Type: String
    AllowedValues:
    - "EC2 NAT Instance"
    - "NAT Gateway"
    Default:  "NAT Gateway"
    Description:  What type of NAT to use for private instances to communicate with the internet.  A single EC2 instance can be used as a NAT, or you can use the AWS NAT Gateway (managed, scalable, more expensive).  This setting will be IGNORED if you do not build private subnets.
…and some additions to the Conditions section:
  BuildNATGateway:  !And[!Equals[!Ref PrivateSubnets,True],!Equals[!Ref NATType, "NAT Gateway"]]
  BuildNATInstance: !And[!Equals[!Ref PrivateSubnets,True],!Equals[!Ref NATType, "EC2 NAT Instance"]]
The first statement is essentially, “Build a NAT Gateway if 1) we have chosen to build private subnets, and if 2) we have chosen to build a NAT Gateway”. The second is “Build an EC2 instance to serve as a NAT if 1) we have chosen to build private subnets, and if 2) we have opted to use an EC2 instance for NAT”.
Our NAT Gateway / Elastic IP Address conditions described earlier will require adjustment, we now want to control their creation based on the BuildNATGateway condition:
 # A NAT Gateway will be built and used if the user selected Private subnets and a Gateway instead of an EC2 instance.
 NATGateway:
   Type: AWS::EC2::NatGateway
   Condition: BuildNATGateway
   Properties:
     AllocationId: !GetAtt ElasticIPAddress.AllocationId
     SubnetId: !Ref PublicSubnetA
     Tags:
     - Key: Name
       Value: !Sub NAT-${AWS::StackName}
 ElasticIPAddress:
   Type: AWS::EC2::EIP
   Condition: BuildNATGateway
   Properties:
     Domain: VPC
The EC2 based NAT instance will require some new construction. First, our EC2 instance will require an AMI, but the value for AMI ID will vary by which region we are running in. To allow this single template to be used in any region, add the following Mappings section to your template before the Condition section (though technically sections can be located in any order, and some people like to put this one near the bottom):
Mappings:
 #  This is the Amazon Linux 2 AMI.  Adjust these values as needed, they can change a few times per year:
 AmazonLinuxAMI:
   us-east-1:
     AMI: ami-04681a1dbd79675a5    # N Virginia
   us-east-2:
     AMI: ami-0cf31d971a3ca20d6    # Ohio
   us-west-1:
     AMI: ami-0782017a917e973e7    # N California
   us-west-2:
     AMI: ami-6cd6f714             # Oregon
   eu-west-1:
     AMI: ami-0bdb1d6c15a40392c    # Ireland
   eu-central-1:
     AMI: ami-0f5dbc86dd9cbf7a8    # Frankfurt
   sa-east-1:
     AMI: ami-0ad7b0031d41ed4b9    # Sao Paulo
   ap-southeast-1:
     AMI: ami-01da99628f381e50a    # Singapore
   ap-southeast-2:
     AMI: ami-00e17d1165b9dd3ec    # Sydney
   ap-northeast-1:
     AMI: ami-08847abae18baa040    # Tokyo
This mapping section defines the AMI ID value for the Amazon Linux 2 OS. The ID value varies according to the region the stack is being created in. In a bit we will see how this mapping table is used when we define the EC2 instance resource. But before moving on there are some important points to mention: 1) comments are your friend, 2) I didn’t provide values for every region, 3) these values are current as of this article’s publish date, from time to time the EC2 team will publish new, improved versions of the AMI which you should probably use.
It wasn’t hard to find these values. I simply used the EC2 instance creation wizard in the AWS management console. Once I reached the AMI selection page, I used the region selection to pop around the globe collection values. I should also point out that there are more advanced techniques which supplant the need to have any mapping table (e.g. a Parameter Store lookup or CloudFormation custom resource backed by a Lambda function), but I did not want to complicate this article too much.
Next, our EC2 instance will need a Security Group:
  # A security group for our NAT.  Ingress from the VPC IPs only.  Egress is TCP & UDP only:
  NATSecurityGroup:
    Type: AWS::EC2::SecurityGroup
    Condition: BuildNATInstance
    DependsOn: AttachGateway
    Properties:
      GroupName: !Sub NATSecurityGroup-${AWS::StackName}
      GroupDescription: Enable internal access to the NAT device
      VpcId: !Ref VPC
      SecurityGroupIngress:
      - IpProtocol: tcp
        FromPort: '0'
        ToPort: '1024'
        CidrIp: !GetAtt VPC.CidrBlock
      SecurityGroupEgress:
      - IpProtocol: tcp
        FromPort: '0'
        ToPort: '65535'
        CidrIp: 0.0.0.0/0
      - IpProtocol: udp
        FromPort: '0'
        ToPort: '65535'
        CidrIp: 0.0.0.0/0
To keep this article brief I’m not going to explain all of the complexities here, but the summary is:
- We only create this if the condition for BuildNATInstance is true.
- We don’t want to attempt to create this until after the Internet Gateway is attached to the VPC (see previous article)
- The Security Group’s name will be based on the name of our CloudFormation stack (see previous article)
- The Security Group only allows inbound traffic from the VPC’s own internal address range. Only private IPs within the VPC can send traffic to our NAT.
- Outbound traffic can be TCP or UDP based, and can go basically anywhere.
- See the AWS::EC2::SecurityGroup for full information on this resource.
Next, the EC2 instance:
  # A NAT Instance will be used if the user selected Private subnets and EC2-based NAT.
  NATInstance:
    Type: AWS::EC2::Instance
    Condition: BuildNATInstance
    DependsOn: PublicRoute1                           # Must have route to IGW established.
    Properties:
      ImageId: !FindInMap [ AmazonLinuxAMI, !Ref "AWS::Region", AMI]  # lookup from AMI map
      InstanceType: t2.small                          # Any instance type is fine
      NetworkInterfaces:
      - DeviceIndex: '0'
        SubnetId: !Ref PublicSubnetA                  # Any public subnet is fine
        AssociatePublicIpAddress: true                # We will need a public IP address
        GroupSet: [!Ref NATSecurityGroup]             # Plug in the security group
      SourceDestCheck: false  # NATs don't work if EC2 matches source with destinations.
      Tags:
      - Key: Name
        Value: !Sub NAT-${AWS::StackName}
      UserData:      #  This code is NAT code.  Last line signals completion:
        Fn::Base64: !Sub |
          #!/bin/bash
          yum -y update
          yum install -y aws-cfn-bootstrap
          echo 1 > /proc/sys/net/ipv4/ip_forward
          echo 0 > /proc/sys/net/ipv4/conf/eth0/send_redirects
          /sbin/iptables -t nat -A POSTROUTING -o eth0 -s 0.0.0.0/0 -j MASQUERADE
          /sbin/iptables-save > /etc/sysconfig/iptables
          mkdir -p /etc/sysctl.d/
          cat << NatConfFileMarker > /etc/sysctl.d/nat.conf
          net.ipv4.ip_forward = 1
          net.ipv4.conf.eth0.send_redirects = 0
          NatConfFileMarker
          /opt/aws/bin/cfn-signal -e 0 --resource NATInstance --stack ${AWS::StackName} --region ${AWS::Region}
    # This NATInstance is only complete when you get 1 signal back within 5 minutes'.
    CreationPolicy:
      ResourceSignal:
        Count: 1
        Timeout: PT5M
Briefly:
- Condition: We will only build this instance if BuildNATInstance is true.
- DependsOn: We won’t attempt to build this until PublicRoute1 is completely built, i.e. we must be connected to the internet. This will be critical to allow the “yum” command in UserData run as expected (below)
- ImageID: The AMI to use comes from the mapping table established earlier. “AWS::Region” is a pseudo parameter which always tells us the region the stack is being created in. Essentially, we are asking CloudFormation to look up the region in the mapping table and use the resulting AMI.
- SubnetId: We are placing this EC2 NAT instance in a public subnet to facilitate the outbound communications. It is a bit simplistic to use a single NAT instance in a single public subnet like this, but the main intent of this article is to demonstrate basic flexibility, not exhaustive coverage of best practices. Feel free to adjust and improve.
- AssociatePublicIPAddress: The NAT needs a public IP address to converse with parties on the public internet.
- GroupSet: The NAT is associated with the security group defined earlier. This parameter requires a list of security groups, not a single value. So the square brackets “[ ]” are added to coerce the single value into a list structure.
- SourceDestCheck: This tells EC2 to bypass the normal checks it makes to ensure that the instance is either the source or destination of any traffic it receives, which is not the case for a NAT. The simple explanation is this is something we must do for NAT to work. See source / destination check for a more in-depth explanation.
- UserData: The Linux script you see here establishes the NAT capability. A full explanation of this script is beyond the scope of this article. The !Sub intrinsic function looks for ${} expressions and substitutes them. such as the ${AWS::StackName}. The final line of the script, cfn-signal is a CloudFormation specific function which signals the CloudFormation stack when the script is complete
- Fn::Base64: !Sub: A UserData script must be Base64 encoded, which is easy to do with the Fn::Base64 intrinsic function. Ordinarily I would use !Base64 shortcut syntax, but I also need to use the !Sub intrinsic function to replace placeholders in the script. Using the !Sub within !Base64 is valid Cloud Formation, but is not valid YAML, so we have to use the full function name for the outer function. Ugh.
- CreationPolicy: Ordinarily, CloudFormation considers a resource to be completely created when the underlying service says it is created. For EC2 instances, this is essentially when the operating system has begun starting up. However, in order for this EC2 NAT instance to be usable by anyone else in this stack, the User Data script needs to have finished. The CreationPolicy is essentially saying “this resource is not actually complete until we receive one signal (from the cfn-signal command) within 5 minutes”
Whew! that’s a lot! But the beauty of CloudFormation, or Infrastructure as Code in general, is that I only need to write this once. See AWS::EC2::Instance for full details on all of these settings.
Finally, we will need to adjust the PrivateRoute we built earlier. We will need to route outbound traffic to the NAT Gateway OR the NAT Instance, depending on which one was created:
PrivateRoute1:            # Private route table can access web via NAT (created below)
   Type: AWS::EC2::Route
   Condition: BuildPrivateSubnets
   Properties:
     RouteTableId: !Ref PrivateRouteTable
     DestinationCidrBlock: 0.0.0.0/0
     # If we are using a NAT Instance, route traffic through the NAT Instance:
     InstanceId:   !If [ BuildNATInstance, !Ref NATInstance, !Ref "AWS::NoValue" ]
     # Otherwise if we are using a NAT Gateway, route traffic through the NAT Gateway:
     NatGatewayId: !If [ BuildNATGateway, !Ref NATGateway, !Ref "AWS::NoValue" ]
Notice the InstanceId and NatGatewayId properties, according to the AWS::EC2::Route documentation they are mutually exclusive. The InstanceId is used in cases where we are routing traffic to an EC2 instance. The !If intrinsic function is only setting this value to the NATInstance if we have chosen to BuildNATInstance. The AWS::NoValue is more than it would appear, not only is it saying there is no value to set, but CloudFormation understands this to mean that there is no need to set this attribute at all. The mirror logic on NatGatewayId sets the value to NATGateway if we have chosen to BuildNATGateway. Since the conditions are mutually exclusive, only one of these is set, and our outbound traffic will use the NATInstance or the NATGateway, ultimately based on our original input decision.
Optional: Template Metadata
One other adjustment we can make on our revised template is cosmetic. We would like to control the input order of parameters more closely, prompting for the more essential choices first. To to this, add a Metadata section before the Parameters section (though some people like to put this at the bottom of the template):
Metadata:
 # Control the UI display when running this template from the AWS Management Console:
 AWS::CloudFormation::Interface:
   ParameterGroups:
     - Label:
         default: "Network Configuration"
       Parameters:
         - NumberOfAZs
         - PrivateSubnets
         - NATType
Now when using this template to create a stack via the AWS Management Console, the parameters page will prompt the operator for “Network Configuration”, and present the parameters in the desired order. When using the CLI, this section has no impact.
Outputs
The template we have created is a nice, general purpose template that can be used as the starting point for other CloudFormation stacks that need a VPC. We want to make it easy to provide values from this stack as inputs into other stacks. This is especially relevant in most IT organizations where responsibilities are segmented between teams, and those permitted to manage network resources are not the same as those permitted to build resources which use the network. Providing output values from a stack can be done by creating an Outputs section:
Outputs:
 VPC:
   Description: VPC of the base network
   Value: !Ref VPC
   Export:
     Name: !Sub ${AWS::StackName}-VPC
 PublicSubnetA:
   Description: First Public Subnet
   Value: !Ref PublicSubnetA
   Export:
     Name: !Sub ${AWS::StackName}-PublicSubnetA
 PublicSubnetB:
   Description: Second Public Subnet
   Condition: BuildPublicB
   Value: !Ref PublicSubnetB
   Export:
     Name: !Sub ${AWS::StackName}-PublicSubnetB
 PublicSubnetC:
   Description: Third Public Subnet
   Condition: BuildPublicC
   Value: !Ref PublicSubnetC
   Export:
     Name: !Sub ${AWS::StackName}-PublicSubnetC
 PrivateSubnetA:
   Condition: BuildPrivateSubnets
   Description: First Private Subnet
   Value: !Ref PrivateSubnetA
   Export:
     Name: !Sub ${AWS::StackName}-PrivateSubnetA
 PrivateSubnetB:
   Condition: BuildPrivateB
   Description: Second Private Subnet
   Value: !Ref PrivateSubnetB
   Export:
     Name: !Sub ${AWS::StackName}-PrivateSubnetB
 PrivateSubnetC:
   Condition: BuildPrivateC
   Description: Third Private Subnet
   Value: !Ref PrivateSubnetC
   Export:
     Name: !Sub ${AWS::StackName}-PrivateSubnetC
At its most basic, these output entries display the relevant values on the AWS Management Console / CLI JSON output upon completion of the stack. Notice the inclusion of Conditional attributes to only emit values for resources which we actually created.
The part to notice is the Export/Name. This is producing a region-wide name by which this resource can be referenced from another stack. Using PublicSubnetA as an example, and assuming a stack name of “my-network”, the exported value would be “my-network-PublicSubnetA”. Another stack could use “!ImportValue my-network-PublicSubnetA” to reference this resource as easily as “!Ref” is used within the stack. Often, the initial (base) stack is used as an input parameter, so the stack-name portion can be dynamic, as in:
Fn::ImportValue: !Sub ${BaseStack}-PublicSubnetA
…where “BaseStack” is an input parameter of a secondary stack. Irritatingly, !Sub inside an !ImportValue is invalid YAML, so we have to use the “long form” of the function name, Fn::ImportValue.
The Export/Name / !ImportValue techniques shown here are common in multi-team environments. Each team often needs to reference resources from stacks produced by other teams, and in turn produce resources to be referenced by other stacks. The export names become well-known, dependable points of inter-team communication. Further, CloudFormation keeps track of these inter-stack references to prevent a delete or update of one stack from invalidating dependent resources in another.
Summary
Except for the addition of the EC2 NAT instance option, and the bulky Output section, we’ve only changed a small number of lines from the original template. Parameters and conditions are a compact way to make our template much more capable. We can now create VPCs having from one to six subnets with a variety of permutations possible. The stacks we create can be referenced by other stacks in a highly organized and reliable way. But even more amazing, we can use this template to modify the resulting stack to add or remove subnets, such as when an initial POC grows to become a trial deployment. You can expand upon the techniques here to make this template more sophisticated, such as a VPC with only private subnets.
About the Author
Ken Krueger‘s professional mission statement is “guiding organizations and individuals toward commercial success through the application of modern technology”. He has over has 30 years of experience as a software developer, project leader, project manager, scrum master and instructor spanning the mainframe, client-server, and web eras. He is heavily experienced in Java, Spring, SQL, web development, cloud, and related technologies. Industry experience includes telecommunications, finance, real estate, retail, power generation, shipping, hospitality, and software development. He has an MIS degree from the University of South Florida, an MBA from the Crummer Graduate School of Business at Rollins College, plus scrum master, PMP, AWS, and Java certifications.