Month: April 2019

MMS • RSS
Article originally posted on Data Science Central. Visit Data Science Central
Introduction
Good data management practices are essential for ensuring that research data are of high quality, findable, accessible and have high validity. You can then share data ensuring their sustainability and accessibility in the long-term, for new research and policy or to replicate and validate existing research and policy. It is important that researchers extend these practices to their work with all types of data, be it big (large or complex) data or smaller, more ‘curatable’ datasets.
In this blog, we are going to understand about the data curation. Furthermore, we will be looking into many other advantages which data curation will bring to the big data table.
What is Data Curation?
Curation is the end-to-end process of creating good data through the identification and formation of resources with long-term value. In information technology, it refers mainly to the management of data throughout its lifecycle, from creation and initial storage to the time when it is archived for future research and analysis, or becomes obsolete and is deleted. The goal of data curation in the enterprise is twofold: to ensure compliance and that data can be retrieved for future research or reuse
Why Do You Need Data Curation?
Organizations invest heavily in big data analytics — $44 billion in 2014 alone, according to Gartner; yet, studies show that most organizations use only about 10% of their collected data, data that remains scattered in silos and varied sources across the organization. With data volumes growing exponentially, along with the increasing variety and heterogeneity of data sources, getting the data you need ready for analysis has become a costly and time-consuming process. Multiple data sets from different sources must first be catalogued and connected before they can be used by various analytics tools. Duplicate data and blank fields need to be eliminated, misspellings fixed, columns split or reshaped, and data need to be enriched with data from additional or third party sources to provide more context.
1. Effective Machine Learning
Machine Learning algorithms have made great strides towards understanding the consumer space. AI consisting of “neural networks” collaborate, and can use Deep Learning to recognize patterns. However, Humans need to intervene, at least initially, to direct algorithmic behavior towards effective learning. Curations are about where the humans can actually add their knowledge to what the machine has automated. This results in prepping for intelligent self-service processes, setting up organizations up for insights.
2. Dealing with Data Swamps
A Data Lake strategy allows users to easily access raw data, to consider multiple data attributes at once, and the flexibility to ask ambiguous business driven questions. But Data Lakes can end up Data Swamps where finding business value becomes like a quest to find the Holy Grail. Such Data swamps minus well be a Data graveyard. Well data curation here can save your data lakes from becoming the data yards
3. Ensuring Data Quality
Data Curators clean and undertake actions to ensure the long undertake actions to ensure the long-term preservation and retention of the authoritative nature of digital objects.
Steps in Data Curation
Data curation is the process of turning independently created data sources (structured and semi-structured data) into unified data sets ready for analytics, using domain experts to guide the process. It involves:
1. Identifying
One needs to identify different data sources of interest (whether from inside or outside the enterprise) before they start working on a problem statement. Identification of the dataset is as important a thing as solving a problem. Many people underestimate the value of data identification. But, when one does data identification the right way, one can save on a lot of time wastage which can happen while optimizing the solution of the problem
2. Cleaning
Once you have some data at hand, one needs to clean the data. The incoming data may have a lot of anomalies like spelling errors, missing values, improper entries etc. Most of the data is always dirty and you need to clean it before you can start working with it. Cleaning data is one of the most important tasks under data curation. There is almost 200% value addition once data is in the right format
3. Transforming
Data transformation is the process of converting data or information from one format to another, usually from the format of a source system into the required format of a new destination system. The usual process involves converting documents, but data conversions sometimes involve the conversion of a program from one computer language to another to enable the program to run on a different platform. The usual reason for this data migration is the adoption of a new system that’s totally different from the previous one. Data curation also takes care of the data transformation
The more data you need to curate for analytics and other business purposes, the more costly and complex curation becomes — mostly because humans (domain experts, or data owners) aren’t scalable. As such, most enterprises are “tearing their hair out” as they try to cope with data curation at scale.
Roles of a Data Curator
In practice, data curation is more concerned with maintaining and managing the metadata rather than the database itself and, to that end, a large part of the process of data curation revolves around ingesting metadata such as schema, table and column popularity, usage popularity, top joins/filters/queries. Data curators not only create, manage, and maintain data, but may also determine best practices for working with that data. They often present the data in a visual format such as a chart, dashboard or report.
Data curation starts with the “data set.” These data sets are the atoms of data curation. Determining which of these data sets are the most useful or relevant is the job of the data curator. Being able to present the data in an effective manner is also extremely important. While some rules of thumb and best practices apply, the data curator must make an educated decision about which data assets are appropriate to use.
It’s important to know the context of the data before it can be trusted. Data curation uses such arbiters of modern taste as lists, popularity rankings, annotations, relevance feeds, comments, articles and the upvoting or downvoting of data assets to determine their relevancy.
How to Start with Data Curation?
First, companies can inject additional data assessments into their reviews of data with end users that evaluate how data can be used or redirected. One way this can be done is by making data retention reviews a collaborative process across business functions. The collaboration enables users who ordinarily wouldn’t be exposed to some types of data to evaluate if there are ways that this data can be plugged in and used in their own departmental analytics processes.
Second, IT and the business should articulate rules governing data purges. Presently, there is a fear of discarding any data, no matter how useless.
Third, companies should consider adding a data curator, which is a librarian-like curation function, to their big data and analytics staffs.
Summary
Data sets are reusable components — anyone conducting analysis should share and expect data sets that they create to be re-used. Re-usability is key to self-service at scale. Companies such as GoDaddy and eBay have already embraced this approach to harvesting and distributing data for re-use, allowing any user to become a curator of data knowledge and resulting in higher productivity.
Data curation observes the use of data, focusing on how context, narrative, and meaning can be collected around a reusable data set. It creates trust in data by tracking the social network and social bonds between users of data. By employing lists, popularity rankings, annotations, relevance feeds, comments, articles and the upvoting or downvoting of data assets, curation takes organizations beyond data documentation to creating trust in data across the enterprise.
If you want to read more about data science, read our Data Science Blogs
MMS • RSS
Article originally posted on Data Science Central. Visit Data Science Central
I’m frustrated! Being a Technophile poses several problems that seem to go unaddressed by leaders of the “Big Tech” firms. As the big firms such as Apple, Google and Samsung continue to develop impressively beautiful, technologically capable, faster and yes, addictive technologies, consumers are left with solving a very complex problem. That is, “how does one optimize the use and efficacy of their technology devices?” To answer this question, I must share with you that I have yet to solve the problem. However, my use of my desktop, laptop, surface book, iPad, smartphone and smartwatch continues to evolve. The question is “How can I best optimize the use of these various technologies?”

To begin to respond to this question, one has to establish a few premises. First, I am device brand agnostic. I have equal numbers of iOS devices as I do Windows 10 devices and Android devices. I’m certain that this is a result of my background in the Technology industry. I spent quite a few years on Unix platforms as a developer with major firms in Colorado’s technology corridor. In addition to this, my first personal computer was the Commodore Vic 20. This computer inspired me to begin writing code and emulating games such as Space Invaders and Missile Command while in high school. Many years later, I continue to rely on technology to perform tasks for my job, personal business, hobbies and research in mathematics. In fact, there are very few times that I can now state with confidence, that access to a desktop, laptop, iPad, or phone wouldn’t make the task or experience better. For the purpose of this article, we will refer to the aforementioned devices as the acronym DLIP.
I’d like to start by stating that the development of computing technology was anchored in a manner that reflected the problem-solving nature resulting in a move away from dedicated computers in dedicated rooms to becoming portable devices. Because of this, we begin with the desktop.
Desktops
Though many believe that they are well on their way to extinction, desktop computers are still widely used in home offices and businesses as a standard machine for accomplishing a wide variety of tasks. From the graphics demands associated with gaming to surfing the web, these machines have the added advantage of being connected via ethernet and the ability to have connections to large monitors.
In addition to the aforementioned advantages, connectivity to a single large monitor or multi-monitors makes multi-tasking a viable option on desktops. Applications such as Logic Pro and Adobe Premiere take full advantage of the screen real estate. I can also personally attest to the wonderful experience of writing and editing documents that are side-by-side while still having room for surfing the web or monitoring social media. Desktops are also great for gaming and for tasks that require significant computing power. I often rely on my desktop to test algorithms of various kinds, ranging from machine learning to root-finding methods for large-scale systems.
Finally, desktops are the best solution for building a rig that is scalable. If your budget would allow, expect to spend anywhere from $600–$1500 for a good-quality system with a great amount of potential for upgrade modifications in the future.
Laptops
These devices continue to blur the lines between traditional desktops and the mobility of portable devices. Laptops usually range in size from 13 inches and 2.1 lbs. to the 21 inch, 17.6 lbs. clamshell monstrosity known as the Acer Predator 21x. The laptop was originally designed to allow for computing on-the-go. Having a 17.6 lb laptop just means that you will go slowly. Nonetheless, laptops are a great option for those who like to change their environment while maintaining their ability to complete complex tasks with a computer. As with size and weight, the capacity of laptops to perform complex and computationally complex task varies widely by manufacturer. Having a full-size keyboard for writing makes a laptop ideal for responding to emails or authoring a variety of documents and/or presentations. For a fine balance of computational capability and mobility, Microsoft’s 15” Surface Book 2 with a 1060 GPU hits the mark without compromising on size and weight.
Mobility may be a significant benefit, however, because of the smaller screen size, a split-screen view is ideal on the larger 15.4 inches. Though for smaller 13.3 inch screens, text is still legible, the posture of the operator is compromised. In the case of the four-screen split-screen option of Windows 10, it’s quite a challenge to justify its effective use other than a single side panel along with two corner panels for monitoring low impact, monitoring tasks or consoles.
2-in-one Hybrids
Surface Pro devices are dominating this category. These devices are best described as more of a laptop than a tablet. As such, their battery power with normal usage ranges from 6–12 hours. However, for tasks that tax the cpu, an average of four hours is still achieved. Screen sizes vary from to 10-12.3 inches. You also have the option of the 1T SSD configuration. These devices were originally designed to compete in the iPad-dominated tablet market. Originally, their value-add was anchored in an exclusive tablet experience with a digital pen. This one technology shifted the tablet market to include inking as a standard feature with the option to purchase a digital pen or pencil.
Again, these devices can be taken and used anywhere for multiple hours. Their cameras are typically not up to the quality levels as modern smartphones such as the iPhones X, Xs, XR or Galaxy S10s. However, having the option to detach the screen and use it as a tablet is a clear added advantage. In particular, if you have a need to edit a document or to review presentations and provide feedback, there is no better tactile workflow that comes close to the experience. However, Microsoft has work to do in improving 3rd-party editing software by imposing standards for inking. For example, when editing documents in the Learning Management System (LMS) Canvas, the experience is clunky and quickly begins to impede the process of effectively commenting on a piece of work.
If you are interested in using these devices for surfing the web or responding to email, stick with the i5 models. However, if you have a need for running algorithms while using these devices, spend the extra money on a quad core, i7 configuration. These devices range in price from: $399 .00— $2300.00 depending on configuration.
Tablets
The Apple iPad continues to dominate this market. Recent moves by apple to release the 11” and 12.9” Pro models along with updates to the 7.9” iPad Mini and 10.5” iPad Air indicate that Apple has no intention on giving up market share. So, what’s the draw? Simply stated, the User interface and battery-life justify the demand. As a device for consuming media, nothing comes close. In addition, the App Store continues to provide tablet software that, for the most part, leveraged the size, power and design of these devices. This is a topic with which the Android operating system and Play Store still continues to struggle. The user interface changes from manufacturer to manufacturer when using the same app. This is simply unacceptable in today’s tablet market.
As mobile devices, tablets are very attractive for their size, portability and battery life. On average, iPads are getting anywhere from 7–12 hours of battery life, consistently. Of course, with the new A12 Bionic chips and dedicated graphics chips, these usage times may vary depending on the tasks. Along with the Apple Pencil, these devices are now beginning to rival the performance of gaming machines and desktops. However, there is still much to be desired with regard to developers porting their desktop-level software to work on these machines. Adobe has stepped forward to be one of the first companies to port their desktop-class software Photoshop to the iPad Pro.
The cameras on the iPad Pro use the same larger sensor on the iPhone. What this does is change the game for tablets as photo and video recording devices. Add to this, the myriad of apps available for creating music, art and writing and you have a mobile device that creatives can leverage in a secure manner. These devices range from $399.00 — $2499.00 depending on size and configuration.
Smartphones
This category is the most personal and intimate of technologies on this list. It’s no surprise then that smartphone shipments worldwide are projected to be around 1.7 billion units in 2020. Smartphones have continued to spawn a variety of new products such as EarPods, PopSockets, cases, camera attachments, gimbals, etc. No other device gives users a convenient access to every aspect of the web on-the-go. The device strength lies primarily in access to quick consumption in the form of articles, text messages, news, social media, music, email and yes, communication via telephone. In addition, the camera capabilities continue to improve at an alarming rate. As a result, cameras now have abilities that were previously reserved for high-end SLRs, bokeh being one example.
That being said, there are limitations to these devices. Screen sizes range from Palm’s 3.3 inches to Galaxy S10’s 6.5 inches. If a task requires creation beyond responding to texts, emails or social media, a larger screen would be more manageable. Now that Microsoft and Apple have created companion apps for their phones and tablets, responding to text messages, emails and even phone calls can occur on either device type.
When it comes to cost, smartphones range from below $30.00 to $1500.00 depending on features, memory and manufacturer.
Smartwatches
Smartwatches have become the go-to device for monitoring your health and activities. Though they are also great for a quick check of notifications, their value lies in the data that they collect. Any device that can reveal trends in my behavior or inform me of how my body is responding to various activities is important and invaluable. The Apple Watch 4’s new EKG feature goes a step further in detecting atrial fibrillation. Several stories indicate that this feature, though only a single point of contact, still provides valuable life-saving information. Beyond these features, smartwatches are difficult to use due to their screen sizes ranging from 36 mm to 44 mm.
Prices range from $80-$799.00 depending on features and accuracy of measurements from associated sensors. The Apple watches tend to be on the high end of this range and have a battery life of about 2 days. On the other end of the range you can find the Amazfit Bip which has basic functionality, including constant heart rate monitoring with a battery life of 30–45 days.
 Summary
In summary, if you’d like to optimize your productivity based on device type, take care in identifying your task first, then the device at hand. Outlined below is a chart that I created based on my usage. Staying in the green zones optimizes my usage as a function of device type. Research is referring to computational math research. The green regions represent the optimal zones of usage based on device type. The red regions represent those activities that can be performed on the device type but is either overkill or a stretch for the given task. Finally, the yellow regions represent tasks that can be performed but is not optimal. Note that “dd” signifies device-dependent.
Originally posted here.
MMS • RSS
Article originally posted on Data Science Central. Visit Data Science Central
Did you ever have a concept that you knew was right, but just couldn’t find the right words to articulate that concept? Okay, well welcome to my nightmare. I know that Data Science and Design Thinking share many common characteristics including the power of “might” (i.e., that “might” be a better predictor of performance), “learning through failing” (which is the only way to determine where the edges of the solution really reside), and the innovation liberation associated with “diverge to converge” thinking (where all ideas are worthy of consideration).
A recent McKinsey article titled “Fusing data and design to supercharge innovation” confirmed the integrated potential of Data Science and Design Thinking:
“While many organizations are investing in data and design capabilities, only those that tightly weave these disciplines together will unlock their full benefits.”
The combination of Design Thinking and Data Science is a powerful combination, but they must be fused on deriving and driving new sources of value and actionable outcomes. To make Data Science and Design Thinking more actionable, we must begin with an end in mind. And to make the conversation more fun, I have created the 7 “Economics of Data” playing cards because I don’t want you gambling on the future of your organization!
Begin with an End in Mind: The Big Data Business Model Maturity Index
The Big Data Business Model Maturity Index (BDBMI) provides that desired end; a frame around which we can drive the organization’s data monetization efforts (see Figure 1).

Playing Card 1: Big Data Business Model Maturity Index
The BDBMI helps organizations leverage data and analytics to:
- Uncover customer, product and operational insights buried in the data
- Leverage these customer, product and operational insights to optimize key business processes
- Build analytic profiles and digital twins that create new monetization opportunities (new products, new packaging, new services, new consumption models, new channels, new audiences, new markets).
- Ultimately lead to the Digital Transformation of the organization
Figure 2 details the stages of the BDBMI.
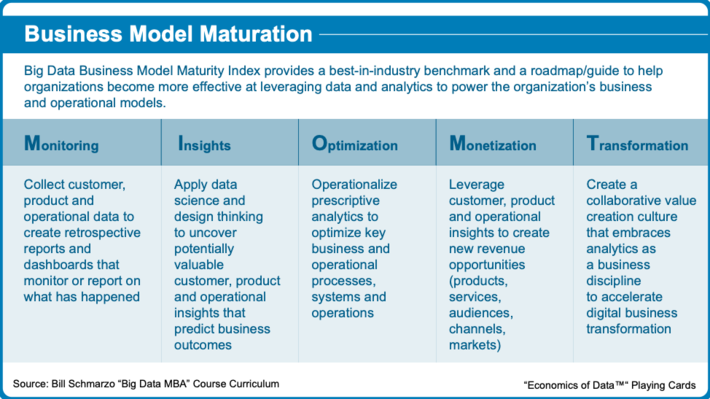
Playing Card 2: Big Data Business Model Maturity Index Phases
BDBMI is ultimately an economic model. And we need to interweave Data Science and design thinking with BDBMI to help organizations exploit the economic value of data and analytics; to help them become more effective at leveraging data and analytics to power their business and operational models.
Step 1: Interweaving BDBMI and Data Science
Data Science is a method of data analysis that automates analytical model building. Data Science uses combinations of different analytic techniques (data mining, predictive analytics, machine learning, deep learning, artificial intelligence)to find hidden insights buried in the data – patterns, trends, associations and relationships – without being explicitly programmed where to look. Data Science is a business discipline (branch of knowledge) that:
- Identifies those variables and metrics that might be better predictors of performance
- Identifies, codifies and determines the strength of the customer, product and operational patterns, trends, associations and relationships buried in the data
- Quantifies “cause-and-effect” and “goodness of fit” in order to know when a predictive model is “good enough” given the costs of False Positives and False Negatives
- Acts, automates and continuously learns from every customer and device transaction and interaction
To support our Data Science development efforts at Hitachi Vantara, we have developed a Data Science methodology called DEPPA: Descriptive, Explorative, Predictive, Prescriptive, Automation (see Figure 3).
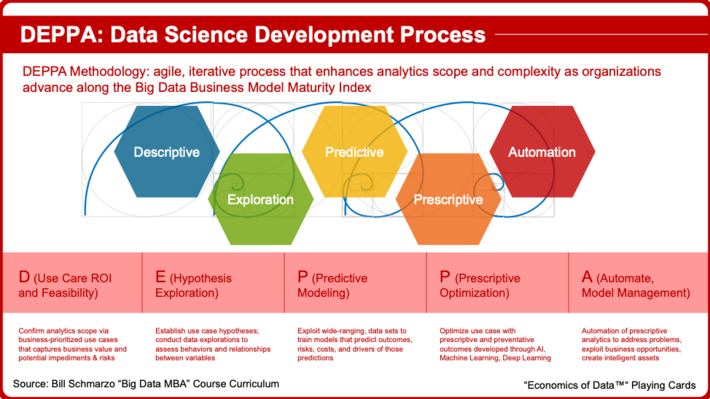
Playing Card 3: DEPPA Data Science Development Methodology
DEPPA is an agile, iterative Data Science maturation process that enhances an organization’s analytics capabilities as they advance along Big Data Business Model Maturity Index. DEPPA is comprised of the 5 stages:
- Descriptive: identify, alert and report on business and operational results; Confirm analytics scope via business-prioritized use cases that captures use cases business value and potential implementation challenges and risks
- Exploration: establish hypotheses, assess variable behaviors and relationships between variables; Establish use case hypotheses and conduct data explorations to assess variable behaviors and relationships between variables
- Predictive: predict outcomes, consequences, costs, or effects; Exploit wide-ranging, detailed data sets to train models that predict outcomes, consequences, costs, and effects, and quantifies the drivers (causes) of those predictions developed through machine learning algorithms
- Prescriptive: quantifies successful outcomes that drive recommended actions; Optimize use case with prescriptive and preventative outcomes driven through recommended actions developed through deep learning algorithms
- Automation: automates steps to prevent problems, exploit business opportunities and create intelligent apps and smart spaces; Automate implementation of prescriptive analytics in intelligent assets to address / prevent problems, exploit next best business opportunities, business decisions and intelligent asset creation
Figure 4 provides more details on the specific stages of DEPPA.
Playing Card 4: DEPPA Stages
The DEPPA Data Science development methodology supports many of the challenges associated with non-linear thinking that I covered in my blog “Why Data Science is like Playing Game Boy® Final Fantasy” (except with different menacing monsters and bosses).
The DEPPA Data Science methodology lives to support the Big Data Business Model Maturity Index which is designed to help organizations become more effective at leveraging data and analytics to power their business models.
Step 2: Interweaving BDBMI and Design Thinking
Design Thinking leverages human engagement, collaboration and envisioning techniques to discover unmet needs within the context and constraints of a particular situation. Design Thinking frames the opportunity and scope of innovation, generating creative ideas, testing and refining solutions. It creates a repeatable and scalable process for innovation. Design Thinkingis a human-first development and engagement approach that is all about:
- Building a deep empathy with the people for whom you are designing
- Generating lots of ideas from a variety of different, even conflicting, perspectives
- Rapidly roughing out prototypes and storyboards
- Sharing those prototypes and storyboards with the people for whom you are designing
- Trying, failing and learning from each failure
- Operationalizing your innovative new solution with the acknowledgement the no solution is perfect
Design Thinking is a customer-obsessed process to uncover and validate human (SME) requirements and insights as organizations advance along Big Data Business Model Maturity Index (see Figure 5).
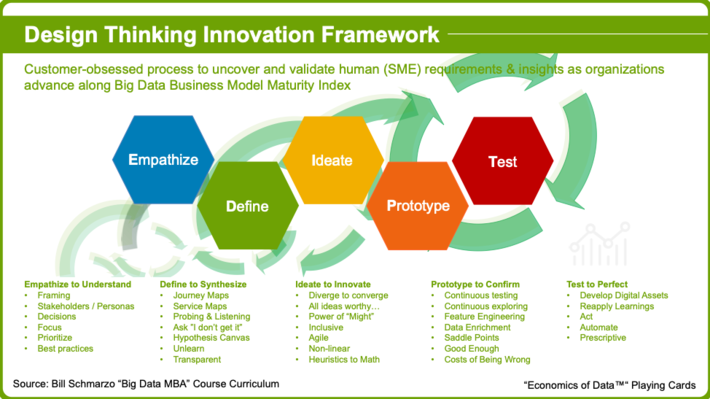
Playing Card 5: Design Thinking Stages
Design Thinking complements Data Science by uncovering and codifying the deep knowledge and insights of the organization’s subject matter experts. Check out the blog “Using Design to Drive Business Outcomes, or Uncovering What You Don’t Know You Know” for more details on our thinking about the application of Design Thinking. See Figure 6 for more details on the stages of the Design Thinking Maturation Model.
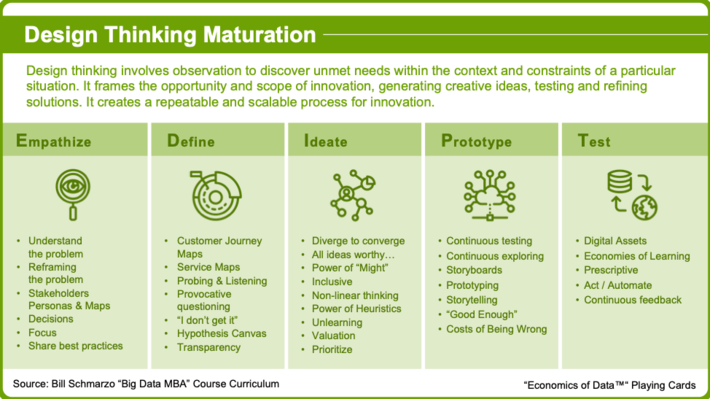
Playing Card 6: Design Thinking Maturation Model
Summary
The Big Data Business Model Maturity Index helps organizations leverage their data (Big Data, IoT) with advanced analytics (machine learning, deep learning, AI) to:
- optimize key operational and business processes,
- mitigate security and compliance risks,
- uncover new sources of customer, product, operational and market revenue, and
- create a differentiated, compelling customer experience.
Data Science and Design Thinking support the BDBMI in helping to identify and codify the customer, product and operational insights – patterns, trends, associations and relationships – buried in the data or in the heads of the Subject Matter Experts (see Figure 7).
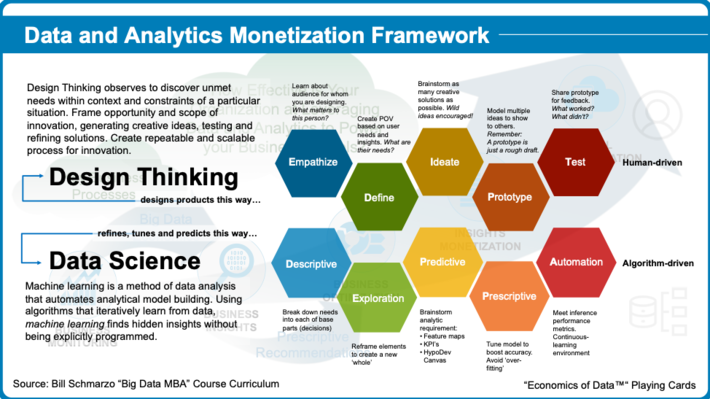
Playing Card 7: Data and Analytics Monetization Framework
Enjoy playing with the cards, and hopefully they’ll someday be as valuable as a Nolan Ryan rookie card (and yes, I have one!).
Blog Summary:
- Design Thinking and Data Science empower the Big Data Business Model Maturity Model (BDBMI).
- The 7 “Economics of Data” playing cards provide a roadmap for helping organizations to become more effective at leveraging data and analytics to power their business models.
- Data Science uses combinations of different analytic techniquesto find hidden insights buried in the data – patterns, trends, associations and relationships – without being explicitly programmed where to look.
- Design Thinking leverages human engagement and envisioning techniques to discover unmet needs within the context and constraints of a particular situation.
- Monetization is about… well, making more money…
MMS • RSS
Posted on nosqlgooglealerts. Visit nosqlgooglealerts
MMS • RSS
Article originally posted on Data Science Central. Visit Data Science Central
Monday newsletter published by Data Science Central. Previous editions can be found here. The contribution flagged with a + is our selection for the picture of the week. To subscribe, follow this link.
Featured Resources and Technical Contributions
- Naive Bayes in One Picture
- Free Book: Lecture Notes on Machine Learning
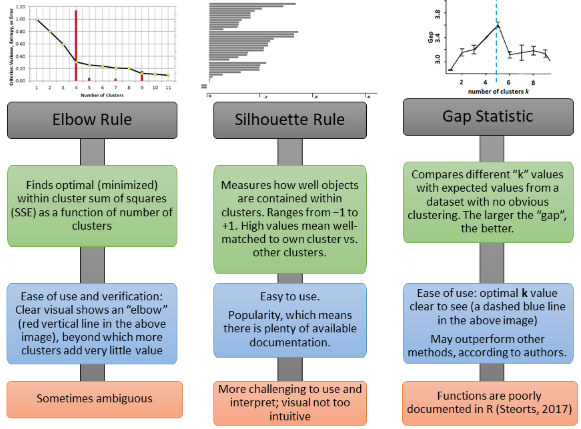
- Determining Number of Clusters in One Picture +
- Optimizing price, maximizing revenue
- Common MapReduce Patterns
- Some Fun with Gentle Chaos, the Golden Ratio, and Stochastic Number Theory
- Frequencies in Pandas Redux
- Free book – learn azure in a month of lunches – covering Cloud, AI, devops etc
- Top 5 Books on AI and ML to Grab Today
- Building ML models in Apache Spark using SCALA in 6 steps
Featured Articles and Forum Questions
- How will the Data Scientist’s job change through automated machine learning?
- Causality – The Next Most Important Thing in AI/ML
- Funny: Medical Diagnostic and Treatment Algorithm – IBM Watson
- How Industrial IoT is Shaping the Modern World?
- How a Data Catalog Connects the What and the Why
- Comparing Hadoop and Spark
- What is Augmented Analytics and Can it Add Value to BI?
- Question: Data admin seeking advice on next role
- Question: Best data set to analyze climate change?
- What are the present top trending automation testing tools?
Picture of the Week
Source: article flagged with a +
To make sure you keep getting these emails, please add mail@newsletter.datasciencecentral.com to your address book or whitelist us. To subscribe, click here. Follow us: Twitter | Facebook.
MMS • RSS
Article originally posted on InfoQ. Visit InfoQ

Key Takeaways
- TypeScript is a strict syntactical, typed superset of JavaScript.
- TypeScript overcomes the limitations of JavaScript in modern, large-scale applications.
- A Decorator is an experimental feature that is used to annotate a class declaration, method, accessor, property or annotation.
- TypeScript is ranked in the top 50 on the TIOBE index of programming languages.
- The TypeORM package provides object-relational mapping to access relational databases such as MySQL database with TypeScript.
JavaScript is a scripting language based on the ECMAScript specification designed for the web. JavaScript has evolved from being a client-side only scripting language to one that runs on both the client- and the server-side. The most notable implementation of server-side JavaScript is Node.js.
Problem
JavaScript lacks several features that are used by large-scale modern web applications; features such as type annotations, compile-time type checking, and type inference. JavaScript code becomes complex in large-scale applications.
Solution
TypeScript was introduced as a typed superset of JavaScript to ease some of the limitations of JavaScript in large-scale applications.
TypeScript is a strict syntactical superset of JavaScript adding features such as compile-time type checking, type annotations, type inference, type erasure and object-oriented features such as support for interfaces and. TypeScript is an open source scripting language and transpiles to JavaScript. The transpiled output is clean, idiomatic JS rather than something that only machines can read.
TypeScript has added an experimental feature called Decorators that provides support for adding additional features to classes and class members using annotations and a meta-programming syntax. Decorators are declarations of the form @expression in which expression evaluates to a function to be called at runtime along with information about the decorated declaration. A decorator may be used to annotate a class declaration, method, accessor, property or annotation. Decorators are used in this article.
TypeScript, introduced in 2012, has had a recent surge in popularity. A recent JavaScript and Web Development InfoQ Trends Report notes that “TypeScript has had a dramatic rise in popularity, now in the top 10 most popular programming languages on GitHub…”. In June 2018 TypeScript made its debut on the TIOBE Index of programming languages top 100 at #93 and the following month was ranked in the top 50. More recently TypeScript is ranked at 44 on the TIOBE index.
TypeScript has emerged as a powerful environment for authoring web applications, providing significant improvements over standard JavaScript while remaining consistent with the language. In this article we’ll explore in depth the details necessary to use TypeScript with Node.js, MySQL, and TypeORM to create a powerful solution for managing database access with server-side TypeScript. We’ll build an example CRUD application to provide a complete end to end solution. The example application shall model a journal catalog. We shall assume familiarity with JavaScript. This article has the following sections.
- Setting the Environment
- Creating a Project
- Configuring Project
- Creating an Entity
- Creating a Connection to Generate Tables
- Running Application
- Exploring Database Tables
- Using Repository to Add Data
- Finding Entities with Connection Manager
- Finding Entities with Repository
- Updating Data
- Removing Data
- Creating a One-to-One Relation
- Finding Objects with Relations
- Creating a One-to-Many Relation
- Creating a Many-to-Many Relation
Setting the Environment
Download and install the following software.
Next, we need to install some Node.js modules (packages). We shall be using the TypeORM package, which provides object-relational mapping for TypeScript to access most relational databases including MySQL database.
Install the typeorm package.
npm install typeorm -g
Install the reflect-metadata library, which is needed when using class decorators. The reflect-metadata library is experimental just as decorators are.
npm install reflect-metadata -g
Install node typings.
npm install @types/node -g
Install the MySQL Database driver.
npm install mysql -g
Creating a Project
Create a TypeORM project for MySQL database. The project name is arbitrary (MySQLProject).
typeorm init --name MySQLProject --database mysql
A project directory MySQLProject gets created. Change directory (cd) to the MySQLProject directory and list the project files.
cd MySQLProject
C:TypescriptMySQLProject>DIR
 Volume in drive C is OS
 Volume Serial Number is BEFC-C04A
 Directory of C:TypescriptMySQLProject
02/02/2019  05:17 PM  <DIR>        .
02/02/2019  05:17 PM  <DIR>       ..
02/02/2019  05:13 PM              47 .gitignore
02/02/2019  05:17 PM  <DIR>       node_modules
02/02/2019  05:13 PM            473 ormconfig.json
02/02/2019  05:17 PM          46,178 package-lock.json
02/02/2019  05:17 PM            406 package.json
02/02/2019  05:13 PM            172 README.md
02/02/2019  05:13 PM  <DIR>       src
02/02/2019  05:13 PM            298 tsconfig.json
            6 File(s)       47,574 bytes
            4 Dir(s)  25,897,005,056 bytes free
C:TypescriptMySQLProject>
Install the project dependencies.
npm install
The output from preceding commands is listed:
C:Typescript>typeorm init --name MySQLProject --database mysql
Project created inside C:Typescript/MySQLProject directory.
C:Typescript>cd MySQLProject

C:TypescriptMySQLProject>npm install
npm notice created a lockfile as package-lock.json. You should commit this file.
npm WARN MySQLProject@0.0.1 No repository field.
npm WARN MySQLProject@0.0.1 No license field.
added 153 packages from 447 contributors and audited 231 packages in 70.022s
found 0 vulnerabilities
The MySQLProject configuration and src files are available on GitHub including scripts added in this article.
Configuring Project
The TypeScript compiler options are configured in the tsconfig.json. Modify tsconfig.json to enable the following settings.
"emitDecoratorMetadata": true,
"experimentalDecorators": true,
The other compiler options such as target compile version are predefined in tsconfig.json. The --experimentalDecorators option enables experimental support for decorators as specified in the ECMAScript (ES) specification standard for JavaScript. The --emitDecoratorMetadata setting emits design-type metadata for decorated declarations in source. The reflect-metadata library would need to be imported in a TypeScript program to emit decorator metadata.
Modify the ormconfig.json to configure the database options to connect to MySQL database. While the host and port would be the default if a local MySQL database is used the username and password could be different.
{
   "type": "mysql",
   "host": "localhost",
   "port": 3306,
   "username": "root",
   "password": "mysql",
   "database": "mysql",
   "synchronize": true,
   "logging": false,
   "entities": [
      "src/entity/**/*.ts"
   ],
   "migrations": [
      "src/migration/**/*.ts"
   ],
   "subscribers": [
    "src/subscriber/**/*.ts"
   ]
}
Creating an Entity
In this section, we shall develop an entity to model a journal catalog. An entity is a class that maps to a database table. What makes a class an entity is the decorator @Entity() from the typeorm library. Add a file Catalog.ts in the entity directory to define an entity. Add an import declaration to import the Entity, Column, and PrimaryGeneratedColumn functions from the typeorm library.
import {Entity, Column, PrimaryGeneratedColumn} from "typeorm";
Export a class called Catalog and annotate or decorate the class with @Entity().
@Entity()
export class Catalog {
…
}
The complete Catalog.ts script is available on the GitHub. A basic entity consists of columns and every entity must declare at least one primary column. TypeORM provides several types of primary columns as discussed in Table 1.
|
Primary Column Type |
Description |
|
@PrimaryColumn() |
Creates a primary column. The column type could be optionally specified and if not set is inferred from the property type. The value for the primary column must be user supplied. |
|
@PrimaryGeneratedColumn() |
Creates a primary column of type int that is automatically generated with an auto-increment value. |
|
@PrimaryGeneratedColumn(“uuid”) |
Creates a primary column that is also automatically generated with a uuid value; uuid being a unique string value. |
Table 1. Primary Column Types
Add a primary column called id to the Catalog entity. MySQL database supports auto-increment of a primary column with which a unique primary key value is assigned by the database automatically for each new row of data. To avail of the auto increment feature use the auto-generated column @PrimaryGeneratedColumn.
@PrimaryGeneratedColumn()
  id: number;
We are modeling a journal catalog in the example application. Add other columns; journal, publisher, edition, title and author all of type string. Add a column called isPublished of type Boolean to indicate whether the catalog entry is published. The entity property types are mapped to appropriate database column types, which could vary with the database used. The string type is mapped to a varchar (255) or similar database type. The number property type is mapped to an integer or similar database type. The entity-database type mapping may also be user supplied. As an example, map the string type column title to MySQL database type text.
@Column("text")
  title: string;
The default length for the string type is 255 but a custom length may be specified as an example:
@Column({
      length: 25
  })
  edition: string;
Copy and paste the following listing to the entity file.
import {Entity, Column, PrimaryGeneratedColumn} from "typeorm";
@Entity()
export class Catalog {
    @PrimaryGeneratedColumn()
  id: number;
  @Column()
  journal: string;

  @Column()
  publisher: string;

  @Column({
      length: 25
  })
  edition: string;

    @Column("text")
  title: string;

  @Column()
  author: string;

  @Column()
  isPublished: boolean;
}
Creating a Connection to Generate Tables
As mentioned before we are developing a CRUD (Create, Read, Update and Delete) application. To be able to develop the application we would need to connect with a MySQL database.
In this section we shall develop a TypeScript script to connect to MySQL database and create tables for the entities defined in the entity directory. We have defined only one entity in the entity/Catalog.ts file. Delete any other entity scripts from the entity directory including the project default User.ts. Create an index.js in src directory of the TypeScript project MySQLProject. Import the reflect-metadata library to be able to use decorators. Import the createConnection function from the typeorm library. Import the Catalog class from the entity directory. We shall use the async/await syntax, which was added in the ES2017. With the async/await syntax asynchronous functions are prefixed with async keyword. The await keyword suspends the running of the script until an asynchronous function return promise is fulfilled. Create a connection using the createConnection function in which the connection options including database type, host, port, username, password, database name and entities are specified.
createConnection({
  type: "mysql",
  host: "localhost",
  port: 3306,
  username: "root",
  password: "mysql",
  database: "mysql",
  entities: [
     __dirname + "/entity/*.ts"
  ],
  synchronize: true,
  logging: false
}).then(async connection => {
…
…
}).catch(error => console.log(error));
In the then block create an instance of the Catalog entity.
let catalog = new Catalog();
Set entity properties’ values to create a catalog entry.
    catalog.journal = "Oracle Magazine";
  catalog.publisher = "Oracle Publishing";
  catalog.edition = "March-April 2005";
  catalog.title = "Starting with Oracle ADF";
  catalog.author = "Steve Muench";
  catalog.isPublished = true;
Obtain an instance of EntityManager and save the entity instance using the save method.
await connection.manager.save(catalog);
The save method saves all given entities in the database. The save method first verifies if the entity already exists in the database. If it does the save method updates the entity and if it doesn’t the save method adds a new entity. Similarly, add another entity. The src/index.ts is listed:
import "reflect-metadata";
import {createConnection} from "typeorm";
import {Catalog} from "./entity/Catalog";

createConnection({
  type: "mysql",
  host: "localhost",
  port: 3306,
  username: "root",
  password: "mysql",
  database: "mysql",
  entities: [
      __dirname + "/entity/*.ts"
  ],
  synchronize: true,
  logging: false
}).then(async connection => {

  let catalog = new Catalog();
  catalog.journal = "Oracle Magazine";
  catalog.publisher = "Oracle Publishing";
  catalog.edition = "March-April 2005";
  catalog.title = "Starting with Oracle ADF";
  catalog.author = "Steve Muench";
  catalog.isPublished = true;

  await connection.manager.save(catalog);
  console.log('Catalog has been saved'+'n');

     let catalog2 = new Catalog();
  catalog2.journal = "Oracle Magazine";
  catalog2.publisher = "Oracle Publishing";
  catalog2.edition = "November December 2013";
  catalog2.title = "Engineering as a Service";
  catalog2.author = "David A. Kelly";
  catalog2.isPublished = true;

  await connection.manager.save(catalog2);
  console.log('Catalog has been saved'+'n');

}).catch(error => console.log(error));
Running the Application
Having created the application, run the application with the following command.
npm start
The database tables for entities in the project get created as index.js runs to connect to the database. Only one database table Catalog gets created. Table data gets added. The output from the command is as follows:
C:TypescriptMySQLProject>npm start
> MySQLProject@0.0.1 start C:TypescriptMySQLProject
> ts-node src/index.ts
Catalog has been saved
Catalog has been saved
Exploring Database Tables
Next, we shall explore the MySQL database tables generated from the MySQL CLI (command-line interface). Start the MySQL CLI shell to display the mysql command prompt.
C:mysql-5.7.25-winx64mysql-5.7.25-winx64bin>mysql -u root -p
Enter password: *****
Welcome to the MySQL monitor.  Commands end with ; or g.
Your MySQL connection id is 7
Server version: 5.7.25 MySQL Community Server (GPL)
Type 'help;' or 'h' for help. Type 'c' to clear the current input statement.
mysql>
Set database to use as mysql.
mysql> use mysql
Database changed
List tables and the catalog table gets listed.
mysql> SHOW TABLES;
+---------------------------+
| Tables_in_mysql           |
+---------------------------+
| catalog                |
…
| user                      |
+---------------------------+
32 rows in set (0.00 sec)
Describe the catalog table and it lists columns corresponding to Catalog entity fields. Because we are using an auto-generated primary key column with auto increment, the id column value is set by the database.
mysql> DESC catalog;
+-------------+--------------+------+-----+---------+----------------+
| Field     | Type      | Null | Key | Default | Extra        |
+-------------+--------------+------+-----+---------+----------------+
| id        | int(11)   | NO   | PRI | NULL | auto_increment |
| journal   | varchar(255) | NO   |   | NULL    |             |
| publisher   | varchar(255) | NO   |   | NULL    |             |
| edition   | varchar(25)  | NO   |     | NULL  |             |
| title     | text      | NO   |  | NULL  |             |
| author    | varchar(255) | NO   |   | NULL    |             |
| isPublished | tinyint(4)   | NO   |   | NULL    |             |
+-------------+--------------+------+-----+---------+----------------+
7 rows in set (0.01 sec)
Run an SQL query with a SELECT statement to list data.
mysql> SELECT * FROM catalog;
| id | journal      | publisher       | edition             | title
            | author      | isPublished |
|  1 | Oracle Magazine | Oracle Publishing | March-April 2005     | Starting w
ith Oracle ADF | Steve Muench   |         1 |
|  2 | Oracle Magazine | Oracle Publishing | November December 2013 | Engineering as a Service | David A. Kelly |         1 |

2 rows in set (0.01 sec)

mysql>
Using Repository to Add Data
Two options are available to perform operations on an entity, EntityManager, which we already used, and Repository, which we shall discuss in this section. When using a lot of entities Repository is the better option as each entity is associated with its own repository. Repository provides most of the same functions as EntityManager does. We added two instances of Catalog using an EntityManager. In this section, we shall add a third Catalog instance using a Repository. We shall be using the same index.js, therefore delete the code used to create a Catalog entry with EntityManager. Create an instance of Catalog as in the previous section. Obtain a Repository instance from a connection.
let catalogRepository = connection.getRepository(Catalog);
Save the Catalog instance using the save function.
await catalogRepository.save(catalog);
The modified index.ts is listed:
import {createConnection} from "typeorm";
import {Catalog} from "./entity/Catalog";
createConnection({
  type: "mysql",
  host: "localhost",
  port: 3306,
  username: "root",
  password: "mysql",
  database: "mysql",
  entities: [
      __dirname + "/entity/*.ts"
  ],
  synchronize: true,
  logging: false
}).then(async connection => {

let catalog = new Catalog();
  catalog.journal = "Oracle Magazine";
  catalog.publisher = "Oracle Publishing";
  catalog.edition = "November December 2013";
  catalog.title = "Quintessential and Collaborative";
  catalog.author = "Tom Haunert";
  catalog.isPublished = true;

  let catalogRepository = connection.getRepository(Catalog);

  await catalogRepository.save(catalog);
  console.log('Catalog has been saved'+'n');

  let [all_Catalogs, CatalogsCount] = await catalogRepository.findAndCount();

  console.log('Catalogs count: ', CatalogsCount+'n');

}).catch(error => console.log(error));
Run the application as before and another instance of Catalog gets saved. As we added two catalog entries earlier a catalog count of 3 is listed.
C:TypescriptMySQLProject>npm start
> MySQLProject@0.0.1 start C:TypescriptMySQLProject
> ts-node src/index.ts
Catalog has been saved
Catalogs count:  3
Run an SQL query and three rows of data get listed:
mysql> SELECT * FROM catalog;
| id | journal      | publisher       | edition             | title
                    | author      | isPublished |
|  1 | Oracle Magazine | Oracle Publishing | March-April 2005       | Starting w
ith Oracle ADF      | Steve Muench   |        1 |
|  2 | Oracle Magazine | Oracle Publishing | November December 2013 | Engineerin
g as a Service      | David A. Kelly |        1 |
|  3 | Oracle Magazine | Oracle Publishing | November December 2013 | Quintessen
tial and Collaborative | Tom Haunert  |           1 |
3 rows in set (0.00 sec)
mysql>
Finding Entities With Entity Manager
In this section, we shall find data using the EntityManager class. EntityManager provides several methods to find data as discussed in Table 2.
|
Method |
Description |
|
find |
Finds entities for the supplied options. |
|
findAndCount |
Finds and counts entities for the supplied options. Pagination options (from and take) are ignored. |
|
findByIds |
Finds entities for the supplied ids. |
|
findOne |
Finds the first entity that matches the options. |
|
findOneOrFail |
Finds the first entity that matches the options or fails. |
Table 2. EntityManager Methods to Find Data
Modify the index.ts to find all Catalog entities. Use the find method to find all catalog entries.
createConnection({
  ...
  ...
}).then(async connection => {
   let savedCatalogs = await connection.manager.find(Catalog);
  console.log("All catalogs from the db: ", savedCatalogs);
}).catch(error => console.log(error));
Run the application. All catalog entries get listed (only two entities are listed as the script is run before adding the third entity with Repository.):
C:TypescriptMySQLProject>npm start
> MySQLProject@0.0.1 start C:TypescriptMySQLProject
> ts-node src/index.ts
All catalogs from the db:  [ Catalog {
  id: 1,
  journal: 'Oracle Magazine',
  publisher: 'Oracle Publishing',
  edition: 'March-April 2005',
  title: 'Starting with Oracle ADF',
  author: 'Steve Muench',
  isPublished: true },
  Catalog {
  id: 2,
  journal: 'Oracle Magazine',
  publisher: 'Oracle Publishing',
  edition: 'November December 2013',
  title: 'Engineering as a Service',
  author: 'David A. Kelly',
  isPublished: true } ]
Finding Entities With Repository
In this section, we shall use the Repository class to find entities. But first, we need to install the class-transformer package, which is used to serialize/deserialize JSON objects.
C:TypescriptMySQLProject>npm install class-transformer -g
+ class-transformer@0.2.0
added 1 package from 1 contributor in 10.452s
In the index.ts obtain an instance of Repository as before. First, use the find method to find entities. The find method has the syntax:
find(options?: FindManyOptions<Entity>)
The FindManyOptions are specified as one or more properties discussed in Table 3.
|
Property |
Description |
|
cache |
Enables or Disables caching of query result. |
|
join |
Specifies relations to be loaded. |
|
loadEagerRelations |
Specifies whether eager relations are to be loaded. By default, eager relations are loaded with find methods. “Eager” relations loading refers to the loading of associated model data when an entity is loaded. |
|
loadRelationIds |
Specifies whether relation ids are to be loaded. If set to true all relation ids are loaded and mapped into relation values. |
|
order |
Specifies the order in which entities are to be ordered. |
|
relations |
Specifies what relations of entities are loaded. |
|
select |
Specifies which columns should be selected. |
|
skip |
The number of entities to skip or offset from entities should be taken. |
|
take |
The maximum number of entities to take. |
|
where |
Specifies where conditions to apply. |
Table 3. FindManyOptions Properties
Modify index.ts to find entities using the find methods. First, obtain a Repository object. Next, using the find method find all entities using the select option to select only title and author columns.
let allCatalogs = await catalogRepository.find({ select: ["title", "author"] });
Use the serialize method to serialize the result as JSON.
console.log("All Catalogs from the db: ", serialize(allCatalogs)+'n');
Use the findOne method to find entity with id as 1. Output the result as JSON with the serialize method.
let firstCatalog = await catalogRepository.findOne(1);
  console.log('First Catalog from the db: ', serialize(firstCatalog)+'n');
Next, using the findOne method find the first entity with title as “Engineering as a Service”.
let specificTitleCatalog = await catalogRepository.findOne({ title: "Engineering as a Service"});
Output the result as JSON.
console.log("'Engineering as a Service' Catalog from the db: ", serialize(specificTitleCatalog)+'n');
Find all entities with edition as “November December 2013”.
let allSpecificEditionCatalogs = await catalogRepository.find({ edition: "November December 2013"});
  console.log('All November December 2013 Catalogs: ', serialize(allSpecificEditionCatalogs)+'n');
Find all entities with isPublished as true.
let allPublishedCatalogs = await catalogRepository.find({ isPublished: true });
  console.log('All published Catalogs: ', serialize(allPublishedCatalogs)+'n');
Run the application and the result is listed:
C:TypescriptMySQLProject>npm start

> MySQLProject@0.0.1 start C:TypescriptMySQLProject

> ts-node src/index.ts


All Catalogs from the db:  [{"title":"Starting with Oracle ADF","author":"Steve

Muench"},{"title":"Engineering as a Service","author":"David A. Kelly"},{"title"

:"Quintessential and Collaborative","author":"Tom Haunert"}]


First Catalog from the db:  {"id":1,"journal":"Oracle Magazine","publisher":"Ora

cle Publishing","edition":"March-April 2005","title":"Starting with Oracle ADF",

"author":"Steve Muench","isPublished":true}


'Engineering as a Service' Catalog from the db:  {"id":2,"journal":"Oracle Magaz

ine","publisher":"Oracle Publishing","edition":"November December 2013","title":

"Engineering as a Service","author":"David A. Kelly","isPublished":true}


All November December 2013 Catalogs:  [{"id":2,"journal":"Oracle Magazine","publ

isher":"Oracle Publishing","edition":"November December 2013","title":"Engineeri

ng as a Service","author":"David A. Kelly","isPublished":true},{"id":3,"journal"

:"Oracle Magazine","publisher":"Oracle Publishing","edition":"November December

2013","title":"Quintessential and Collaborative","author":"Tom Haunert","isPubli

shed":true}]


All published Catalogs:  [{"id":1,"journal":"Oracle Magazine","publisher":"Oracle

Publishing","edition":"March-April 2005","title":"Starting with Oracle ADF","author":"Steve

Muench","isPublished":true},{"id":2,"journal":"Oracle Magazine","publisher":"Oracle

Publishing","edition":"November December 2013","title":"Engineering as a Service","author":"David A.

Kelly","isPublished":true},{"id":3,"journal":"Oracle Magazine","publisher":"Oracle

Publishing","edition":"November December 2013","title":"Quintessential and

Collaborative","author":"Tom Haunert","isPublished":true}]
Updating an Entity
In this section, we shall update a Catalog entity. Both the EntityManager and Repository classes provide the update method to update an entity partially. The update method is fast and efficient but has the following limitations:
- Performs a primitive operation without cascades, relations and other operations included.
- Does not verify if entity exists in the database.
The save method updates an entity if it already exists and adds a new entity if it does not. The save method does not have the limitations the update has. As an example, we shall update the title of an entity, the Catalog entity with id 1, from “Starting with Oracle ADF” to “Beginning with Oracle ADF”. Obtain an instance of Repository for Catalog entity.
Find the entity with id as 1.
let catalogToUpdate = await catalogRepository.findOne(1);
Set the title to “Beginning with Oracle ADF”.
catalogToUpdate.title = "Beginning with Oracle ADF";
Save the entity with the save method.
await catalogRepository.save(catalogToUpdate);
Subsequently, find the entity with id 1 again.
let updatedCatalog = await catalogRepository.findOne(1);
Output the updated entity as JSON.
console.log('Updated Catalog from the db: ', serialize(updatedCatalog)+'n');
Run the application and the entity gets updated. The updated entity gets output.
C:TypescriptMySQLProject>npm start
> MySQLProject@0.0.1 start C:TypescriptMySQLProject
> ts-node src/index.ts
First Catalog from the db:  {"id":1,"journal":"Oracle Magazine","publisher":"Ora
cle Publishing","edition":"March-April 2005","title":"Beginning with Oracle ADF"
,"author":"Steve Muench","isPublished":true}
Removing an Entity
In this section, we shall remove an entity. Both the EntityManager and Repository classes provide the methods discussed in Table 4 to remove an entity.
|
Method |
Description |
|
delete |
Deletes entities using the provided conditions that cannot be empty. Has the same drawbacks as the update method that it does not verify if entity exists and cascades and relations are not included. Otherwise delete is fast and efficient. |
|
remove |
Removes an entity from database. |
Table 4. Methods to remove Entities
Modify index.ts to demonstrate removing an entity. Obtain an instance of Repository for Catalog entity as before.
Find an entity with id 1 using the findOne method.
let catalogToRemove = await catalogRepository.findOne(1);
Remove the entity using the remove method.
await catalogRepository.remove(catalogToRemove);
Subsequently, find and output the same entity to verify if it has been removed. If removed the result should not list any entities.
let firstCatalog = await catalogRepository.findOne(1);
    console.log("First Catalog from the db: ", serialize(firstCatalog));
Run application and the result of findOne is undefined. Which implies that the entity has been removed.
C:TypescriptMySQLProject>npm start
> MySQLProject@0.0.1 start C:TypescriptMySQLProject
> ts-node src/index.ts
First Catalog from the db:  undefined
Run an SQL query in MySQL CLI and the data row with id as 1 is not listed.
mysql> SELECT * FROM catalog;
| id | journal       | publisher      | edition             | title
                    | author      | isPublished |
|  2 | Oracle Magazine | Oracle Publishing | November December 2013 | Engineerin
g as a Service      | David A. Kelly |        1 |
|  3 | Oracle Magazine | Oracle Publishing | November December 2013 | Quintessen
tial and Collaborative | Tom Haunert  |           1 |
2 rows in set (0.00 sec)
mysql>
Creating a One-to-One Relation between Entities
TypeORM supports several kinds of relations between entities:
- One To One
- One To Many, Many To One
- Many To Many
Decorators and functions are provided in typeorm for each of these as discussed in Table 5.
|
Function |
Description |
|
OneToOne |
Specifies a one to one relation between entities |
|
JoinColumn |
Specifies the owning side of a one to one relation |
|
OneToMany |
Specifies a one to many relation between entities |
|
ManyToOne |
Specifies a many to one relation between entities |
|
ManyToMany |
Specifies a many to many relation between entities |
|
JoinTable |
Specifies the owning side of a many to many relation |
Table 5. Functions for Relations
In this section, we shall discuss one-to-one relation between two entities. Define a second entity CatalogTimestamp for Catalog timestamp. Create a CatalogTimestamp.ts script in entity directory. Import the OneToOne and JoinColumn functions in addition to other functions.
import {Entity, Column, PrimaryGeneratedColumn, OneToOne, JoinColumn} from "typeorm";
import {Catalog} from "./Catalog";
Export class CatalogTimestamp and use the @Entity() decorator to make the class an entity.
@Entity()
export class CatalogTimestamp {
…
}
Declare a primary key column id.
    @PrimaryGeneratedColumn()
  id: number;
Add columns firstAdded, firstUpdated and lastUpdated, all of type string.
@Column()
  firstAdded: string;
  @Column()
  firstUpdated: string;

  @Column()
  lastUpdated: string;
Add a one-to-one relation with Catalog entity using the @OneToOne decorator. A relation could be unidirectional or bi-directional. We shall specify a bi-directional relation. The type => Catalog function, which could also be specified as () => Catalog returns the class of the entity with which a one-to-one relation exists. The function catalog => catalog.timestamp returns the inverse side of the relation. The @JoinColumn() decorator specifies the owning side of a one-to-one relationship and only one side could be the owning side.
  @OneToOne(type => Catalog, catalog => catalog.timestamp)
  @JoinColumn()
  catalog: Catalog;
The CatalogTimestamp entity is listed on the GitHub; copy the listing to the CatalogEntity.ts script.
We need to modify the Catalog entity to specify the one-to-one relation with CatalogTimestamp. Import the OneToOne and JoinColumn functions in addition to the other functions from typeorm. Import the CatalogTimestamp class.
import {Entity, Column, PrimaryGeneratedColumn, OneToOne, JoinColumn} from "typeorm";
import {CatalogTimestamp} from "./CatalogTimestamp";
The rest of the Catalog entity is the same as before except that we need to declare a @OneToOne decorator. The type => CatalogTimestamp function specifies the entity with which the relation exists. The timestamp => timestamp.catalog function specifies the inverse relation. The cascade option is set to true to save related entities whenever an entity is saved, which implies that if an instance of Catalog is saved the associated instance of CatalogTimestamp is also saved.
@OneToOne(type => CatalogTimestamp, timestamp => timestamp.catalog,{
      cascade: true,
  })
  timestamp: CatalogTimestamp;
Next, we shall modify the index.ts to use the Catalog and CatalogTimestamp entities to create a one-to-one relation. Import the CatalogTimestamp class additionally.
import {CatalogTimestamp} from "./entity/CatalogTimestamp";
Create a Catalog entity instance as before.
let catalog = new Catalog();
  catalog.journal = "Oracle Magazine";
  catalog.publisher = "Oracle Publishing";
  catalog.edition = "March-April 2005";
  catalog.title = "Starting with Oracle ADF";
  catalog.author = "Steve Muench";
  catalog.isPublished = true;
Additionally, create a CatalogTimestamp entity instance.
  let timestamp = new CatalogTimestamp();
  timestamp.firstAdded = "Apr-8-2014-7:06:16-PM-PDT";
  timestamp.firstUpdated = "Apr-8-2014-7:06:20-PM-PDT";
  timestamp.lastUpdated = "Apr-8-2014-7:06:20-PM-PDT";
Associate or connect the CatalogTimestamp and Catalog entity instances.
timestamp.catalog = catalog;
Obtain entity repository for Catalog.
let catalogRepository = connection.getRepository(Catalog);
Save Catalog entity with save method.
   await catalogRepository.save(catalog);
    console.log("Catalog has been saved");
The modified Catalog.ts script is listed in the GitHub project.
Run the application and the entities including relation between them gets saved. The CatalogTimestamp entity gets saved because we specified cascade.
C:TypescriptMySQLProject>npm start
> MySQLProject@0.0.1 start C:TypescriptMySQLProject
> ts-node src/index.ts
Catalog has been saved
Timestamp is saved, and relation between timestamp and catalog is created in the database too
Finding Objects With Relations
In this section, we shall find objects with relations between them. The find* methods from EntityManager or Repository may be used to find objects with relations. Modify index.ts. Obtain a Repository instance for Catalog. Find all entities including relations. The relations property of FindManyOptions option to find method specifies the timestamp relation.
let catalogs = await catalogRepository.find({relations: ["timestamp"]});
Output the result as JSON.
console.log(serialize(catalogs));
Run the application to output the newly added Catalog entity and the associated CatalogTimestamp entity. Only one of the three Catalog entities has an associated non-null timestamp.
C:TypescriptMySQLProject>npm start
> MySQLProject@0.0.1 start C:TypescriptMySQLProject
> ts-node src/index.ts

[{"id":6,"journal":"Oracle Magazine","publisher":"Oracle Publishing","edition":"
March-April 2005","title":"Starting with Oracle ADF","author":"Steve Muench","is
Published":true,"timestamp":{"id":1,"firstAdded":"Apr-8-2014-7:06:16-PM-PDT","fi
rstUpdated":"Apr-8-2014-7:06:20-PM-PDT","lastUpdated":"Apr-8-2014-7:06:20-PM-PDT
"}},{"id":2,"journal":"Oracle Magazine","publisher":"Oracle Publishing","edition
":"November December 2013","title":"Engineering as a Service","author":"David A.
 Kelly","isPublished":true,"timestamp":null},{"id":3,"journal":"Oracle Magazine"
,"publisher":"Oracle Publishing","edition":"November December 2013","title":"Qui
ntessential and Collaborative","author":"Tom Haunert","isPublished":true,"timest
amp":null}]
While using find* methods along with the FindOneOptions and FindManyOptions is suitable for most queries, the QueryBuilder is more suitable for complex queries as it provides more options and settings for specifying the subset of entities to find including WHERE expression, HAVING expression, ORDER BY expression, GROUP BY expression, LIMIT expression, and OFFSET expression, in addition to joining relations, inner and left joins, join without selection, joining and mapping functionality, pagination, and subqueries. As an example, obtain a repository and create a QueryBuilder. Specify an INNER JOIN with innerJoinAndSelect. To get multiple results use getMany. To get only one result getOne should be used.
  let catalogs = await connection
            .getRepository(Catalog)
            .createQueryBuilder("catalog")
            .innerJoinAndSelect("catalog.timestamp", "timestamp")
          .getMany();
    console.log(serialize(catalogs));
Run application to output the Catalog entity that has a one-to-one relation with CatalogTimestamp.
C:TypescriptMySQLProject>npm start
> MySQLProject@0.0.1 start C:TypescriptMySQLProject
> ts-node src/index.ts
[{"id":6,"journal":"Oracle Magazine","publisher":"Oracle Publishing","edition":"
March-April 2005","title":"Starting with Oracle ADF","author":"Steve Muench","is
Published":true,"timestamp":{"id":1,"firstAdded":"Apr-8-2014-7:06:16-PM-PDT","fi
rstUpdated":"Apr-8-2014-7:06:20-PM-PDT","lastUpdated":"Apr-8-2014-7:06:20-PM-PDT
"}}]
List MySQL tables in mysql database from MySQL CLI and the catalog and catalog_timestamp tables get listed.
mysql> use mysql
Database changed
mysql> show tables;
+---------------------------+
| Tables_in_mysql           |
| catalog                |
| catalog_timestamp         |
Describe the catalog_timestamp table and the foreign key catalogId gets listed in addition to the other columns.
mysql> DESC catalog_timestamp;
+--------------+--------------+------+-----+---------+----------------+
| Field     | Type      | Null | Key | Default | Extra        |
+--------------+--------------+------+-----+---------+----------------+
| id        | int(11)   | NO   | PRI | NULL | auto_increment |
| firstAdded   | varchar(255) | NO   |     | NULL |             |
| firstUpdated | varchar(255) | NO   |  | NULL    |             |
| lastUpdated  | varchar(255) | NO   |     | NULL |             |
| catalogId | int(11)   | YES  | UNI | NULL |             |
+--------------+--------------+------+-----+---------+----------------+
5 rows in set (0.02 sec)
Run a SELECT statement on catalog_timestamp and the query result includes the foreign key column value 6, which is the id of the catalog table row with which the timestamp is associated.
mysql> SELECT * FROM catalog_timestamp;
| id | firstAdded                | firstUpdated           | lastUpdated
      | catalogId |

|  1 | Apr-8-2014-7:06:16-PM-PDT | Apr-8-2014-7:06:20-PM-PDT | Apr-8-2014-7:06:2
0-PM-PDT |      6 |
1 row in set (0.00 sec)
Run a SELECT statement on catalog and a row with id 6 should get listed. The example data could be different but a foreign key value is associated with a timestamp.
mysql> SELECT * FROM catalog;
| id | journal      | publisher       | edition             | title
                    | author      | isPublished |
|  2 | Oracle Magazine | Oracle Publishing | November December 2013 | Engineerin
g as a Service      | David A. Kelly |        1 |
|  3 | Oracle Magazine | Oracle Publishing | November December 2013 | Quintessen
tial and Collaborative | Tom Haunert  |         1 |
|  6 | Oracle Magazine | Oracle Publishing | March-April 2005     | Starting w
ith Oracle ADF      | Steve Muench   |           1 |
3 rows in set (0.00 sec)
Similarly, one-to-many and many-to-many relations may be used. Next, we shall discuss an example of a one-to-many relation.
Creating a One-to-Many Relation
To demonstrate the use of one-to-many we again need two entities and for this section we shall use a CatalogEdition entity that has a one-to-many with a CatalogEntry entity. The CatalogEdition entity specifies columns edition and isPublished in addition to primary column id. The @OneToMany decorator defines a one-to-many relation with CatalogEntry including an inverse relation; a bi-directional relation is defined.
@OneToMany(type => CatalogEntry, catalogEntry => catalogEntry.catalogEdition)
  catalogEntries: CatalogEntry[];
The CatalogEdition entity is listed in the GitHub project.
The CatalogEntry entity specifies columns title, author, isPublished in addition to primary column id. The @ManyToOne decorator specifies a many-to-one relation with CatalogEdition including an inverse relation.
  @ManyToOne(type => CatalogEdition, catalogEdition => catalogEdition.catalogEntries)
  catalogEdition: CatalogEdition;
The CatalogEntry entity is listed in the GitHub project.
Modify the index.ts as follows.
import "reflect-metadata";
import {createConnection} from "typeorm";
import {CatalogEdition} from "./entity/Edition";
import {CatalogEntry} from "./entity/Section";
import {serialize} from "class-transformer";

createConnection({
  type: "mysql",
  host: "localhost",
  port: 3306,
  username: "root",
  password: "mysql",
  database: "mysql",
  entities: [
      __dirname + "/entity/*.ts"
  ],
  synchronize: true,
  logging: false
}).then(async connection => {
  // Create entity instances and save data to entities
}).catch(error => console.log(error));
Run the application to create tables and relations.
C:TypescriptMySQLProject>npm start
> MySQLProject@0.0.1 start C:TypescriptMySQLProject
> ts-node src/index.ts
Listing tables in mysql database should list the catalog_edition and catalog_entry tables in addition to other tables if any.
mysql> show tables;
+---------------------------+
| Tables_in_mysql           |
+---------------------------+
| catalog                   |
| catalog_edition           |
| catalog_entry             |
| catalog_timestamp         |
Describe the catalog_edition table and it lists the three columns id, edition and isPublished.
mysql> DESCRIBE catalog_edition;
| Field         | Type          | Null | Key | Default | Extra          |
| id            | int(11)      | NO   | PRI | NULL      | auto_increment |
| edition       | varchar(255) | NO   |         | NULL    |             |
| isPublished | tinyint(4)   | NO   |   | NULL    |             |
3 rows in set (0.01 sec)
Describe the catalog_entry table and it should include a foreign key column catalogEditionId.
mysql> DESCRIBE catalog_entry;
| Field         | Type      | Null | Key | Default | Extra        |
| id            | int(11)   | NO   | PRI | NULL | auto_increment |
| title         | varchar(255) | NO   |   | NULL    |             |
| author        | varchar(255) | NO   |   | NULL    |             |
| isPublished   | tinyint(4)   | NO   |     | NULL  |             |
| catalogEditionId | int(11)      | YES  | MUL | NULL |             |
5 rows in set (0.01 sec)
Creating a Many-to-Many Relation
In this section, we shall demonstrate creating a many-to-many relation between entities for which we again need two entities. We shall use two new entities Edition and Section. The Section entity defines columns id and name. The many-to-many bi-directional relation with Edition is defined with @ManyToMany decorator as follows.
@ManyToMany(type => Edition, edition => edition.sections)
  editions: Edition[];
The Section entity is listed in the GitHub project.
The Edition entity specifies columns id and name. The @ManyToMany decorator defines a relation with Section including the inverse relation. The @JoinTable() decorator indicates the owning side of the relation and only one side can be owning.
  @ManyToMany(type => Section, section => section.editions)
  @JoinTable()
  sections: Section[];
The Edition entity is listed in the GitHub project.
Modify the index.ts to demonstrate the many-to-many relation between entities Edition and Section. Create two instances of Edition entity and save to database.
let edition1 = new Edition();
edition1.name = "January February 2019";
await connection.manager.save(edition1);

let edition2 = new Edition();
edition2.name = "November December 2018";
await connection.manager.save(edition2);
Create an instance of Section entity.
let section = new Section();
section.name = "Application Development";
Set the editions relation to edition1 and edition2.
section.editions = [edition1, edition2];
Save the Section entity to database.
await connection.manager.save(section);
Create another Section entity instance and set relation editions to just one edition, edition1. Save the Section entity instance.
let section2 = new Section();
section2.name = "DBA";
section2.editions = [edition1];
await connection.manager.save(section2);
Create a third Section entity instance, associate with edition1 and save to database. Subsequently, find one Section entity with findOne method including Edition entities associated by editions relation.
const loadedSection = await connection
  .getRepository(Section)
  .findOne(1, { relations: ["editions"] });
Output result as JSON.
console.log(serialize(loadedSection));
The modified index.ts is listed in the GitHub project.
Run the application to create a many-to-many relation between Edition and Section. The Section entity with id 1 and associated Editions are also output as JSON.
C:TypescriptMySQLProject>npm start
> MySQLProject@0.0.1 start C:TypescriptMySQLProject
> ts-node src/index.ts
{"id":1,"name":"Application Development","editions":[{"id":2,"name":"January Feb
ruary 2019"},{"id":3,"name":"November December 2018"}]}
List tables and the edition and section tables get listed. A junction table edition_sections_section also gets listed.
mysql> show tables;
| Tables_in_mysql           |
| edition                   |
| edition_sections_section  |
| section                   |
Summary
TypeScript is a typed open-source superset of JavaScript and provides object-oriented features such as interfaces in addition to static typing, type annotations and type inference. TypeScript includes an experimental feature called Decorators to decorate/annotate classes and class members to provide additional features. TypeScript is designed for modern, large-scale applications. In this article, we discussed using TypeScript with MySQL database. The TypeORM library is used to connect with database, create and save entities, create relations between entities, find entities, update and delete entities. We demonstrated using TypeScript with an end-to-end object-relational-mapping application that runs on Node.js and connects to MySQL database to model a magazine catalog.
About the Author
Deepak Vohra is a Sun Certified Java Programmer and Sun Certified Web Component Developer. Deepak has published Java and Java EE related technical articles in WebLogic Developer’s Journal, XML Journal, ONJava, java.net, IBM developerWorks, Java Developer’s Journal, Oracle Magazine, and devx. Deepak has also published a book on Asynchronous JavaScript and XML; Ajax in Oracle JDeveloper.
MMS • RSS
Article originally posted on Data Science Central. Visit Data Science Central
If you want to determine the optimal number of clusters in your analysis, you’re faced with an overwhelming number of (mostly subjective) choices. Note that there’s no “best” method, no “correct” k, and there isn’t even a consensus as to the definition of what a “cluster” is. With that said, this picture focuses on three popular methods that should fit almost every need: Silhouette, Elbow, and Gap Statistic.
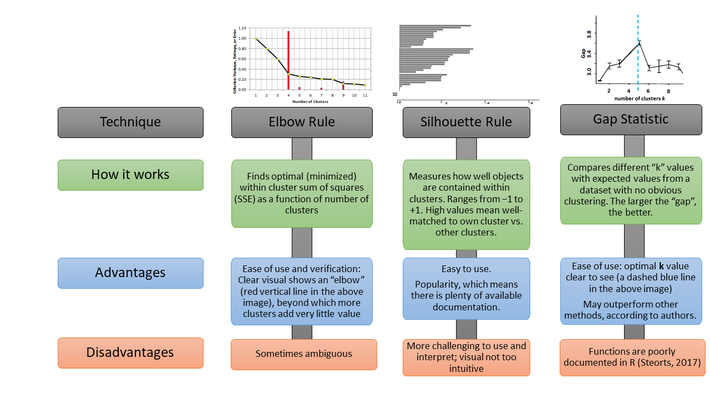
Click on the picture to zoom in
For other machine learning concepts explained in one picture, see here. For other tutorials on clustering, follow this link.
References
How to choose the number of clusters K?
How to determine the number of clusters in your data
Estimating the number of clusters in a data set via the gap statistic.
Kassambara, A. (2017)Practical Guide to Cluster Analysis in R: Unsupervised Machine Learning. STHDA.
MMS • RSS
Article originally posted on Data Science Central. Visit Data Science Central
Problem statement
Price and quantity sold are the two determinants of business revenue/profit. At higher price the revenue is expected to be high. But this is not the case all the time. We know from our everyday experience, as price of something goes up, people have less tendency to buy it.
The reverse is also true, that is, as price is down, sales goes up (think what happens in a block buster sales event in a nearby shopping mall). But sales going up doesn’t always mean that the revenue will also go up, because of the trade-off created by price drop.
Setting a right price of products/services is one of the most important decisions a business can make. Under-pricing and over-pricing both can hurt a company’s bottom line. So where is the sweet spot, the right price, that maximizes revenue and profit?
With a simple example let’s examine how to optimization price to maximize revenue/profit.
Import libraries
import numpy as np
import pandas as pd
from pandas import DataFrame
import matplotlib.pyplot as plt
import seaborn as sns
import statsmodels.api as sm
from statsmodels.compat import lzip
from statsmodels.formula.api import ols
Data
Data in this analysis came from here [Susan Li has a nice blog post about price elasticity of demand (i.e. sensitivity of demand to change in price) explained using the same dataset]. This is a time series, quarterly data of beef sales (i.e. quantity sold) and its corresponding price.
This data will be used first to find price elasticity of demand and then to use this information to find at what price the profit is maximized.
# Load data
data_source = https://raw.githubusercontent.com/susanli2016/Machine-Learning-with-Python/master/beef.csv
beef = pd.read_csv('data_source')
# View first few rows
beef.tail(5)
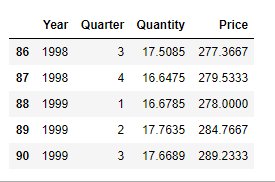
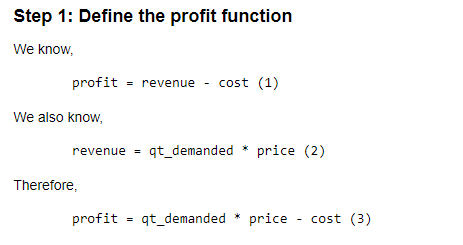

# demand curve estimation
sns.lmplot( x="Price", y="Quantity", data=beef, fit_reg=True, size=4)
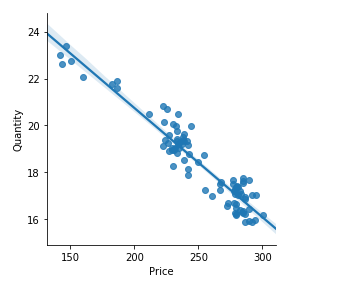
# fit OLS model
model = ols("Quantity ~ Price", data=beef).fit()
# print model summary
print(model.summary())
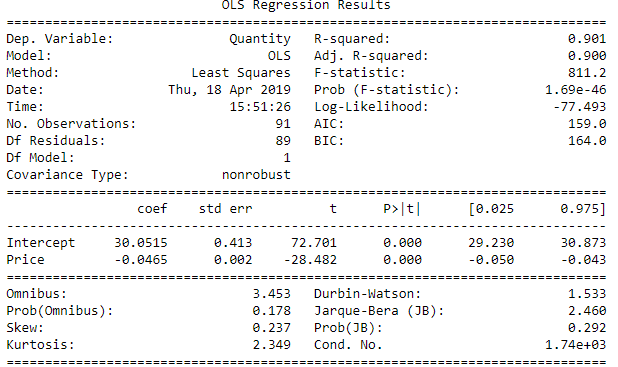
Price = [320, 330,340,350, 360, 370, 380, 390] # a range of different prices to find the optimum one
Cost = 80 # a fixed cost in this case
Revenue = []
for i in Price:
    quantity_demanded=30.05-0.0465*i
    Revenue.append((i-cost)*quantity_demanded) # profit function

#create data frame of price and revenue
profit = pd.DataFrame({"Price": Price, "Revenue": Revenue})
#plot revenue against price
plt.plot(profit["Price"], profit["Revenue"])
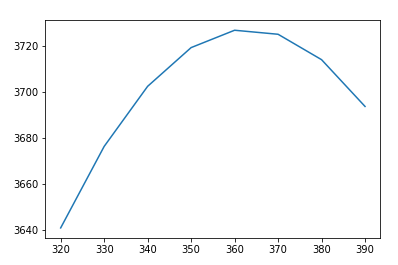
# price at which the revenue is maximum
profit[profit['Revenue'] == profit['Revenue'].max()]

[Note: This is also posted in my personal blog here]
MMS • RSS
Article originally posted on InfoQ. Visit InfoQ
Last month in ICSA 2019 in Hamburg, Germany Eoin Woods, CTO at Endava gave a speech about how we can democratise software architecture.
Starting from a historical perspective, Eoin described how software systems have evolved in the past three decades. In the 80’s we were all using monolithic architectures, which evolved into distributed monoliths in the next decade. With the rise of the Internet, connectivity prevailed software architecture in the 2000’s leading into our current decades software architecture where Internet is the System. The next step with IoT’s rise will be intelligent connected software architectures. The defining characteristic in modern architectures is not only defining an architecture or adhering to quality properties but more importantly, how architecture can react and evolve to rapid business requirements changes.
Historically, software architecture was mostly completed before implementation ended or even started. It was defined by a central small group of experts, whose task was to organise large architectural components with relatively static connections between them. These experts were taking key decisions like technology choices, code structure and processes and managing stakeholders.
Contrasting this to today’s landscape, we now have a more fluid evolving architecture. This has happened because of the rise of devops, microservices, cloud computing and agile programming which have all contributed to shorter release cycles and faster reaction to changing requirements. Smaller teams, more independently thinking and developing, evolving constantly in an agile manner means that there is less certainty and value in making decisions early in the lifecycle.
Software architecture is still needed because stakeholders are still around, we need to decide on design tradeoffs and we have several cross cutting concerns in software. In practice, what happens nowadays is having more empowered cross-functional teams and using more lightweight descriptions for architecture than in the past. Difficult to understand and evolve architecture diagrams are now replaced by lightweight C4 and Architecture Decision Records diagrams. Code static and runtime analyses combined with informal documentation in the form of Wiki or powerpoint documents can substitute complex static documents. Tools like sonarqube for static code analysis or jaeger, zipkin, ELK, prometheus/grafana and NewRelic for distributed monitoring and tracing services in production can give an accurate and real time view of code and its architecture.
In contrast with the current status quo, Eoin is proposing a new approach. In his opinion, architecture should be viewed as more of a skill than a well defined role. Architecting “little and often” in a manner of a continuous stream of decisions rather than “one off” architectural diagrams is in the core of this new approach. Architecture work should be integral to every sprint and as close to the actual code as possible. An inclusive architecture group should be delivering the relevant decisions as they are needed, together with practical tests to validate them.
Overall, Agile and devops have changed how we work within the software industry, whereas cloud computing and software containers have changed the way we deploy software. From this point of view, an architect is a trusted leader and advisor in a team. This new perspective can lead to software architecture suited for the current and upcoming intelligent connected software systems era.
MMS • RSS
Article originally posted on Data Science Central. Visit Data Science Central
This article by Chanchal Singh and Manish Kumar will delve into some of the common MapReduce patterns that will help you work with Hadoop. Chanchal Singh has more than five years of experience in product development and architect design, and Manish Kumar is a technical architect with more than ten years of experience in data management, working as a data architect and product architect.
The design patterns are the solution templates for solving specific problems. Developers can reuse templates for similar problems across domains so that they save time in solving problems. If you are a programmer, you would have used the abstract factory pattern, builder pattern, observer pattern, and so on before. These patterns are discovered by people who have been solving similar problems for many years. The MapReduce framework has existed for almost a decade now. Let’s look into a few of the commonly used MapReduce design patterns across industries.
Summarization patterns
Summarization problems use the pattern widely across domains. It’s all about grouping similar data together and then performing an operation such as calculating a minimum, maximum, count, average, median-standard deviation, building an index, or just simply counting based on key. For example, we might want to calculate the total amount of money our website has made by country.
As another example, let’s say you want to get the average number of times the users log on to our website. One more example can be finding the minimum and maximum number of users by state. MapReduce works with key-value pair. Thus, operations on keys are commonly used operations. The mapper emits the key-value pairs and the values of these keys are aggregated on the reducer. The following are a few commonly used examples of the summarization pattern.
Word count example
Many people who start to learn MapReduce development would have written Word count as their first program. Thus, it is sometimes known as the Hello World program of MapReduce. The basic idea of this program is to show how the MapReduce framework works. The pattern of Word count can be applied to use cases such as counting population by state, counting the total number of crime by state, finding total spending per person, and so on. Let’s briefly discuss the word count program with a Mapper, Reducer, and combiner example.
Mapper
The job of a Mapper is to split the record, get each word from record, and emit a value of one with a word. The output key and the output value are of type Text and IntWritable, as shown in the following code:
import org.apache.Hadoop.io.IntWritable;
import org.apache.Hadoop.io.LongWritable;
import org.apache.Hadoop.io.Text;
import org.apache.Hadoop.mapreduce.Mapper;
import java.io.IOException;
public class WordcountMapper extends Mapper<LongWritable, Text, Text, IntWritable> {
public static final IntWritable ONE = new IntWritable(1);
@Override
protected void map(LongWritable offset, Text line, Context context)
throws IOException, InterruptedException {
String[] result = line.toString().split(” “);
for (String word : result) {
context.write(new Text(word), ONE);
}
}
}
Reducer
The MapReduce framework uses partitions to make sure that all the records with the same key always go to the same reducer. The reducer receives the list of values for the key and thus can easily perform aggregated operations such as count and sum, as follows:
import org.apache.Hadoop.io.IntWritable;
import org.apache.Hadoop.io.Text;
import org.apache.Hadoop.mapreduce.Reducer;
import java.io.IOException;
public class WordcountReducer extends Reducer<Text, IntWritable, Text, IntWritable> {
@Override
protected void reduce(Text key, Iterable<IntWritable> values, Context context)
throws IOException, InterruptedException {
int count = 0;
for (IntWritable current : values) {
count += current.get();
}
context.write(key, new IntWritable(count));
}
}
Combiner
The combiner would be the same as the Reducer in most of the cases and it can be added to the Driver class with the same class as that of the reducer. The advantage of the combiner is that it works as a mini reducer and runs on the same machine as the mapper, thus reducing the amount of data shuffling. The Driver class of the word count application is as follows:
import org.apache.Hadoop.conf.Configuration;
import org.apache.Hadoop.conf.Configured;
import org.apache.Hadoop.fs.Path;
import org.apache.Hadoop.io.IntWritable;
import org.apache.Hadoop.io.Text;
import org.apache.Hadoop.mapreduce.Job;
import org.apache.Hadoop.mapreduce.lib.input.FileInputFormat;
import org.apache.Hadoop.mapreduce.lib.input.TextInputFormat;
import org.apache.Hadoop.mapreduce.lib.output.FileOutputFormat;
import org.apache.Hadoop.mapreduce.lib.output.TextOutputFormat;
import org.apache.Hadoop.util.Tool;
import org.apache.Hadoop.util.ToolRunner;
public class Driver extends Configured implements Tool {
public static void main(String[] args) throws Exception {
int res = ToolRunner.run(new Configuration(), (Tool) new Driver(), args);
System.exit(res);
}
public int run(String[] args) throws Exception {
Configuration conf = new Configuration();
Job job = Job.getInstance(conf, “WordCount”);
job.setJarByClass(Driver.class);
if (args.length < 2) {
System.out.println(“Jar requires 2 paramaters : “”
+ job.getJar()
+ ” input_path output_path”);
return 1;
}
job.setMapperClass(WordcountMapper.class);
job.setReducerClass(WordcountReducer.class);
job.setCombinerClass(WordcountReducer.class);
job.setOutputKeyClass(Text.class);
job.setOutputValueClass(IntWritable.class);
job.setInputFormatClass(TextInputFormat.class);
job.setOutputFormatClass(TextOutputFormat.class);
Path filePath = new Path(args[0]);
FileInputFormat.setInputPaths(job, filePath);
Path outputPath = new Path(args[1]);
FileOutputFormat.setOutputPath(job, outputPath);
job.waitForCompletion(true);
return 0;
}
}
Minimum and maximum
The minimum and maximum calculation for a specific field is a commonly used use case in MapReduce. Once the mapper completes its operation, the reducer simply iterates through all the key values and finds out the minimum and maximum in the key grouping:
- Writables: The idea behind writing custom writable was to save extra effort in splitting data at the reducer side and avoiding unnecessary problems that can occur from the delimiter. Most of the time, we choose the delimiter that is already present in the record and then it leads to the incorrect mapping of records with the field.
We will use the following import packages:
import org.apache.Hadoop.io.IntWritable;
import org.apache.Hadoop.io.LongWritable;
import org.apache.Hadoop.io.Text;
import org.apache.Hadoop.io.Writable;
import java.io.DataInput;
import java.io.DataOutput;
import java.io.IOException;
The custom Writable class encapsulates the details inside the Writable object, which can be used at the reducer side to fetch values for the records:
public class PlayerDetail implements Writable {
private Text playerName;
private IntWritable score;
private Text opposition;
private LongWritable timestamps;
private IntWritable ballsTaken;
private IntWritable fours;
private IntWritable six;
public void readFields(DataInput dataInput) throws IOException {
playerName.readFields(dataInput);
score.readFields(dataInput);
opposition.readFields(dataInput);
timestamps.readFields(dataInput);
ballsTaken.readFields(dataInput);
fours.readFields(dataInput);
six.readFields(dataInput);
}
public void write(DataOutput dataOutput) throws IOException {
playerName.write(dataOutput);
score.write(dataOutput);
opposition.write(dataOutput);
timestamps.write(dataOutput);
ballsTaken.write(dataOutput);
fours.write(dataOutput);
playerName.write(dataOutput);
}
public Text getPlayerName() {
return playerName;
}
public void setPlayerName(Text playerName) {
this.playerName = playerName;
}
public IntWritable getScore() {
return score;
}
public void setScore(IntWritable score) {
this.score = score;
}
public Text getOpposition() {
return opposition;
}
public void setOpposition(Text opposition) {
this.opposition = opposition;
}
public LongWritable getTimestamps() {
return timestamps;
}
public void setTimestamps(LongWritable timestamps) {
this.timestamps = timestamps;
}
public IntWritable getBallsTaken() {
return ballsTaken;
}
public void setBallsTaken(IntWritable ballsTaken) {
this.ballsTaken = ballsTaken;
}
public IntWritable getFours() {
return fours;
}
public void setFours(IntWritable fours) {
this.fours = fours;
}
public IntWritable getSix() {
return six;
}
public void setSix(IntWritable six) {
this.six = six;
}
@Override
public String toString() {
return playerName +
“t” + score +
“t” + opposition +
“t” + timestamps +
“t” + ballsTaken +
“t” + fours +
“t” + six;
}
}
We will import the following packages and implement the custom Writable class:
importorg.apache.Hadoop.io.IntWritable;
import org.apache.Hadoop.io.Text;
import org.apache.Hadoop.io.Writable;
import java.io.DataInput;
import java.io.DataOutput;
import java.io.IOException;
public class PlayerReport implements Writable {
private Text playerName;
private IntWritable maxScore;
private Text maxScoreopposition;
private IntWritable minScore;
private Text minScoreopposition;
public void write(DataOutput dataOutput) throws IOException {
playerName.write(dataOutput);
maxScore.write(dataOutput);
maxScoreopposition.write(dataOutput);
minScore.write(dataOutput);
minScoreopposition.write(dataOutput);
}
public void readFields(DataInput dataInput) throws IOException {
playerName.readFields(dataInput);
maxScore.readFields(dataInput);
maxScoreopposition.readFields(dataInput);
minScore.readFields(dataInput);
minScoreopposition.readFields(dataInput);
}
public Text getPlayerName() {
return playerName;
}
public void setPlayerName(Text playerName) {
this.playerName = playerName;
}
public IntWritable getMaxScore() {
return maxScore;
}
public void setMaxScore(IntWritable maxScore) {
this.maxScore = maxScore;
}
public Text getMaxScoreopposition() {
return maxScoreopposition;
}
public void setMaxScoreopposition(Text maxScoreopposition) {
this.maxScoreopposition = maxScoreopposition;
}
public IntWritable getMinScore() {
return minScore;
}
public void setMinScore(IntWritable minScore) {
this.minScore = minScore;
}
public Text getMinScoreopposition() {
return minScoreopposition;
}
public void setMinScoreopposition(Text minScoreopposition) {
this.minScoreopposition = minScoreopposition;
}
@Override
public String toString() {
return playerName +
“t” + maxScore +
“t” + maxScoreopposition +
“t” + minScore +
“t” + minScoreopposition;
}
}
- Mapper class: The Mapperclass in the MinMax algorithm maps the record with the custom writable object and emits the record for each player using the player name as key and PlayerDetail as value, as follows:
import org.apache.Hadoop.io.IntWritable;
import org.apache.Hadoop.io.LongWritable;
import org.apache.Hadoop.io.Text;
import org.apache.Hadoop.mapreduce.Mapper;
import java.io.IOException;
public class MinMaxMapper extends
Mapper<LongWritable, Text, Text, PlayerDetail> {
private PlayerDetail playerDetail = new PlayerDetail();
@Override
protected void map(LongWritable key, Text value, Context context) throws IOException, InterruptedException {
String[] player = value.toString().split(“,”);
playerDetail.setPlayerName(new Text(player[0]));
playerDetail.setScore(new IntWritable(Integer.parseInt(player[1])));
playerDetail.setOpposition(new Text(player[2]));
playerDetail.setTimestamps(new LongWritable(Long.parseLong(player[3])));
playerDetail.setBallsTaken(new IntWritable(Integer.parseInt(player[4])));
playerDetail.setFours(new IntWritable(Integer.parseInt(player[5])));
playerDetail.setSix(new IntWritable(Integer.parseInt(player[6])));
context.write(playerDetail.getPlayerName(), playerDetail);
}
}
- Reducer class: The Reduceris responsible for calculating the minimum and maximum scores of each individual by iterating through the list of records of players and emit the record using the PlayerReport writable object, as follows:
import org.apache.Hadoop.io.IntWritable;
import org.apache.Hadoop.io.Text;
import org.apache.Hadoop.mapreduce.Reducer;
import java.io.IOException;
public class MinMaxReducer extends Reducer<Text, PlayerDetail, Text, PlayerReport> {
PlayerReport playerReport = new PlayerReport();
@Override
protected void reduce(Text key, Iterable<PlayerDetail> values, Context context) throws IOException, InterruptedException {
playerReport.setPlayerName(key);
playerReport.setMaxScore(new IntWritable(0));
playerReport.setMinScore(new IntWritable(0));
for (PlayerDetail playerDetail : values) {
int score = playerDetail.getScore().get();
if (score > playerReport.getMaxScore().get()) {
playerReport.setMaxScore(new IntWritable(score));
playerReport.setMaxScoreopposition(playerDetail.getOpposition());
}
if (score < playerReport.getMaxScore().get()) {
playerReport.setMinScore(new IntWritable(score));
playerReport.setMinScoreopposition(playerDetail.getOpposition());
}
context.write(key, playerReport);
}
}
}
- Driver class: The Driverclass provides the basic configuration to run MapReduce applications and defines the protocol that cannot be violated by the MapReduce framework. For example, the Driver class mentions the output key class as IntWritable and the value as text, but the reducer tries to emit the key as text and the value as IntWritable. Due to this, the job will fail and an error will be thrown, as follows:
import org.apache.Hadoop.conf.Configuration;
import org.apache.Hadoop.fs.Path;
import org.apache.Hadoop.io.Text;
import org.apache.Hadoop.mapreduce.Job;
import org.apache.Hadoop.mapreduce.lib.input.FileInputFormat;
import org.apache.Hadoop.mapreduce.lib.input.TextInputFormat;
import org.apache.Hadoop.mapreduce.lib.output.FileOutputFormat;
import org.apache.Hadoop.mapreduce.lib.output.TextOutputFormat;
import org.apache.Hadoop.util.Tool;
import org.apache.Hadoop.util.ToolRunner;
public class MinMaxDriver {
public static void main(String[] args) throws Exception {
int res = ToolRunner.run(new Configuration(), (Tool) new MinMaxDriver(), args);
System.exit(res);
}
public int run(String[] args) throws Exception {
Configuration conf = new Configuration();
Job job = Job.getInstance(conf, “MinMax”);
job.setJarByClass(MinMaxDriver.class);
if (args.length < 2) {
System.out.println(“Jar requires 2 paramaters : “”
+ job.getJar()
+ ” input_path output_path”);
return 1;
}
job.setMapperClass(MinMaxMapper.class);
job.setReducerClass(MinMaxReducer.class);
job.setCombinerClass(MinMaxReducer.class);
job.setOutputKeyClass(Text.class);
job.setOutputValueClass(PlayerReport.class);
job.setInputFormatClass(TextInputFormat.class);
job.setOutputFormatClass(TextOutputFormat.class);
Path filePath = new Path(args[0]);
FileInputFormat.setInputPaths(job, filePath);
Path outputPath = new Path(args[1]);
FileOutputFormat.setOutputPath(job, outputPath);
job.waitForCompletion(true);
return 0;
}
}
Filtering patterns
The filtering pattern is simply filtering out records based on a particular condition. Data cleansing is one of the commonly used examples of a filtering pattern. The raw data may have records in which a few fields are not present or it’s just junk that we cannot use in further analysis. Filtering logic can be used to validate each record and remove any junk records. The other example could be web article filtering based on particular word/regex matches. These web articles can be further used in classification, tagging, or machine learning use cases. The other use case could be filtering out all the customers who do not buy anything that is more than 500 dollars in value and then process it further for any other analysis. Let’s look at the following regex filtering example:
import org.apache.Hadoop.io.NullWritable;
import org.apache.Hadoop.io.Text;
import org.apache.Hadoop.mapreduce.Mapper;
import java.io.IOException;
public class RegexFilteringMapper extends Mapper<Object, Text, NullWritable, Text> {
private String regexPattern = “/* REGEX PATTERN HERE */”;
@Override
protected void map(Object key, Text value, Context context) throws IOException, InterruptedException {
if (value.toString().matches(regexPattern)) {
context.write(NullWritable.get(), value);
}
}
}
The other example could be random sampling of data, which is required in many use cases such as data for testing applications, training machine learning models, and so on. The other common use case is to find out top-k records based on a specific condition. In most organizations, it is important to find out the outliers/customers who are genuinely loyal to the merchant and offer them good rewards or to find out about customers who have not used the application for a long time and offer them a good discount to get them to re-engage. Let’s look into how we can find out about the top-k records using MapReduce based on a particular condition.
Top-k MapReduce implementation
The top-k reduce algorithm is a popular algorithm in MapReduce. The mappers are responsible for emitting top-k records at its level and then reducer filters out top-k records from all the records it received from the mapper. We will be using an example of player score. The objective is to find out top-k players with the lowest score. Let’s look onto the mapper implementation. We are assuming that each player has a unique score, otherwise the logic will require a little change, and we need to keep a list of players’ details in values and emit only 10 records from the cleanup method.
The code for TopKMapper can be seen as follows:
import org.apache.Hadoop.io.IntWritable;
import org.apache.Hadoop.io.LongWritable;
import org.apache.Hadoop.io.Text;
import org.apache.Hadoop.mapreduce.Mapper;
import java.io.IOException;
import java.util.Map;
import java.util.TreeMap;
public class TopKMapper extends
Mapper<LongWritable, Text, IntWritable, PlayerDetail> {
private int K = 10;
private TreeMap<Integer, PlayerDetail> topKPlayerWithLessScore = new TreeMap<Integer, PlayerDetail>();
private PlayerDetail playerDetail = new PlayerDetail();
@Override
protected void map(LongWritable key, Text value, Context context) throws IOException, InterruptedException {
String[] player = value.toString().split(“,”);
playerDetail.setPlayerName(new Text(player[0]));
playerDetail.setScore(new IntWritable(Integer.parseInt(player[1])));
playerDetail.setOpposition(new Text(player[2]));
playerDetail.setTimestamps(new LongWritable(Long.parseLong(player[3])));
playerDetail.setBallsTaken(new IntWritable(Integer.parseInt(player[4])));
playerDetail.setFours(new IntWritable(Integer.parseInt(player[5])));
playerDetail.setSix(new IntWritable(Integer.parseInt(player[6])));
topKPlayerWithLessScore.put(playerDetail.getScore().get(), playerDetail);
if (topKPlayerWithLessScore.size() > K) {
topKPlayerWithLessScore.remove(topKPlayerWithLessScore.lastKey());
}
}
@Override
protected void cleanup(Context context) throws IOException, InterruptedException {
for (Map.Entry<Integer, PlayerDetail> playerDetailEntry : topKPlayerWithLessScore.entrySet()) {
context.write(new IntWritable(playerDetailEntry.getKey()), playerDetail);
}
}
}
The TopKReducer has the same logic as that of the reducer and we are assuming that scores are unique for players. We can also have logic for duplicate player scores and emit records for the same. The code for TopKReducer can be seen as follows:
import org.apache.Hadoop.io.IntWritable;
import org.apache.Hadoop.mapreduce.Reducer;
import java.io.IOException;
import java.util.Map;
import java.util.TreeMap;
public class TopKReducer extends Reducer<IntWritable, PlayerDetail, IntWritable, PlayerDetail> {
private int K = 10;
private TreeMap<Integer, PlayerDetail> topKPlayerWithLessScore = new TreeMap<Integer, PlayerDetail>();
private PlayerDetail playerDetail = new PlayerDetail();
@Override
protected void reduce(IntWritable key, Iterable<PlayerDetail> values, Context context) throws IOException, InterruptedException {
for (PlayerDetail playerDetail : values) {
topKPlayerWithLessScore.put(key.get(), playerDetail);
if (topKPlayerWithLessScore.size() > K) {
topKPlayerWithLessScore.remove(topKPlayerWithLessScore.lastKey());
}
}
}
@Override
protected void cleanup(Context context) throws IOException, InterruptedException {
for (Map.Entry<Integer, PlayerDetail> playerDetailEntry : topKPlayerWithLessScore.entrySet()) {
context.write(new IntWritable(playerDetailEntry.getKey()), playerDetail);
}
}
}
The Driver class has a configuration of job.setNumReduceTasks(1), which means that only one reducer will be running to find out the top-k records, otherwise, in case of multiple reducers, we will have multiple top-k files. The code for TopKDriver can be seen as follows:
import org.apache.Hadoop.conf.Configuration;
import org.apache.Hadoop.fs.Path;
import org.apache.Hadoop.io.Text;
import org.apache.Hadoop.mapreduce.Job;
import org.apache.Hadoop.mapreduce.lib.input.FileInputFormat;
import org.apache.Hadoop.mapreduce.lib.input.TextInputFormat;
import org.apache.Hadoop.mapreduce.lib.output.FileOutputFormat;
import org.apache.Hadoop.mapreduce.lib.output.TextOutputFormat;
import org.apache.Hadoop.util.Tool;
import org.apache.Hadoop.util.ToolRunner;
public class TopKDriver {
public static void main(String[] args) throws Exception {
int res = ToolRunner.run(new Configuration(), (Tool) new TopKDriver(), args);
System.exit(res);
}
public int run(String[] args) throws Exception {
Configuration conf = new Configuration();
Job job = Job.getInstance(conf, “TopK”);
job.setNumReduceTasks(1);
job.setJarByClass(TopKDriver.class);
if (args.length < 2) {
System.out.println(“Jar requires 2 paramaters : “”
+ job.getJar()
+ ” input_path output_path”);
return 1;
}
job.setMapperClass(TopKMapper.class);
job.setReducerClass(TopKReducer.class);
job.setOutputKeyClass(Text.class);
job.setOutputValueClass(PlayerDetail.class);
job.setInputFormatClass(TextInputFormat.class);
job.setOutputFormatClass(TextOutputFormat.class);
Path filePath = new Path(args[0]);
FileInputFormat.setInputPaths(job, filePath);
Path outputPath = new Path(args[1]);
FileOutputFormat.setOutputPath(job, outputPath);
job.waitForCompletion(true);
return 0;
}
}
Join pattern
The join is commonly used across companies where reports are being created. The two datasets are joined together to extract meaningful analysis, which can be helpful for decision makers. The join queries are simple in SQL but achieving this in MapReduce is a bit complex. Both mappers and reducers operate on a single key at a time. Joining two datasets of equal size will require two times the network bandwidth as all data from both datasets will have to be sent to the reducer for joining.
The join operation is very costly in Hadoop as it requires data traversal from one machine to another over the network and thus it is important to make sure that enough effort is made to save network bandwidth. Let’s look into a few join patterns.
Reduce side join
The simplest form of join available in the MapReduce framework and nearly any type of SQL join such as inner, left outer, full outer, and so on can be done using reduce side join. The only difficulty is that nearly all the data will be shuffled across the network to go to the reducer. Two or more datasets will be joined together using a common key. Multiple large datasets can be joined by a foreign key. Remember that you should go with map side join if one of the datasets can fit into the memory. Reduce side join should be used when both datasets cannot fit into memory.
MapReduce has the capability of reading data from multiple inputs and different formats in the same MapReduce program and it also allows different mappers to be used for a specific InputFormat. The following configuration needs to be added to the Driver class so that the MapReduce program reads the input from multiple paths and redirects to the specific mapper for processing, for example:
MultipleInputs.addInputPath(job, new Path(args[0]), TextInputFormat.class, UserMapper.class);
MultipleInputs.addInputPath(job, new Path(args[1]), TextInputFormat.class, PurchaseReportMapper.class);
Let’s look into some sample code of the reduce side join and see how it works. The mappers emit the records with a key as userId and a value as an identifier appended to the whole record. The X is appended to the record so that on the reducer we can easily identify that the record is coming from which Mapper. The UserMapper class will look as follows:
import org.apache.Hadoop.io.Text;
import org.apache.Hadoop.mapreduce.Mapper;
import java.io.IOException;
public class UserMapper extends Mapper<Object, Text, Text, Text> {
private Text outputkey = new Text();
private Text outputvalue = new Text();
public void map(Object key, Text value, Context context)
throws IOException, InterruptedException {
String[] userRecord = value.toString().split(“,”);
String userId = userRecord[0];
outputkey.set(userId);
outputvalue.set(“X” + value.toString());
context.write(outputkey, outputvalue);
}
}
Similarly, the second Mapper processes the purchase history of the users and emits the IDs of the users who purchase the goods, and appends Y to the value as the identifier, as follows:
import org.apache.Hadoop.io.Text;
import org.apache.Hadoop.mapreduce.Mapper;
import java.io.IOException;
public class PurchaseReportMapper {
private Text outputkey = new Text();
private Text outputvalue = new Text();
public void map(Object key, Text value, Mapper.Context context)
throws IOException, InterruptedException {
String[] purchaseRecord = value.toString().split(“,”);
String userId = purchaseRecord[1];
outputkey.set(userId);
outputvalue.set(“Y” + value.toString());
context.write(outputkey, outputvalue);
}
}
On the Reducer side, the idea is to simply keep two lists and add user records to one list and purchase records to the other list, then perform a join based on the condition. The sample Reducer code will look as follows:
import org.apache.Hadoop.io.Text;
import org.apache.Hadoop.mapreduce.Reducer;
import java.io.IOException;
import java.util.ArrayList;
public class UserPurchaseJoinReducer extends Reducer<Text, Text, Text, Text> {
private Text tmp = new Text();
private ArrayList<Text> userList = new ArrayList<Text>();
private ArrayList<Text> purchaseList = new ArrayList<Text>();
public void reduce(Text key, Iterable<Text> values, Context context) throws IOException, InterruptedException {
userList.clear();
purchaseList.clear();
while (values.iterator().hasNext()) {
tmp = values.iterator().next();
if (tmp.charAt(0) == ‘X’) {
userList.add(new Text(tmp.toString().substring(1)));
} else if (tmp.charAt(‘0’) == ‘Y’) {
purchaseList.add(new Text(tmp.toString().substring(1)));
}
}
/* Joining both dataset */
if (!userList.isEmpty() && !purchaseList.isEmpty()) {
for (Text user : userList) {
for (Text purchase : purchaseList) {
context.write(user, purchase);
}
}
}
}
}
The joining operation is a more costly operation that requires shuffling of data over the network. If there is scope, the data should be filtered at the mapper side to avoid unnecessary data movement.
Map side join (replicated join)
If any of the data is small enough to fit into the main memory, then a map side join can be a good choice. In a map side join, the small dataset is loaded into the memory map during the setup phase of mapper. Large datasets will be read as input to the mapper so that each record gets joined with a small dataset and output is then emitted to a file. There is no reduce phase and therefore there will be no shuffling and sorting phases. Map side join is widely used for left outer join and inner join use cases. Let’s look into examples of how we can create a Mapper class for map side join and Driver class:
- Mapper class: The following Mapperclass is a template for using map side join and you can use it and modify the logic according to your input dataset. The data that’s read from a distributed cache is stored in RAM and therefore it can throw an out of memory exception if the file size does not fit into memory. The only option to solve this problem is to increase the memory space. The setup method is executed only once during the mapper life cycle and the map function is called for each record. Inside the map function, each record is processed and checked for any matching record available in memory to perform any join operation.
Let’s look into the Mapper class template. The following is the code for the Mapperclass:
import org.apache.Hadoop.conf.Configuration;
import org.apache.Hadoop.fs.Path;
import org.apache.Hadoop.io.LongWritable;
import org.apache.Hadoop.io.Text;
import org.apache.Hadoop.mapreduce.Job;
import org.apache.Hadoop.mapreduce.Mapper;
import java.io.*;
import java.net.URI;
import java.util.HashMap;
public class UserPurchaseMapSideJoinMapper extends
Mapper<LongWritable, Text, Text, Text> {
private HashMap<String, String> userDetails = new HashMap<String, String>();
private Configuration conf;
public void setup(Context context) throws IOException {
conf = context.getConfiguration();
URI[] URIs = Job.getInstance(conf).getCacheFiles();
for (URI patternsURI : URIs) {
Path filePath = new Path(patternsURI.getPath());
String userDetailFile = filePath.getName();
readFile(userDetailFile);
}
}
private void readFile(String filePath) {
try {
BufferedReader bufferedReader = new BufferedReader(new FileReader(filePath));
String userInfo = null;
while ((userInfo = bufferedReader.readLine()) != null) {
/* Add Record to map here. You can modify value and key accordingly.*/
userDetails.put(userInfo.split(“,”)[0], userInfo.toLowerCase());
}
} catch (IOException ex) {
System.err.println(“Exception while reading stop words file: ” + ex.getMessage());
}
}
@Override
protected void map(LongWritable key, Text value, Context context) throws IOException, InterruptedException {
String purchaseDetailUserId = value.toString().split(“,”)[0];
String userDetail = userDetails.get(purchaseDetailUserId);
/*Perform the join operation here*/
}
}
- Driver class: In the Driverclass, we add the path of the input file that will be shipped to each mapper during their execution. Let’s look into the Driver class template, as follows:
import org.apache.Hadoop.conf.Configuration;
import org.apache.Hadoop.fs.Path;
import org.apache.Hadoop.io.Text;
import org.apache.Hadoop.mapreduce.Job;
import org.apache.Hadoop.mapreduce.lib.input.FileInputFormat;
import org.apache.Hadoop.mapreduce.lib.input.TextInputFormat;
import org.apache.Hadoop.mapreduce.lib.output.FileOutputFormat;
import org.apache.Hadoop.mapreduce.lib.output.TextOutputFormat;
import org.apache.Hadoop.util.Tool;
import org.apache.Hadoop.util.ToolRunner;
import java.util.Map;
public class MapSideJoinDriver {
public static void main(String[] args) throws Exception {
int res = ToolRunner.run(new Configuration(), (Tool) new MapSideJoinDriver(), args);
System.exit(res);
}
public int run(String[] args) throws Exception {
Configuration conf = new Configuration();
Job job = Job.getInstance(conf, “map join”);
job.setJarByClass(MapSideJoinDriver.class);
if (args.length < 3) {
System.out.println(“Jar requires 3 paramaters : “”
+ job.getJar()
+ ” input_path output_path distributedcachefile”);
return 1;
}
job.addCacheFile(new Path(args[2]).toUri());
job.setMapperClass(UserPurchaseMapSideJoinMapper.class);
job.setOutputKeyClass(Text.class);
job.setOutputValueClass(Text.class);
job.setInputFormatClass(TextInputFormat.class);
job.setOutputFormatClass(TextOutputFormat.class);
Path filePath = new Path(args[0]);
FileInputFormat.setInputPaths(job, filePath);
Path outputPath = new Path(args[1]);
FileOutputFormat.setOutputPath(job, outputPath);
job.waitForCompletion(true);
return 0;
}
}
Composite join
The map side join on a very large dataset is known as a composite join. The advantage will be that the shuffling and sorting phase will be skipped as there will be no reducer. The only condition for composite join is that data needs to be prepared with a specific condition before it gets processed.
One of the conditions is that the dataset must be sorted with the key that was used for the join. It must also partition by the key and both datasets must have the same number of partitions. Hadoop provides a special InputFormat to read such datasets with CompositeInputFormat.
Before using the following template, you must process your input data to sort and partition to make the data be in the format that’s required for composite join. The first step should be to prepare the input data and we must preprocess input data to sort and partition it using a join key. Let’s look into mapper and reducer to sort and partition the input data.
Sorting and partitioning
The following Mapper swaps the first key with the index key. In our case, the index is already at the first position, so we may not require getRecordInCompositeJoinFormat() here:
import com.google.common.base.Joiner;
import com.google.common.base.Splitter;
import com.google.common.collect.Iterables;
import com.google.common.collect.Lists;
import org.apache.Hadoop.io.LongWritable;
import org.apache.Hadoop.io.Text;
import org.apache.Hadoop.mapreduce.Mapper;
import java.io.IOException;
import java.util.List;
public class PrepareCompositeJoinRecordMapper extends Mapper<LongWritable, Text, Text, Text> {
private int indexOfKey=0;
private Splitter splitter;
private Joiner joiner;
private Text joinKey = new Text();
String separator=”,”;
@Override
protected void setup(Context context) throws IOException, InterruptedException {
splitter = Splitter.on(separator);
joiner = Joiner.on(separator);
}
@Override
protected void map(LongWritable key, Text value, Context context) throws IOException, InterruptedException {
Iterable<String> recordColumns = splitter.split(value.toString());
joinKey.set(Iterables.get(recordColumns, indexOfKey));
if(indexOfKey != 0){
value.set(getRecordInCompositeJoinFormat(recordColumns, indexOfKey));
}
context.write(joinKey,value);
}
private String getRecordInCompositeJoinFormat(Iterable<String> value, int index){
List<String> temp = Lists.newArrayList(value);
String originalFirst = temp.get(0);
String newFirst = temp.get(index);
temp.set(0,newFirst);
temp.set(index,originalFirst);
return joiner.join(temp);
}
}
Reducer: The reducer emits the record with the key as the join key and the value as the entire record. The value is kept as key because in the composite join Driver class, we are going to use the KeyValueTextInputFormat class as the input format class for CompositeInputFormat, as shown in the following code:
import org.apache.Hadoop.io.Text;
import org.apache.Hadoop.mapreduce.Reducer;
import java.io.IOException;
public class PrepareCompositeJoinRecordReducer extends Reducer<Text,Text,Text,Text> {
@Override
protected void reduce(Text key, Iterable<Text> values, Context context) throws IOException, InterruptedException {
for (Text value : values) {
context.write(key,value);
}
}
}
Composite join template: The following template can be used to create and run your composite join example. You can modify the logic with respect to your use case. Let’s look into its implementation.
Driver class: The Driver class takes four input arguments. The first two are input data files, the third one is the output file path, and the fourth one is the join type. The composite join supports only inner and outer join type, as follows:
import org.apache.Hadoop.fs.Path;
import org.apache.Hadoop.io.Text;
import org.apache.Hadoop.mapred.*;
import org.apache.Hadoop.mapred.join.CompositeInputFormat;
public class CompositeJoinExampleDriver {
public static void main(String[] args) throws Exception {
JobConf conf = new JobConf(“CompositeJoin”);
conf.setJarByClass(CompositeJoinExampleDriver.class);
if (args.length < 2) {
System.out.println(“Jar requires 4 paramaters : “”
+ conf.getJar()
+ ” input_path1 input_path2 output_path jointype[outer or inner] “);
System.exit(1);
}
conf.setMapperClass(CompositeJoinMapper.class);
conf.setNumReduceTasks(0);
conf.setInputFormat(CompositeInputFormat.class);
conf.set(“mapred.join.expr”, CompositeInputFormat.compose(args[3],
KeyValueTextInputFormat.class, new Path(args[0]), new Path(args[1])));
TextOutputFormat.setOutputPath(conf,new Path(args[2]));
conf.setOutputKeyClass(Text.class);
conf.setOutputValueClass(Text.class);
RunningJob job = JobClient.runJob(conf);
System.exit(job.isSuccessful() ? 0 : 1);
}
}
Mapper class: The Mapper class takes join keys as the mapper’s input key and TupleWritable as the value. Remember the join key will be fetched from the input files and that is why we said the input data should be in specific format, for example:
import org.apache.Hadoop.io.Text;
import org.apache.Hadoop.mapred.MapReduceBase;
import org.apache.Hadoop.mapred.Mapper;
import org.apache.Hadoop.mapred.OutputCollector;
import org.apache.Hadoop.mapred.Reporter;
import org.apache.Hadoop.mapred.join.TupleWritable;
import java.io.IOException;
public class CompositeJoinMapper extends MapReduceBase implements
Mapper<Text, TupleWritable, Text, Text> {
public void map(Text text, TupleWritable value, OutputCollector<Text, Text> outputCollector, Reporter reporter) throws IOException {
outputCollector.collect((Text) value.get(0), (Text) value.get(1));
}
}
There are many more design patterns available in MapReduce which you can explore. Hope you found this article interesting; you can refer to Mastering Hadoop 3 as a comprehensive guide to mastering the most advanced Hadoop 3 concepts. Mastering Hadoop 3 will help you learn how Hadoop works internally, study advanced concepts of different ecosystem tools, discover solutions to real-world use cases, and understand how to secure your cluster.